

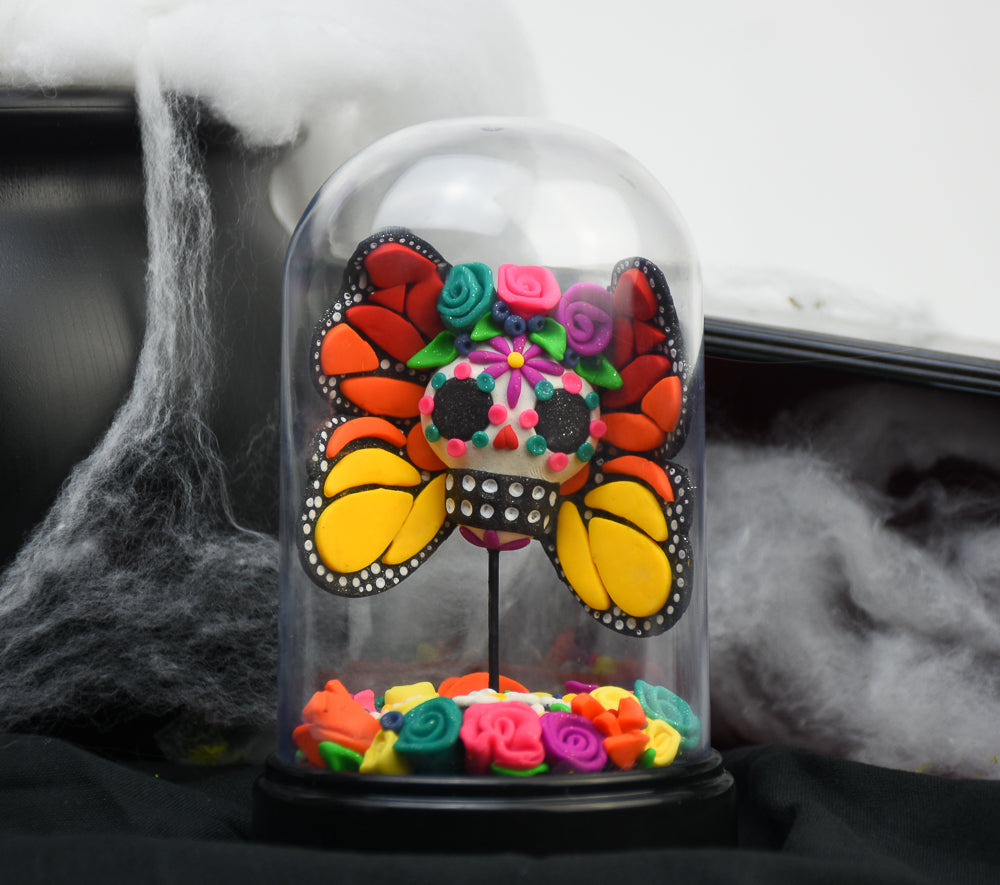
Sculpey III® Sugar Skutterfly Cloche
Sculpey III® Sugar Skutterfly Cloche
Designed by Amy Koranek
Read More
Read Less
I love all the colors and details in this project. You can stay as simple or get as decorative as you want. Oven bake Sculpey III® is the perfect medium for projects like this one because you don’t have to complete it in one sitting. If you want to come back and add more details later, you can do that because the clay won’t dry out until you are ready to bake it.
COMPLETION TIME:
3 Hours to make and bake
ADDITIONAL SUPPLIES
- Small piece of barrier paper like a deli sheet or scrap copier paper at least 4” x 4”
- Cloche dome and base
- White acrylic paint
- Disposable paper plate
- Toothpick
- Black permanent marker
- Black electrical tape
- Small sharp scissors
- Small bakeable bowl about the same circumference as the cloche dome
Project Instructions
- Getting Started:
Start with clean hands, unwrap and knead clay until soft and smooth, or condition by running clay though a Pasta Machine. We recommend using a designated machine for clay purposes only. When working with multiple colors, clean hands with soap and water or baby wipes (we have found that baby wipes work best) before switching colors. Shape clay, pressing pieces firmly together. Wash hands after use.
- Baking (also called Curing):
We will start first by constructing the wings. When I’m challenged with making something that I’m not so familiar with, I rely on tools that I already have to make the shapes more simple. For example, if you look at a photo of butterfly wing shapes, you can easily translate them to a series of teardrop shapes that are connected together.
Roll Black Glitter to a sheet about 1/8” thick and cut out teardrops using the Graduated Teardrop Cutters, shown in order from bottom to top:
Two 2”;
One 1”, cut in half lengthwise;
Two 1.5”; and,
Two 1.25”
Roll Black Glitter to a sheet about 1/8” thick and cut out teardrops using the Graduated Teardrop Cutters, shown in order from bottom to top:
Two 2”;
One 1”, cut in half lengthwise;
Two 1.5”; and,
Two 1.25”

To make this project easier to move around on my work surface, I’m going to assemble the wings on top of barrier paper.
Gather the teardrop shapes together as shown. Use your fingers to curve the shapes as needed so they hug each other well.
Smooth the seams with your fingertips.
Gather the teardrop shapes together as shown. Use your fingers to curve the shapes as needed so they hug each other well.
Smooth the seams with your fingertips.

Connect the top wings to the bottom wings and smooth the seams with your fingertips.

The top lobes were made more graceful by adding small triangles of Black Glitter that I hand cut with a Clay Blade. Smooth the seams with fingertips.
Place the left and right wings close together where you want them to stay. The place where the wings join will be connected by the Sugar Skull.
Place the left and right wings close together where you want them to stay. The place where the wings join will be connected by the Sugar Skull.

Decorate the wings with Red Hot Red, Just Orange, and Yellow.
Roll each color into a thin sheet about 1/16” thick. Use the Mini Geometric Cutters to cut out shapes. I used teardrops and elipses. I also hand cut a few triangles as filler. Basically, I just started laying out shapes on top of the wings and adjusting for size and shape as I went. The shapes can easily be bent to create more fluid lines as needed. The shapes can also be trimmed with the Clay Blade so they fit perfectly.
Keep all the Red Hot Red shapes closer to the top. Keep all the Yellow shapes at the bottom.
Be sure to leave space between each shape to create a network of black veins between the colors.

Add Just Orange shapes in the center. The central orange shapes were allowed to overflow the black background because they will connect to the back of the skull.

Before going any further, I realized, I really need to see if the wings will fit into the cloche. So I gently placed them inside to make sure. I slid the wings inside with the barrier paper holding them together. The barrier paper also protected the plastic cloche from the clay plasticizer. Make any adjustments needed to the size and shape of the wings in relation to the cloche before proceeding.

Now it’s time to do some dot painting for super detail!
Place a thin puddle of white acrylic paint on a paper plate. Dip the tip of the 2 mm Dual End Detail Ball Tool in the paint.
If you’ve never dot painted with a ball tool, take a second to touch the paint to a scrap of black clay. You can make really neat little dots on the clay depending upon how hard you press the ball tool.
When you are ready, apply dots using the 2 mm (small) Ball Tool dipped in white paint directly to the wings.

Keep adding dots all the way around the edges.
Allow the paint to dry on the wings while we work on the skull.
Allow the paint to dry on the wings while we work on the skull.

Form a thick teardrop shape as shown using 1/4 bar White Glitter.

Use your fingers to make the shape more pear-like.

Flatten the pear shape against the work surface to spread it out, giving it a domed top and a flat back.

Color most of a toothpick black with a permanent marker. The toothpick will suspend the sugar skull above the base.

Push the sugar skull right down on top of the wings connecting them together.
Push the toothpick into the chin of the skull.
Push the toothpick into the chin of the skull.

Use the 12 mm Ball (large tool) from the Dual End Clay Tools to impress eye sockets.

Push just enough Black Glitter into the eye sockets to fill them level.
Place a very thin band of Black Glitter across the mouth area.
Place a very thin band of Black Glitter across the mouth area.

Now the fun part! Decorating your sugar skull! Go as free style as you want or follow along with my design - either way, it’s gonna be cool!
I started with an 8 petal flower smack in the middle of the forehead. Form the petals with your fingertips from Violet Glitter. Place them into a radiating pattern.
The Light Yellow that I’m using from this point on is a 1:1 mixture of White Glitter and Yellow. Start by mixing up 1/8 bar of each White Glitter and Yellow. You can always make more if you want. Put a Light Yellow center in the flower.

Place a series of Pink Glitter and Turquoise Glitter dots around the eye sockets, seating them in place with the 6 mm (medium) Ball Tool.
Make a little Red Hot Red heart shaped nose - the little nose is simply two tiny teardrops placed side by side and flattened.
Make a little Red Hot Red heart shaped nose - the little nose is simply two tiny teardrops placed side by side and flattened.

Roses are obviously what is needed next. To make roses, roll 1/8” thick ropes of any color you choose.

Flatten the rope with your thumb.

Coil the flattened rope up to form a rose. Trim the end when the rose is as long as you like.
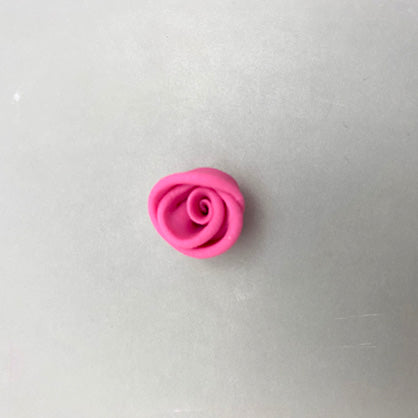
Use your fingertips to push the wraps of the rose petals in and out creating a more organic shape.

To pick up the rose and set it into place, I use the Needle Tool. Pierce the rose through the base.

Set the rose into place in your design location. You can see the holes made by the Needle Tool in the base of the roses. We will cover these up shortly.
Add more roses in the colors of your choice. Mine are Turquoise Glitter, Pink Glitter, and Violet Glitter.
Add more roses in the colors of your choice. Mine are Turquoise Glitter, Pink Glitter, and Violet Glitter.

Make Green by mixing 1/8 bar of Yellow to 1/8 bar of Turquoise Glitter.
Make teardrop shaped Green leaves and push them into place with the Pointed Tool.
Make teardrop shaped Green leaves and push them into place with the Pointed Tool.

Make Blueberry by mixing 1/8 bar Turquoise Glitter with 1/8 bar Violet Glitter.
Make tiny ball berries and fill in empty spaces by pushing them into place with the Blunt Point.
Push divots in two rows across the mouth band with the 6 mm Ball Tool.
Make tiny ball berries and fill in empty spaces by pushing them into place with the Blunt Point.
Push divots in two rows across the mouth band with the 6 mm Ball Tool.

Dot paint the teeth with the 2 mm Ball Tool as you did for the wings.
I also added a few flower petals at the chin that match the forehead design.
I also added a few flower petals at the chin that match the forehead design.

We want the wings to curve slightly so use a bowl form that is about the same circumference as the plastic cloche to bake the skutterfly in. My skutterfly is upside down so that the toothpick is not disturbed during baking.
Bake following the baking instructions for Sculpey III® in the bowl.
Allow to cool completely before handling.
Bake following the baking instructions for Sculpey III® in the bowl.
Allow to cool completely before handling.

After baking and cooling, I slipped the skutterfly into the cloche dome. I realized that the wings are going to take a bit of flexing and I wanted to reinforce them. I backed them with strips of black electrical tape so that if they need to give a bit, the tape will hold them together. Once they are installed, I shouldn’t have to remove them again, so this is just a precaution.

I trimmed the electrical tape close to the edges with small sharp scissors.
Time to work on the matching base.
Time to work on the matching base.

Make a Black Glitter domed base (right) that is smaller than the plastic base (left).
It needs to be at least 1/4” smaller all the way around to accommodate the flowers around the edges, and to allow the clear dome to fit inside the rim of the base.
It needs to be at least 1/4” smaller all the way around to accommodate the flowers around the edges, and to allow the clear dome to fit inside the rim of the base.

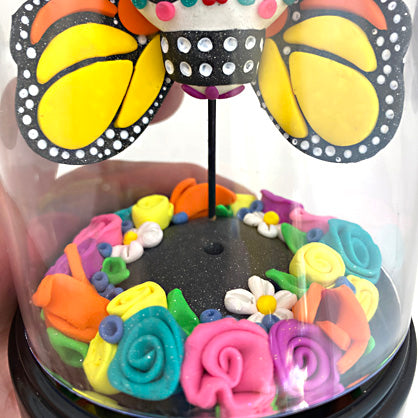
Using the instructions above on rose making (Steps 20-25), start adding roses to the edge of the base.

Make smaller roses as well and nestle those into place.
So far I have large roses in Violet Glitter, Pink Glitter, and Turquoise Glitter; and small roses in Light Yellow that was made in Step 18.
So far I have large roses in Violet Glitter, Pink Glitter, and Turquoise Glitter; and small roses in Light Yellow that was made in Step 18.

Roll Just Orange into a thin sheet and use the elipse cutter to cut out four petals for each lily. Bundle the petals together, overlapping them, and leaving a space in the middle for a center.

Add lilies to the base. Use the Pointed Tool to push them into place and to add a red center.

Fill in empty spaces with more small roses and White Glitter daisies with Yellow centers.

Make small Green leaves and set into place as shown.

Add Blueberry buds randomly.

Double check that the clay flower base can still fit in the plastic cloche base.

Manipulate flowers by hand gently as needed making sure the clear dome can fit in between the clay base and the sides of the plastic cloche base.

Carefully hold the clay base on the top of the plastic base.
If your plastic base has a vent hole through it, it’s important to match that hole in the clay base as well so that air can escape the cloche later when it comes time to assemble it.
From the bottom side of the plastic base, pierce through with the Needle Tool.
If your plastic base has a vent hole through it, it’s important to match that hole in the clay base as well so that air can escape the cloche later when it comes time to assemble it.
From the bottom side of the plastic base, pierce through with the Needle Tool.

Pierce all the way up through the clay base.

Carefully insert the skutterfly into the clear plastic dome. Line the toothpick up from the skutterfly to the clay base, making a mark where the toothpick pierces the clay base. Remove the clear dome and skutterfly.
Decorate the center vent hole with a daisy design so that the vent hole is hidden. The hole in the center of my daisy is the vent hole.
The toothpick hole, where the skutterfly will be positioned is marked with the red circle.
Take the clay base off of the plastic base and bake the clay separately following the baking instructions for Sculpey III®. Allow to cool completely before handling.
The toothpick hole, where the skutterfly will be positioned is marked with the red circle.
Take the clay base off of the plastic base and bake the clay separately following the baking instructions for Sculpey III®. Allow to cool completely before handling.

Wipe the base and the clear dome clean with paper towel.
Assemble the cloche as shown.
Assemble the cloche as shown.
