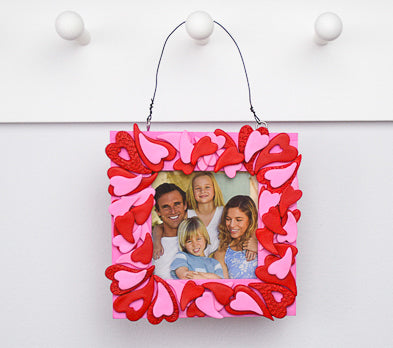

Sculpey Air-Dry™ Pink and Red Heart Frame
Sculpey Air-Dry™ Pink and Red Heart Frame
Designed by Linda Hollander
Read More
Create a darling frame to showcase your favorite photo, no oven required!
Sculpey Air-Dry clay makes it easy, and it's a terrific project to do with kids or at a crafting party.
Read Less
TIME TO COMPLETE: 45 minutes plus air drying time
Tips
- Use water on fingertips or paint brushes to help smooth clay as needed.
- Use a hard surface such as a large tile or piece of glass to roll out clay.
- When rolling clay sheets, use the Super Slicer to lift the sheet and turn over after each roll to prevent the clay from sticking to your work surface.
- Keep unused clay covered tightly with plastic wrap.
- Lightly sand dried clay to smooth out imperfections.
ADDITIONAL SUPPLIES
- 5” square unfinished flat wood frame or frame of choice
- Plaid Mod Podge Ultra All -In-One Glue & Sealer: Matte
- DecoArt Multi-Purpose Sealer
- DecoArt Americana Paint: Baby Pink, Royal Fuchsia, Calico Red
- Paint brushes
- Sponge backed sanding block: medium/fine grit

Project Instructions
- Getting Started:
Start with clean hands, unwrap and knead clay until soft and smooth. Wash hands after use. This clay doesn’t dry out so after you are done playing with it put it in a container that will protect it from dirt and dust. Does not need to be an air-tight container as this clay will never dry out.
Remove the glass and backing board from the frame and set aside. Apply Multi-Purpose Sealer to the entire frame. Let dry then sand smooth as needed.
Use Royal Fuchsia + touch of Baby Pink to basecoat the frame until opaque.
Use Royal Fuchsia + touch of Baby Pink to basecoat the frame until opaque.

Use the Super Slicer to cut off a piece of clay off the brick then roll into a ball. Use the clay roller to roll into a sheet approximately 2/16” thick. To add texture to some of the large hearts, use the Petal texture sheet. Lay the texture sheet over the clay and use the clay roller to apply pressure. Lift the texture sheet and set aside .

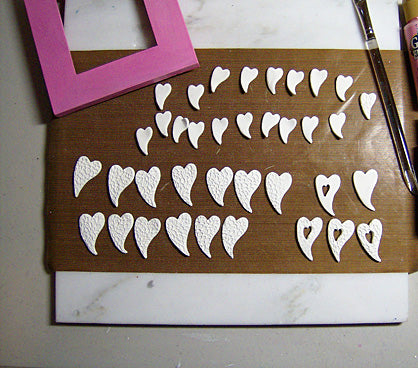
Use the medium and large cutters to cut clay shapes. You will need about a dozen large shapes for the corners of the frame and 20-25 medium hearts to fill the sides of the frame. Flip some of the shapes over for a reverse image. It is a good idea to cut a few extra of each size and style. Use the smallest heart cutter to cut windows in some of the large hearts. Reuse the scrap clay over and over.
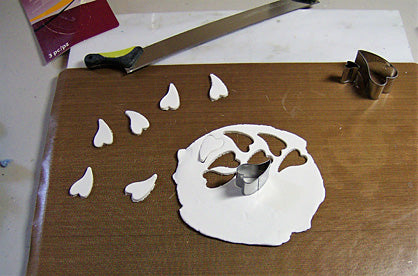
Use finger pressure to smooth edges of cut clay. Lay on a flat surface to dry. Flip clay shapes over occasionally for promoting drying. When dry, lightly sand edges as needed.
Use Calico Red to basecoat the large hearts and half of the medium hearts. Use Calico Red to base the remaining medium hearts .
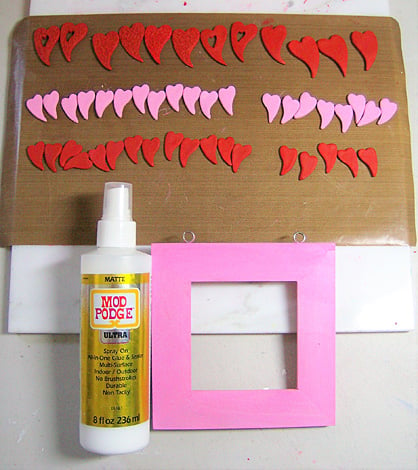
Lay out clay shapes into a pleasing arrangement. Remove shapes temporarily. Shake Mod Podge Ultra well then spray a light coat onto the frame. Immediately place the first layer of clay shapes on the wet surface and let set up for 10-15 minutes or until the shapes are adhered to the frame. Use a paint brush to smooth any Mod Podge that may have puddled on the hearts or dripped on the frame’s edges. Spray another coat of Mod Podge Ultra and place the second layer of shapes. Allow this layer to set up. Check for puddles and drips. Spray a final light coat of Mod Podge Ultra as a sealer/topcoat.
