

Premo Sculpey® Marbled Finial Ornament
Premo Sculpey® Marbled Finial Ornament
Designed by Amy Koranek
Read More
Read Less
This twist on a classic design is so festive for holiday decorating.
COMPLETION TIME:45 Minutes to make and bake.
ADDITIONAL SUPPLIES
- Printed finial shape about 3” x 2”
- 8 mm Silver tone jump ring
- 12” Ribbon
- Scissors

Project Instructions
- Getting Started:
Start with clean hands, unwrap and knead clay until soft and smooth, or condition by running clay though a Pasta Machine. We recommend using a designated machine for clay purposes only. When working with multiple colors, clean hands with soap and water or baby wipes (we have found that baby wipes work best) before switching colors. Shape clay, pressing pieces firmly together. Wash hands after use.
- Baking:
Start with 1/4 block of White Premo and make a thick log. Make flat bands of White Gold Glitter and Yellow Gold Glitter that are the same length as the White. You will also need tiny ropes of Bright Green Pearl and Cadmium Red in the same lengths.
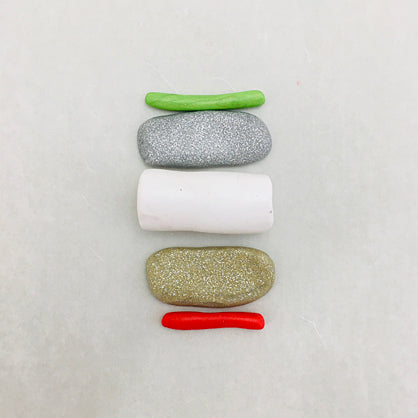
Press the bands of White Gold Glitter and Yellow Gold Glitter flat to the sides of the White log with spaces between them so the White shows in between. Press the little rope of Bright Green Pearl down the middle of the White Gold Glitter and the Cadmium Red rope down the middle of the Yellow Gold Glitter.

Roll the little rope on the work surface to smooth it. Then gently twist it to make candy stripes.

Keep rolling and twisting to a rope about 5” long. Fold the rope in half and in half again.

Roll the folded rope up into a ball.

If you want your colors to be more marbled, you can knead the ball in your hands until the colors start to blend slightly.

Twist the ball once again into a thick rope. Taper the rope on one end.

Shape the rope so that it is thicker in the middle.

Flatten the rope with your fingertips to make it start to take the shape of an ornament.

Print out or draw a finial ornament shape. I used a copyright free shape that I found on www.NorthPoleChristmas.com

Make sure your pattern is the size that you want for the finished ornament. Keep flattening your clay to be large enough to accommodate the pattern.

Cut out your pattern. Just to be sure my piece is symmetrical I fold my pattern in half to cut it out.

Open up the pattern and place it on top of the clay.

Cut out around the pattern with the knife blade loaded in the 5-in-1 Tool.

You can save the scrap clays to make another marbled ornament. Flip the ornament shape over and imbed a jump ring into the top to serve as a hanger for the ornament.

Flip the ornament back over to the front.

Smooth all the cut edges with your fingertips.

Make a very thin band of White Gold Glitter. Drape it over the top section of the ornament shape to look like the ornament cap.

Trim the sides of the cap. Score lines in the cap with the needle tool in the 5-in-1 Tool. Make another very thin band of White Gold Glitter and place in across the same area on the back of the ornament, securing the jump ring into place. Trim the sides of the cap and score lines again.

Bake the ornament following the baking instructions for Premo. When it is completely cool, add the ribbon to the jump ring, tie a knot and trim the ends.

- Choosing a selection results in a full page refresh.
- Opens in a new window.