

Liquid Sculpey® Skull Planter
Liquid Sculpey® Skull Planter
Designed by Amy Koranek
Read More
Read Less
In this tutorial I’ll go over some tips for filling a large bakeable mold. With so many cool molds on the market - that are intended for chocolates, soap, bath bombs, resin, and polymer - there are an unlimited number of choices for crafting any DIY project. As long as the mold is silicone, flexible, and can be placed in a 275 F (130C) oven; it will be safe for use with oven-bake Liquid Sculpey®.
ADDITIONAL SUPPLIES
- Paper towels
- 2 Cup liquid measuring cup
- Silicone baking cup, or small glass dish, or metal dish - large enough to hold 2 ounces
- Purple alcohol ink or purple oil-based paint - If you make a planter for a real live succulent, you may want to consider using oil paint instead of alcohol ink for the tint. Alcohol ink is generally not UV safe and will fade over time if exposed to the bright light needed to keep a succulent alive.
- Silicone skull planter mold or large oven safe mold of your choice
- Black acrylic paint
- Paintbrush
- Paper plate or paint palette
- Damp rag or disposable cloth
Project Instructions
- Getting Started with Liquid Sculpey:
- Baking:
A good way to determine approximately how much Liquid Sculpey® is needed to fill the mold is to first fill it with water. Then empty the water from the mold into a 2 cup liquid measuring cup. This will provide an approximation of how much Liquid Sculpey® is needed to fill the mold.
To get the mold completely dry and ready to use, place it in a 275F pre-heated oven for 20 minutes. This will steam the water out of even the smallest crevices.
Next make the tinted Liquid Sculpey® for the mold. My mold will require 6 ounces or 3 - 2 ounce bottles. I will make my color batches up one at a time. I will fill the mold with one batch, bake it; add the second batch, bake again; then top it up with the third batch and bake a third time. This is why it will be important to keep track of how much color and thinner you use, so that you can make each batch exactly the same way and each layer will match perfectly.
Pour an entire bottle of Pearl Liquid Sculpey® into a small glass, metal, or silicone dish. For each 2 ounces of liquid, I added 10 drops of purple alcohol ink and 10 drops of Sculpey® Softener & Thinner. I added the Thinner because my silicone mold has a lot of ornate detail all over it. I wanted to make sure that my Liquid Sculpey® would really fill in all the details well, so I thinned it slightly.
Stir the ink (or paint) and the Thinner into the LS completely with one of the clay tools. If you are using paint instead of ink, you will need to add a very small amount of paint and mix it in completely to check your color. Then add more paint as needed to get the depth of color that you want. Oil paint is recommended for this project instead of acrylic paint. For most applications, acrylic paint works really well with oven-bake clays. However, with LS, acrylic paint is not a good alternative because the acrylic paint will not dry out in the LS before going into the oven. Once in the oven, acrylic paint will have a tendency to bubble in the LS causing an inconsistent outcome.
If you are using oil-based paint, keep track of how much you add so that you can re-create your recipe in future batches.
Wipe tools clean with paper towels.

Pour the first batch of colored LS into the mold. If you are using a large and/or detailed mold, you will want to spend some time making sure the air bubbles are worked out.
First release bubbles by tapping the mold on the work surface.
First release bubbles by tapping the mold on the work surface.

You can also squeeze the mold, burping air bubbles out.
Another method for releasing air is to approach the mold as if you were going to turn it inside out. But instead of turning it completely inside out, you just push the outside inward. This will help the LS to creep into the details and push air out at the same time.
With the mold only partially filled, bake following the baking instructions for Liquid Sculpey®.
While the mold is baking, you can mix another batch of the colored LS.
When the baked mold is completely cool, fill with the next batch of colored LS. Do your best to burp out as much air as possible. This will be a little more difficult since the mold already has some cured LS in it. Bake the mold again.
If you need to mix a third batch of colored LS, do so while the mold is baking. Allow it to cool completely, then add the final batch. Make sure you fill the mold to level. Bake again following the baking instructions for Liquid Sculpey®.

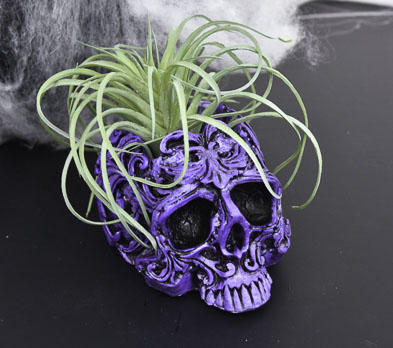
When the mold is completely cool, carefully push the baked piece out.

My mold has an area in the top for a small plant.
If the bottom edges of your design have rough areas where the LS was not completely smooth at the level mark, feel free to trim little bits away with small sharp scissors.
If the bottom edges of your design have rough areas where the LS was not completely smooth at the level mark, feel free to trim little bits away with small sharp scissors.

Next we will antique the molded piece with black acrylic paint. You can squirt some paint out onto a paper plate or painting tray and thin just slightly with water to make it easy to spread. Spread the paint into one area at a time with a paintbrush. Be sure the paint gets into all the nooks and crannies.

Wipe away excess paint with a damp rag. Continue applying paint and wiping away excess until the entire piece is antiqued.

Allow the paint to dry completely before handling.
If you have used up as much of your tinted LS as possible, you can simply bake your silicone, glass, or metal mixing vessel and then peal the extra LS out and discard. If you have quite a bit of tinted LS remaining, you can pour it into smaller molds that you may have on hand, bake, and save for future projects. Or you can place the leftover tinted LS in a small container with a lid for storage.
If you have used up as much of your tinted LS as possible, you can simply bake your silicone, glass, or metal mixing vessel and then peal the extra LS out and discard. If you have quite a bit of tinted LS remaining, you can pour it into smaller molds that you may have on hand, bake, and save for future projects. Or you can place the leftover tinted LS in a small container with a lid for storage.

- Choosing a selection results in a full page refresh.
- Opens in a new window.