
Sculpey Premo™ Winter Cardinal Gourd and Clay Ornament
Sculpey Premo™ Winter Cardinal Gourd and Clay Ornament
Read More
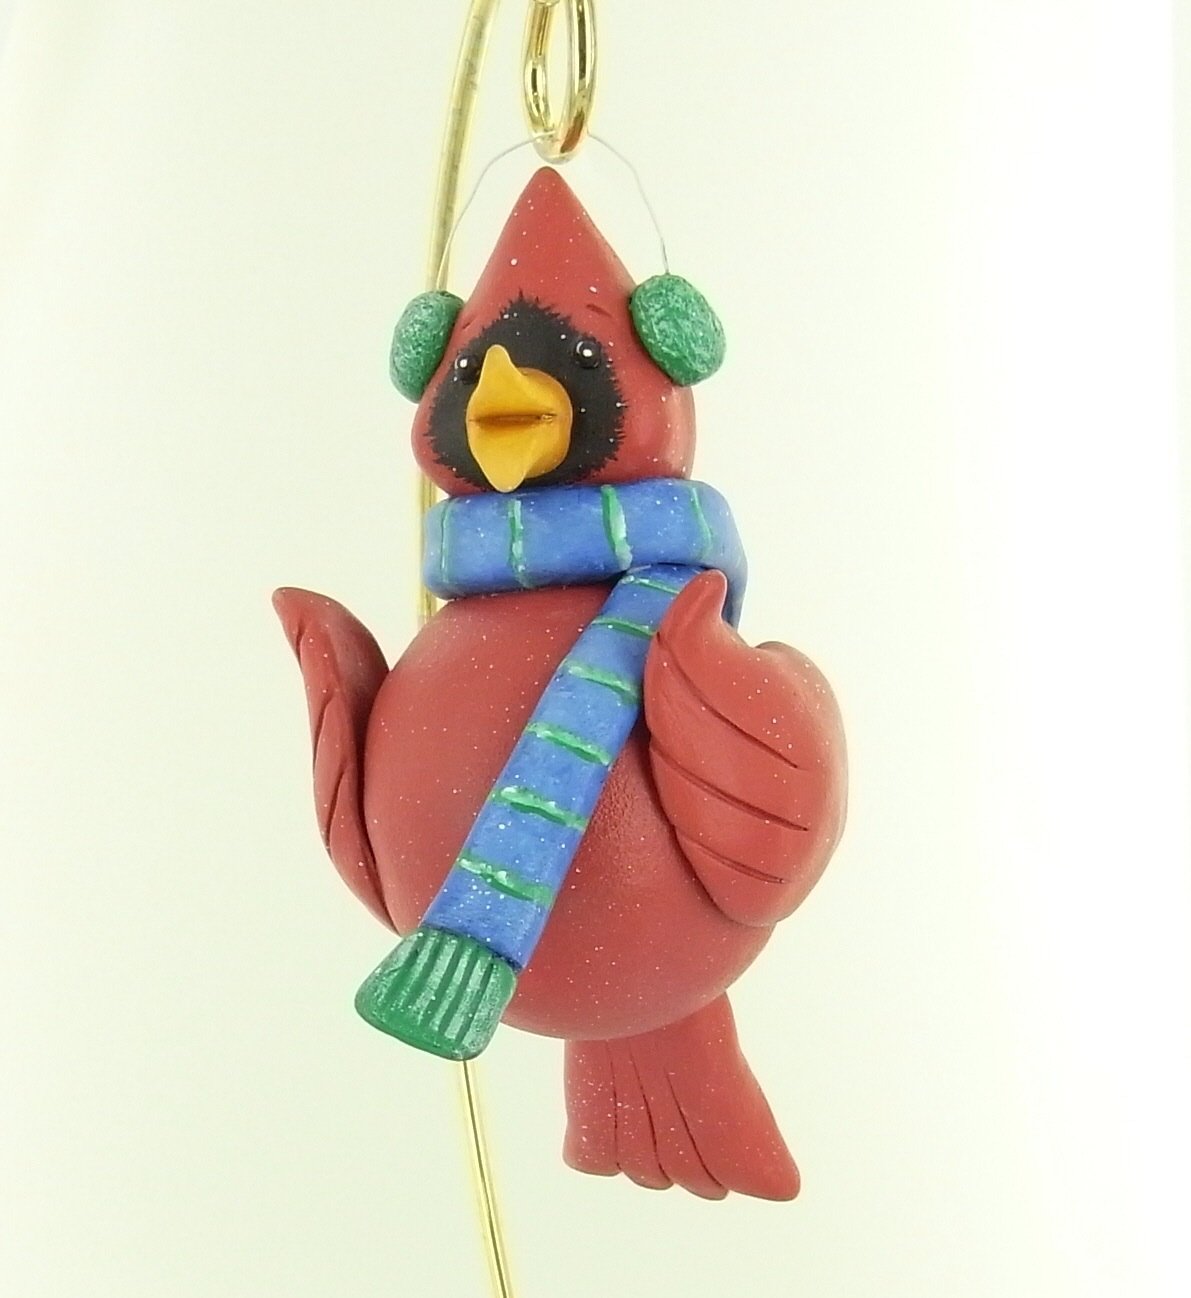
The cardinal is a sure sign of winter approaching. This magnificently painted cardinal, created with clay over a gourd, makes us happy to celebrate the season!
Read Less
ADDITIONAL SUPPLIES
- DecoArtAmericana : Autumn Red, Blue Violet, Grey Sky, Kelly Green, Lamp Black, Marigold, Milk Chocolate, Snow (Titanium) White
- FM/Dynasty Brushes:Gold Taklon Series SC361F Flat #2, 6, and 12; Series SC361ML Liner 15/0
- 26 gauge white craft wire
- Dust Mask Electric drill with small bit Sand
- Aluminum foil
- Super glue or glue of choice
- 2 Toothpicks
- Ruler
- Scissors
- Old stiff toothbrush
Project Instructions
Do not use unbaked clay on unprotected furniture or finished surfaces. Start with clean hands and work surface area. Good work surfaces include wax paper, metal baking sheet, or disposable foil. Knead clay until soft and smooth. For best results, clean your hands in between colors. Shape clay, pressing pieces together firmly. Bake on oven-proof glass or metal surface at 275°F (130°C) for 30 minutes per 1/4" (6 mm) thickness. For best baking results, use an oven thermometer. DO NOT USE MICROWAVE OVEN. DO NOT EXCEED THE ABOVE TEMPERATURE OR RECOMMENDED BAKING TIME. Wash hands after use. Baking should be completed by an adult. Begin by preheating oven to 275°F (130 °C). Test temperature with oven thermometer for perfectly cured clay. For best results, condition all clay by running it through the Clay Conditioning Machine several passes on the widest setting. Fold the clay in half after each pass and insert the fold side into the rollers first.Note: Wear dusk mask when drilling on gourds as the dust is toxic.
description Step 1 If gourd is not pre-cleaned soak in warm water for 10-15 minutes then use a plastic scouring pad to remove dirt and outer skin. Stubborn skin may be gently scraped with a plastic knife. Let dry. Basecoat Gray Sky until opaque.

Drill holes for toothpicks to place head and tail.

Note: Clay parts may need to be reduced or enlarged slightly depending on size of your gourds. Using the White clay roll a 1.5” ball for head. Use fingers to form crest at top of head. Roll ½” ball for beak then form into a cone shape. Roll 2 peas sized balls for cheek and press onto face leaving room for beak. Use the Flexible Tip Shaper and finger pressure to smooth edges of cheeks into face (picture # 4). Press beak between cheeks firmly. Do not blend edges into face. Use blade to divide beak sections by cutting through horizontally about ¾ of the way through. Use fingertip to gently push beak sections up and down respectively. Use the needle tool to indent two tiny nostrils in the top half and to indent eyebrow. Use blunt point tool to indent eye sockets.

Press toothpick halfway into bottom of head. Fill ramekin ¾ full with sand then cover tightly with foil. Insert toothpick into foil/sand.

Roll two 1/2" balls for wings. Flatten slightly with roller then form into a kidney shape. Use fingers to form tips. Press wings firmly onto gourd one at a time over stem and blossom ends. Use finger pressure to taper edges slightly to conform to gourd shape. Bend tips upward slightly. Gently remove wings from gourd.

Roll a 1” ball for tail then form a 1.5” cone shape. Use roller to flatten slightly. Use needle tool to indent feathers. Use flexible tip shaper to indent and smooth tail feather tips. Insert toothpick halfway into tail section.

Press onto tail area of gourd so short end of tail contours the gourd shape.

Roll two tiny balls for eyes. Place eyes, wings and tail on tray and bake.

Use Gray Sky to basecoat until opaque. Basecoat gourd and clay parts again with Autumn Red until opaque. Apply glue to head toothpick and insert into body. Let dry. Use Marigold to basecoat beak until opaque. Use the liner and Lamp Black to paint mask. Thin paint with a touch of water as needed for flow. It is helpful to carefully outline mask area around beak before pulling strokes from beak outward. Let dry. Nestle body into foil covered ramekin.

Roll a ¼’ ball of White clay and use the slicer to cut in half. Use toothbrush to texture the round sides of earmuff. Cut a 3” length of wire and bend ends up slightly. Press earmuffs onto head then carefully insert wire into muffs.
Roll a 1” ball of Ultramarine clay into a 7” log. Use roller to flatten slightly. Use needle tool to indent fringed areas at ends. Wrap scarf around neck area crossing over on one side. Use gentle finger pressure to adhere scarf to head and body. Bake as directed above.
Basecoat earmuffs Kelly Green. Load the deerfoot brush with a small amount of Blue Violet then touch the toe into a touch of Snow (Titanium) White. Tap on palette to blend slightly the use a stippling motion to paint the scarf. Tap very carefully around the edges and underside of scarf. Use a damp shader to remove unwanted paint from red areas. Load the chisel edge of the #6 shader with Kelly Green then tap into a small amount of Snow (Titanium) White. Tap the chisel edge of the brush on palette to blend slightly then tap stripes on scarf. Use Kelly Green to basecoat fringe until opaque. Dry the #6 shader then load with Snow (Titanium) White. Offload excess paint onto a paper towel then use the flat side of the brush to drybrush the scarf fringe and earmuffs.
Use Snow (Titanium) White to under paint beak. When dry basecoat Marigold until opaque. Wet the #6 shader with clean water and blot lightly on paper towel. Load the corner of the brush with Milk Chocolate and blend on palette. Shade inside beak and next to face.
Glue eyes in place. When dry base coat Lamp Black. Use the liner and Snow (Titanium) White to add reflected highlights. Glue wings and tail in place.
Load old toothbrush with slightly thinned Snow (Titanium) White and spatter cardinal lightly.
Apply two coats of Scupley Satin Glaze.