
Sculpey Premo™ and Liquid Sculpey® Snowflake Gift Tag Ornament
Sculpey Premo™ and Liquid Sculpey® Snowflake Gift Tag Ornament
Designed by Amy Koranek
Read More
Read Less
You can easily find inspiration for your snowflake patterns online. Then transfer your ideas onto Sculpey PremoTM backgrounds with White Liquid Sculpey® for gift tags and ornaments as unique as snowflakes.
COMPLETION TIME:45 Minutes to make and bake
ADDITIONAL SUPPLIES
- Circle cutters - 3.25” shown in this tutorial
- Circle template marked into six equal sections - sized so that the circle is 3.5” in diameter
- Silver ribbon
- Scissors
- Optional - White paint pen for inscribing a name on the back so that it can be used as a gift tag

Project Instructions
Please make sure your work area is covered and you are not working on an unprotected surface. We recommend working on the Sculpey® Oven Safe Work Mat, wax paper, metal baking sheet, or disposable foil. Uncured Liquid Polymer Clay may damage unprotected furniture or finished surfaces. Be sure to cover your crafting area appropriately.
Getting Started with Premo Clay:
Start with clean hands, unwrap and knead clay until soft and smooth, or condition by running clay though a Pasta Machine. We recommend using a designated machine for clay purposes only. When working with multiple colors, clean hands with soap and water or baby wipes (we have found that baby wipes work best) before switching colors. Shape clay, pressing pieces firmly together. Wash hands after use.
Getting Started with Liquid Sculpey
Stir Liquid Sculpey® completely. Thin with Sculpey® Liquid Clay Softener as needed - Wash hands after use (we have found that baby wipes work best) .
Getting Started with Premo Clay:
Start with clean hands, unwrap and knead clay until soft and smooth, or condition by running clay though a Pasta Machine. We recommend using a designated machine for clay purposes only. When working with multiple colors, clean hands with soap and water or baby wipes (we have found that baby wipes work best) before switching colors. Shape clay, pressing pieces firmly together. Wash hands after use.
- Baking:
Getting Started with Liquid Sculpey
Stir Liquid Sculpey® completely. Thin with Sculpey® Liquid Clay Softener as needed - Wash hands after use (we have found that baby wipes work best) .
- Baking:
Condition and roll 1/2 bar of Galaxy Glitter Premo to 1/8” thick. Cut out a circle using the circle cutter

Copy and size the circle template so that it is larger than your clay circle. Position the circle of clay in the center of the template.


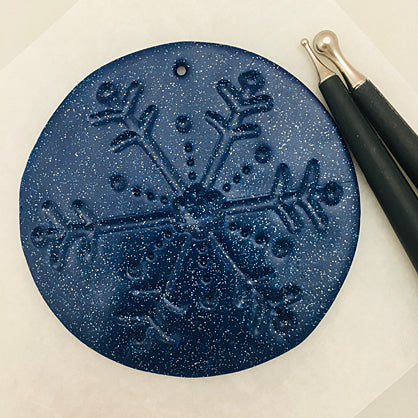
Use the 6mm Ball Tool to impress thick lines in the clay following the lines on the template. You can use the straight edge of a piece of paper to help as a guide for creating straight lines across the clay.
Put little thick bulbs on the end of each line with the 6mm Ball Tool.
Put little thick bulbs on the end of each line with the 6mm Ball Tool.

Continue using the tool to make more details in each line, like little branches toward each end and a six sided flower in the very center. Try to keep your lines as symmetrical as possible. It’s good here to reference snowflake styles so that you can get your piece as realistic as possible.

Use the 2mm Ball Tool to make smaller details in the snowflake.
Use the 2mm Ball Tool to poke a hole through the circle keeping it at least 1/8” away from the edge for strength.
Use the 2mm Ball Tool to poke a hole through the circle keeping it at least 1/8” away from the edge for strength.
Next, fill the impressed areas with White Liquid Sculpey® (LS). Start with the largest areas first to get a feel for how the LS squirts out of the bottle.

Next, add White LS to the branch areas.
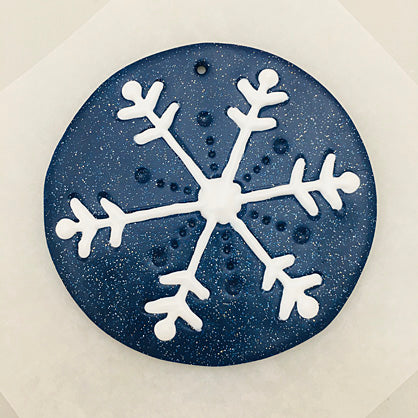
Lastly fill in the tiny details.
Bake the ornament/tag following the baking instructions for Premo. When the piece is completely cool, add a 9” ribbon
Bake the ornament/tag following the baking instructions for Premo. When the piece is completely cool, add a 9” ribbon