

Sculpey III® and Liquid Sculpey® Candied Christmas Ornament
Sculpey III® and Liquid Sculpey® Candied Christmas Ornament
Designed by Amy Koranek
Read More
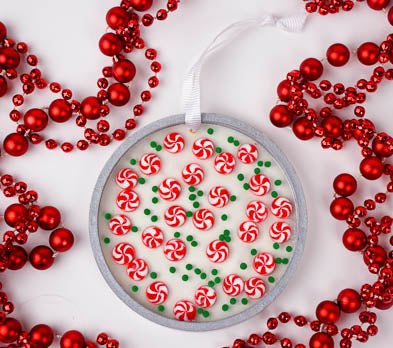
Cute little candies are sliced from a Sculpey III® cane and encased in Liquid Sculpey® for a festive holiday ornament or coaster.
COMPLETION TIME:
90 Minutes to make and bake
Read Less
ADDITIONAL SUPPLIES
- Silicone coaster mold
- 12” Ribbon
- Dremel drill, pin drill, or spring drill
Project Instructions
GETTING STARTED WITH SCULPEY III AND LIQUID CLAY:
Please make sure your work area is covered and you are not working on an unprotected surface. We recommend working on the Sculpey® Oven Safe Work Mat, wax paper, metal baking sheet, or disposable foil. Uncured Liquid Polymer Clay may damage unprotected furniture or finished surfaces. Be sure to cover your crafting area appropriately.
Getting Started with Sculpey III Clay:
Start with clean hands, unwrap and knead clay until soft and smooth, or condition by running clay though a Pasta Machine. We recommend using a designated machine for clay purposes only. When working with multiple colors, clean hands with soap and water or baby wipes (we have found that baby wipes work best) before switching colors. Shape clay, pressing pieces firmly together. Wash hands after use.
Getting Started with Liquid Sculpey
Stir Liquid Sculpey® completely. Thin with Sculpey® Liquid Clay Softener as needed - Wash hands after use (we have found that baby wipes work best) .
Please make sure your work area is covered and you are not working on an unprotected surface. We recommend working on the Sculpey® Oven Safe Work Mat, wax paper, metal baking sheet, or disposable foil. Uncured Liquid Polymer Clay may damage unprotected furniture or finished surfaces. Be sure to cover your crafting area appropriately.
Getting Started with Sculpey III Clay:
Start with clean hands, unwrap and knead clay until soft and smooth, or condition by running clay though a Pasta Machine. We recommend using a designated machine for clay purposes only. When working with multiple colors, clean hands with soap and water or baby wipes (we have found that baby wipes work best) before switching colors. Shape clay, pressing pieces firmly together. Wash hands after use.
- Baking:
Getting Started with Liquid Sculpey
Stir Liquid Sculpey® completely. Thin with Sculpey® Liquid Clay Softener as needed - Wash hands after use (we have found that baby wipes work best) .
- Baking:
Fill the rim area of the coaster mold with Silver Liquid Sculpey® (LS).

Use the tip of the Needle Tool to release air bubbles that may be trapped in the corner of the rim. Dip the tip of the Needle Tool into the outer corner and run the tip gently around this outer edge. Then move the tip to the inner corner and run it gently around. Clean tools with paper towel.
Bake the mold to cure the rim following the baking instructions for Liquid Sculpey®.
Bake the mold to cure the rim following the baking instructions for Liquid Sculpey®.

While the rim is baking, make the candy cane. Roll a little log from 1/4 block of White Glitter.

With the log laying on the work surface in front of you, pinch a ridge along the length, then turn the log 1/3 turn and pinch another ridge. Finally, roll the log one more time to pinch a third ridge making a triangle shaped cane.

From 1/4 block of Red Hot Red, make a triangle shaped cane.

Push one flat side of each of the triangular canes together and make sure there are no gaps between them.

Lay the two-toned triangle cane on the work surface and pinch the edge up where the two colors come together along the top.

Pinch each point so that you have a two-colored triangle cane with three flat sides.

Slice the cane into three equal lengths.

Push the three lengths side to side making a little fan shape.

Lay the flat side of the fan shape on the work surface and make sure all the points come together in the center.

Slice the fan shaped cane in half so that you have two mirror image halves.

Push the mirror image sides together to form a new cane. Squeeze the cane gently to make sure no air bubbles are trapped in the middle.

Lay the cane on its side and gently roll it to make it longer.

Carefully twist the cane to make stripes.

Roll and twist the cane until it is 3/8” thick.

Section the cane to see the candy pattern inside.

Slice the cane into lots of little candy slices 1/8” thick.

From Emerald make lots of little sprinkles.
Bake the candy slices and the sprinkles following the baking instructions for Sculpey III®. Allow them to cool completely before handling.
Bake the candy slices and the sprinkles following the baking instructions for Sculpey III®. Allow them to cool completely before handling.

After stirring the Clear LS completely, place a thin layer of Clear LS in the flat area of the coaster mold.

Add the Emerald Green sprinkles to the Clear LS. Use the tip of the Needle Tool to make sure the candies and sprinkles are settling into the liquid. Cover the top of the candies and sprinkles with another layer of Clear LS.

Bake the coaster following the baking instructions for Liquid Sculpey®.
Allow the coaster to cool completely. Gently flex the mold to release the baked ornament. The baked piece can be used as a coaster or made into an ornament.
Use a Dremel drill, pin drill, or spring drill to make a hole near the edge of the rim. Add a ribbon so the ornament can be displayed.
Use a Dremel drill, pin drill, or spring drill to make a hole near the edge of the rim. Add a ribbon so the ornament can be displayed.

- Choosing a selection results in a full page refresh.
- Opens in a new window.