

Sculpey Premo™ Retro Ornament
Sculpey Premo™ Retro Ornament
Read More
Read Less
The new vibrant Premo colors are perfect for doing retro designs. This quick, easy ornament is sure to be a standout in your holiday display.
ADDITIONAL SUPPLIES
- Gold Glitter
- White craft glue
- 1 large round glass ornament (clear or colored)
- Baking Nest – polyester fiberfill
- 2-1/2" round metal cutter or cardboard cut and taped to make a circle
Project Instructions
- Getting Started:
Start with clean hands, unwrap and knead clay until soft and smooth, or condition by running clay though a Pasta Machine. We recommend using a designated machine for clay purposes only. When working with multiple colors, clean hands with soap and water or baby wipes (we have found that baby wipes work best) before switching colors. Shape clay, pressing pieces firmly together. Wash hands after use.
- Baking:
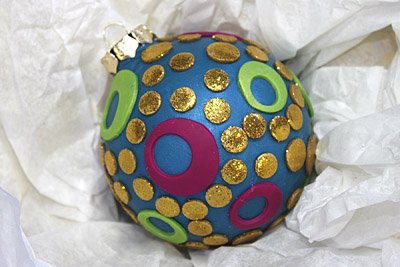
Roll 1/3 of the package of Peacock clay through the Clay Conditioning Machine on #1 and then on #5 to create a very thin sheet of clay. Begin to put the clay near the top of the ornament (hanger removed), slightly stretching the clay around the middle and tucking into the bottom of the ornament.

Yes! You will have overlaps of clay, but try to keep it as neat as you can! Carefully, use the Super Slicer blade to trim the excess layers of clay away from the base layer on the ornament. Cut as close as you can, take several passes if you need to. Use the acrylic roller to help smooth these areas out. You may want to wear gloves if you have issues with fingerprinting!

Roll the covered ornament in your hand to help smooth the seams and set it on your baking nest. Place the nest into the preheated oven set to the temperature indicated on your clay package. Bake for about 10 minutes.

While the ornament is baking, begin making the brightly colored circles to create the pattern. Roll 1/3 package of Pearl Green out on #1 setting and then on #3 setting. Use your circle cutters to cut first the large circle and then an offset smaller circle. You can even use your Sculpey tools to add a quick pattern around the edge if you wish. Create about 4 large circles and 6 smaller circles from the Green Pearl and Magenta Pearl clays. Set aside.

Once the ornament is baked and cool to touch, you can add your circles. Once all your Bright Green Pearl and Magenta Pearl Circles are in place, put the ornament back in its baking nest and bake for another 10 minutes.

While the ornament is baking again, punch out about 2 dozen 18K gold circles and coat them in gold glitter. If you have 2 small cutters, you can punch out several options for your pattern!

Add the gold circles to the baked ornament, using a small drop of glue on each to help hold it. Just allow the pattern of the gold circles to flow around the larger circles. Rebake for 10 minutes in the baking nest and you are done!

Roll 1/3 of the package of Peacock clay through the Clay Conditioning Machine on #1 and then on #5 to create a very thin sheet of clay. Begin to put the clay near the top of the ornament (hanger removed), slightly stretching the clay around the middle and tucking into the bottom of the ornament.
Yes! You will have overlaps of clay, but try to keep it as neat as you can! Carefully, use the Super Slicer blade to trim the excess layers of clay away from the base layer on the ornament. Cut as close as you can, take several passes if you need to. Use the acrylic roller to help smooth these areas out. You may want to wear gloves if you have issues with fingerprinting!
Roll the covered ornament in your hand to help smooth the seams and set it on your baking nest. Place the nest into the preheated oven set to the temperature indicated on your clay package. Bake for about 10 minutes.
While the ornament is baking, begin making the brightly colored circles to create the pattern. Roll 1/3 package of Pearl Green out on #1 setting and then on #3 setting. Use your circle cutters to cut first the large circle and then an offset smaller circle. You can even use your Sculpey tools to add a quick pattern around the edge if you wish. Create about 4 large circles and 6 smaller circles from the Green Pearl and Magenta Pearl clays. Set aside.
Once the ornament is baked and cool to touch, you can add your circles. See how cool the surface of the Peacock looks? Once all your Green and Magenta Pearl Circles are in place, put the ornament back in its baking nest and bake for another 10 minutes.
While the ornament is baking again, punch out about 2 dozen gold circles and coat them in gold glitter. If you have 2 small cutters, you can punch out several options for your pattern!
Add the gold circles to the baked ornament, using a small drop of glue on each to help hold it. Just allow the pattern of the gold circles to flow around the larger circles. Rebake for 10 minutes in the baking nest and you are done!
- Choosing a selection results in a full page refresh.
- Opens in a new window.