
Sculpey Air-Dry™ Pumpkin Fairy House
Sculpey Air-Dry™ Pumpkin Fairy House
Designed by Linda Hollander
Read More
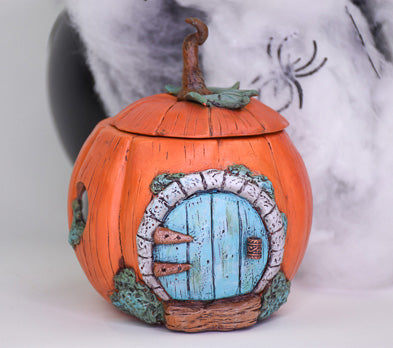
Sculpey Air-Dry™ teams up with seasonal paint colors to create this clever little pumpkin house tea light holder.
Make Time – six hours
Dry time – 24 hours
Clay Tips from the Artist
• Use water on fingertips to help smooth clay as needed.
• Use a hard surface such as a large tile or piece of glass to roll out clay.
• When rolling clay sheets, use the Clay Blade to lift the sheet and turn over after each roll to prevent the clay from sticking tightly to your work surface.
• Lightly sand dried clay to smooth out imperfections.
• Use water to dampen dry clay areas before applying more clay. A dab of craft glue can also be used to help adhesion.
Read Less
Make Time – six hours
Dry time – 24 hours
Clay Tips from the Artist
• Use water on fingertips to help smooth clay as needed.
• Use a hard surface such as a large tile or piece of glass to roll out clay.
• When rolling clay sheets, use the Clay Blade to lift the sheet and turn over after each roll to prevent the clay from sticking tightly to your work surface.
• Lightly sand dried clay to smooth out imperfections.
• Use water to dampen dry clay areas before applying more clay. A dab of craft glue can also be used to help adhesion.
ADDITIONAL SUPPLIES
- DecoArt Multi-Purpose Sealer; Matte Varnish
- DecoArt Americana Acrylic Paint: Aqua Sky, Cocoa, Desert Cactus, Grey Sky, Soft Black, Snow White
- Flat art brushes: small, medium; old stiff brush or toothbrush
- Toothpick or pointed tool for texture clay
- Masking tape
- Thin piece of cardboard
- Craft knife
- Metal necklace bale (jewelry findings)
- Craft glue
- 4” fishbowl from a craft store or size of choice
- Sand paper

Project Instructions
- Getting Started:
Please make sure your work area is covered. We recommend working on the Sculpey® Oven-Safe Work Mat, wax paper, or disposable foil.
Start with clean hands, unwrap and knead clay until soft and smooth. Wash hands after use. Wrap any extra clay in then wrapper and then put in an airtight container.
Use the clay blade to cut off a piece of clay then roll into a ball. Use the clay roller to roll a sheet of clay 1/4” thick x 5” long.
Bend the blade slightly and trim off outer edges of clay sheet to form a barrel stave shape.
Use finger pressure to bevel the long edges of the sheet.
Use the blade to gently lift the clay from the surface. Apply the sheet of clay to the bowl and use the blade to trim top and bottom edges. Repeat until the sides of the bowl are covered.

Choose an area for the door and use the blade to slice off that area. Use the 1” circle cutter to cut two windows on either side of the pumpkin.
Use the toothpick to create vertical texture in the wet clay.
Use a wet paintbrush to smooth the clay as desired.
Let dry. Sand as needed.
Use the toothpick to create vertical texture in the wet clay.
Use a wet paintbrush to smooth the clay as desired.
Let dry. Sand as needed.

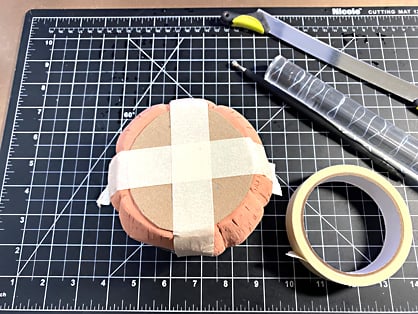
Cut a circle from the cardboard to fit over the opening of the pumpkin and tape down.
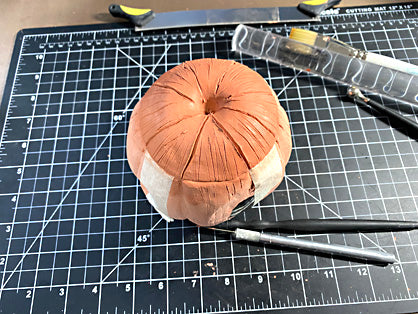
To make the pumpkin lid begin with a 2” ball of clay flattened out on the work surface to form a dome shape that will reach across the top of the bowl.

Place the dome on top of the cardboard to and use the Dual Ended Tool to make an indentation in the center and to indent sections to match the pumpkin base.
Use the toothpick to add details. Soften details as desired with a wet paint brush. Let dry. Remove cardboard and tape.
Use the toothpick to add details. Soften details as desired with a wet paint brush. Let dry. Remove cardboard and tape.
Use largest cutter to cut a thick circle. Let dry then glue to the underside of the lid.
Roll a piece of clay into a log then use finger pressure to shape into a stem.
Push one end into the indentation of the lid.
Use the toothpick to add texture.
Remove from lid and let dry. Glue stem in place.
Roll out a thin sheet of clay and use a craft knife to cut two leaf shapes. Gently press the leaves onto the lid next to the stem. Use tools to add veins.

Use the 2” circle cutter to cut the door. Use the blade to slice off the bottom of the door. Apply the door to the flattened part of the pumpkin.
Use tools to vertical make indentations for boards and to add wood-like texture.
Form hinges from small bits of clay and press onto door.
Roll a ball of clay into a long snake and press around door. Use tools to make indentations and texture.
Roll a ball of clay into a log shape and press onto house under the door. Use tools to add bark-like texture.
Add small irregular bits of clay here and there on windows and around door. Use tools to texture the moss.
Add a touch of glue to the back of the jewelry bale and press into place as a door handle. Let dry.
Apply a coat of Multi-Purpose Sealer all dried clay areas. This step helps the clay to accept paint evenly and also allows you to wipe off unwanted paint from adjacent areas.

Paint the moss and leaves Desert Cactus. Let dry then drybrush relief areas with a touch of Aqua Sky. Base the door with Aqua Sky. Base the hinges and step Cocoa. Base the door frame Snow White.

Apply a coat of sealer to painted areas.
Mix Staining and Antiquing medium with Soft Black (4:1). Use a brush to apply all over the clay areas working the mix into the nooks and crannies.
Let dry for 10-15 minutes. DO NOT USE HEAT to speed up drying time. Use a slightly damp cloth or shop towel to remove excess antiquing. If you remove too much more can be added as needed.
Apply a coat of varnish. Use rubbing alcohol on a cotton swab to clean windows. Add a battery powered tea light if desired.
