

Liquid Sculpey® Halloween Floating Frame
Liquid Sculpey® Halloween Floating Frame
Designed by Gretchen Amberg
Read More
Read Less
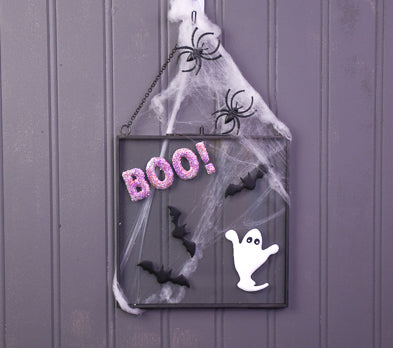
We love holiday decorations that are quick and easy to both display and store! So now you can create some clever Halloween window clings using Liquid Sculpey® to display in one of the small floating frames.
Working Time: 30-minutes
Baking Time: 15-minutes
ADDITIONAL SUPPLIES
- Small Paint Brush
- Plain Copy Paper
- Glitters – Purple, Orange, and Green
- Clear tempered glass sheet – 8”x10”
- Floating Glass Frame - 6” square
- Small plastic mixing cup
- Aluminum foil
Project Instructions
- Getting Started with Liquid Sculpey®:
- Baking:
Select the following from free online clipart options: “BOO”, a bat, and a ghost. Size and print the designs so you are able to fit 3-small bats, one ghost, and “BOO” on the floating glass frame.
Tape the printed images to the bottom of the tempered glass sheet. Note: Taping the paper to the glass sheet will keep the images from moving while you apply the liquid clay to the glass.

Start with one of the bats. Squeeze a drop of black liquid clay onto the body of the bat. Use the small paintbrush to move the liquid clay to the edge of the clipart image. Add more drops of the liquid clay as needed. Note: Adding the clay a few drops at a time will keep the liquid clay from spreading past the outer edge of the clipart design.

Use the needle tool to pull the liquid clay into the tips of the ears and wings.

To create the ghost, use White liquid clay and follow the process used to make the bats.
Add two black drops of Black liquid clay to the ghost face.
Add two black drops of Black liquid clay to the ghost face.

Use the needle tool to add a small white dot on each black drop.

To create the word “BOO”, use the White liquid clay and follow the process used to make the bats.
Use the aluminum foil to create a “tent” and place the tent over the bats and ghost. We will be adding glitter to the word “BOO”; tenting the bats and ghosts will protect them from getting covered in glitter.
Use the aluminum foil to create a “tent” and place the tent over the bats and ghost. We will be adding glitter to the word “BOO”; tenting the bats and ghosts will protect them from getting covered in glitter.

Add small amounts of the green, orange, and purple glitter into the small plastic mixing cup and stir the glitter together.

Liberally sprinkle the glitter over the word “BOO”.
Once you have achieved good glitter coverage bake the liquid clay on the glass per the information in Getting Started.
Once you have achieved good glitter coverage bake the liquid clay on the glass per the information in Getting Started.

Let the baked liquid clay cool completely, remove from tempered glass sheet, and add to the floating glass frame.
