

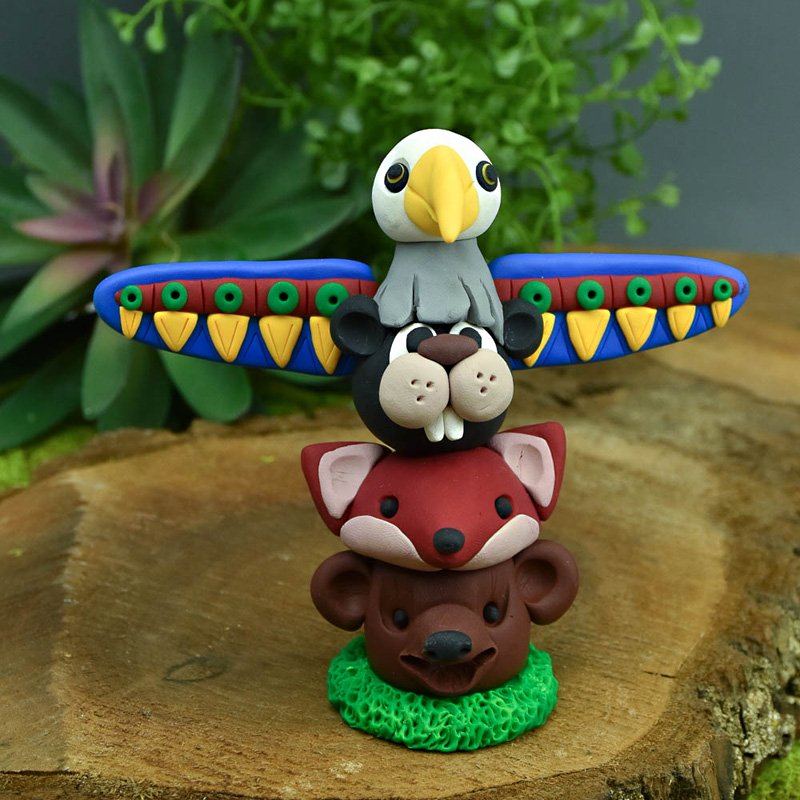
Sculpey III® - Colorful Animal Totem Pole
Sculpey III® - Colorful Animal Totem Pole
Designed by Amy Koranek
Read More
Read Less
This colorful animal totem pole is a great way to spend an afternoon or create a school project.
Project time: 60 minutes plus baking time
ADDITIONAL SUPPLIES
- Toothpicks (2)
- Empty BIC pen barrel or 5” dowel rod (1/4” thick)
Project Instructions
- Getting Started:
Start with clean hands, unwrap and knead clay until soft and smooth, or condition by running clay though a Pasta Machine. We recommend using a designated machine for clay purposes only. When working with multiple colors, clean hands with soap and water or baby wipes (we have found that baby wipes work best) before switching colors. Shape clay, pressing pieces firmly together. Wash hands after use.
- Baking:
First make a grassy bottom for your totem pole to stand on. Mix 1/4 bar of Green with 1/4 bar of Yellow but don't blend completely.

Flatten the mixed Green/Yellow into a little thick patty.

Next make the bear head. Use 1/2 bar of Brown to make a big marshmallow shape that will be the head. From 1/8 bar of Brown make two ears and a snout. You'll need a little oval of Black for the nose.

Poke a hole all the way through the head shape with the pointed tool. Remove the tool.

Place the bear head in the center of the grass base. Push an empty pen barrel or a small dowel rod into the hole for support for the totem structure.

Prick the grass all over randomly with the pointer tool to texture it

Push the snout onto the front of the face. Add one ear to each side.

Add the face details: cut a mouth in the bottom of the snout with the knife tool, poke eye sockets with the pointer tool, add ear canals with the ball tool. Set the totem aside while working on the fox head.

From 3/8 bar of Red, make a big teardrop for the Fox head that is flat on the bottom and domed on the top. Make Red triangle ears. Mix equal parts of White and Red to make a lighter color. From the lighter color, make two very flat pancakes for the cheeks and two flat triangles for the inside of the ears.

Poke a hole down through the head from top to bottom with the pointer tool. Remove the tool from the hole. Press the cheeks into place on either side of the hole and wrap them up from the bottom of the face.

Position the fox head onto the totem on top of the bear. Add the ears and the inner ears.

Poke eye sockets with the pointer tool and add Black clay balls for the eyes. Add a little Black nose.

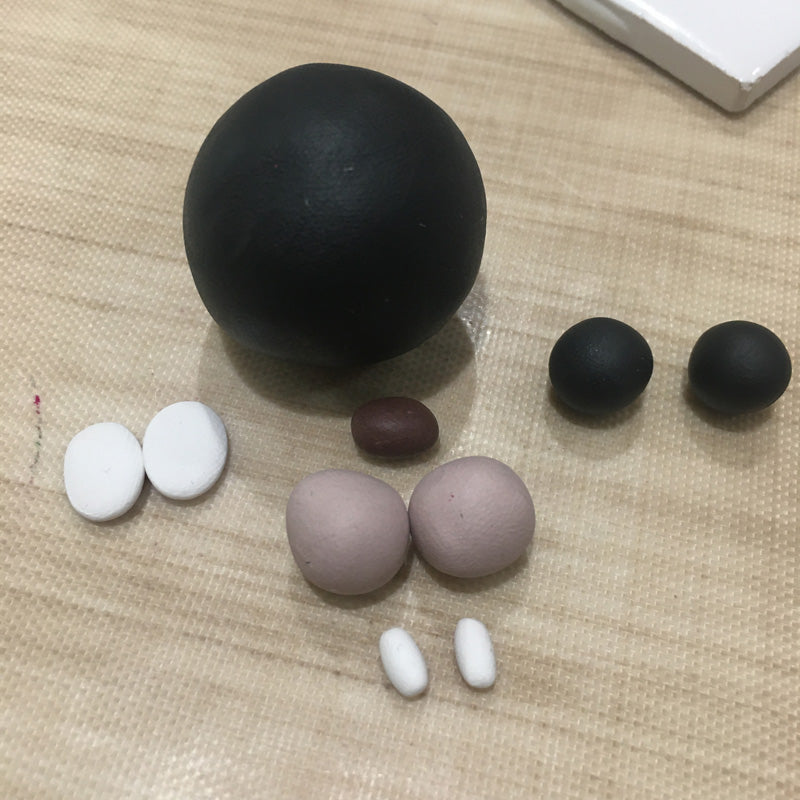
For the beaver, make a ball shape from 3/8 bar of Black. Make two little Black balls for ears, and a tiny Brown ball for the nose. Shape two flat White ovals for the eyes, and two tiny White ovals for teeth. Mix equal parts of Brown and White together to make light brown. Make two light brown balls for the muzzle.
Poke a hole all the way through the Black ball. Place it on the totem on top of the fox. First add the flat White ovals for the eyes and the little White teeth so they will end up behind the muzzle.

Add the light brown muzzle pieces in front of the eyes and the teeth. Add the Brown nose and make some little Black pupils. Save the ears for putting on later so they will be in front of the eagle

For the eagle make a ball from 1/4 bar of White. Mix 1/8 bar of White with 1/8 bar of Black. Shape the gray mixture into a little volcano shape for the Eagle's neck. Make a Yellow tapered teardrop for the beak.

Poke a hole all the way through the neck from top to bottom with the pointer tool. Cut little lines in around the thick base of the eagle's neck. Place the eagle neck on top of the beaver head.

Poke a hole just in the bottom of the White head of the eagle. Pinch the top of the gray eagle's neck. Put the pinched top of the neck into the hole in the bottom of the eagle head.

Push the Yellow beak onto the front of the eagle head and shape it with your fingers.

Poke shallow holes in the sides of the eagle's head with the ball tool. Set the totem aside for now while making the wings.

From 1/2 bar of Blue make two flat long triangles.

Lay a toothpick on each blue wing making sure the point on one end is exposed at least 1/4". Cover the toothpick with a Red stripe and flatten the stripe so it holds the toothpick in place.

Add flat triangles of Yellow to the wings.

Add Green dots to the wings. Add any details that you want to the wings. Bake the wings following the baking instructions described in Step 1.

When the wings are completely cool, push the toothpicks that stick out of the wings into the sides of the eagle's shoulders. Add eyes to the eagle's face. Cut a smile in the eagle's beak. Prick little whisker marks in the beaver's muzzle. Add the beaver's ears to the sides of his head and overlapping the bottom of the eagle. Bake the totem pole following the baking instructions in Step 1 and allow to cool completely before handling.
