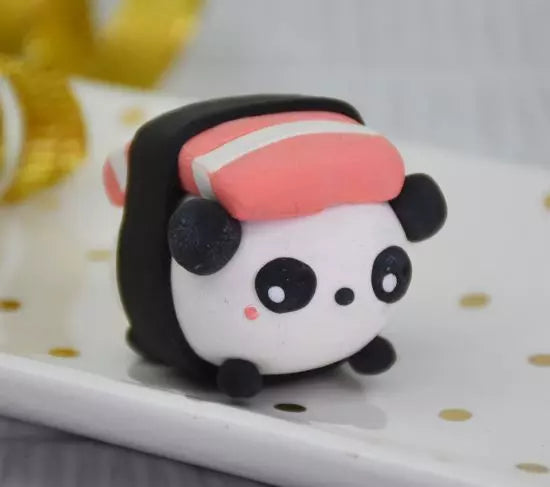

Sculpey Bake Shop® Cute Sushi Panda Figurine
Sculpey Bake Shop® Cute Sushi Panda Figurine
Designed by Lynniepopsicle
Read More
Read Less
This cute panda is inspired by the kawaii Japanese culture - anything tiny and sweet. You can turn it into a charm by inserting an eye pin before baking, and attach it to bags, necklaces, phones etc… Or just keep it as a cute little figurine. TIME TO COMPLETION: 20 minutes to make and 30 minutes to bake
ADDITIONAL SUPPLIES
This cute panda is inspired by the kawaii Japanese culture - anything tiny and sweet. You can turn it into a charm by inserting an eye pin before baking, and attach it to bags, necklaces, phones etc… Or just keep it as a cute little figurine. TIME TO COMPLETION: 20 minutes to make and 30 minutes to bake

Project Instructions
Step 1
Getting Started with Sculpey Bake Shop® clays:• Bake at 275 °F (121 °C), 15 minutes per 1/4 inch (6 mm) thickness.
• DO NOT MICROWAVE.
• DO NOT EXCEED THE ABOVE TEMPERATURE OR RECOMMENDED BAKING TIME.
Please make sure your work area is covered and you are not working on an unprotected surface. We recommend working on the Sculpey Tools™ Oven-Safe Work Mat, wax paper, metal baking sheet, or disposable foil. Uncured clay may damage unprotected furniture or finished surfaces. Be sure to cover your crafting area appropriately.
Step 2
Condition a 2-inch ball of white clay by rolling it for a few minutes between your hands until it becomes soft then form a ball. Flatten the ball with the palm of your hand to make an oval shape.
Step 3
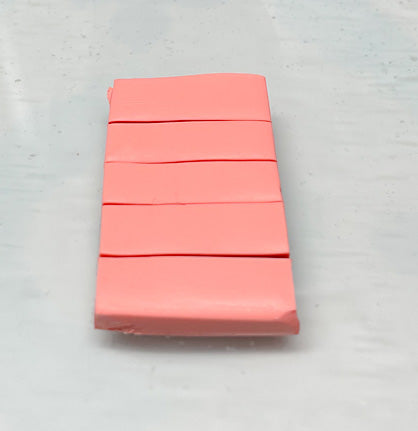
Mix a 1 inch ball of tan clay with a 1/4-inch ball of pink clay and flatten it out using the roller.Form a 1.5-inch by 1 inch rectangle and divide into 5 strips.
Step 4
Form a 1.5 inch by 1 inch rectangle of White clay and divide into 4 strips.
Step 5
Alternate pink and white strips to form the faux salmon sushi slice.
Step 6
Roll four 1/4-inch balls of black clay for the legs and arms. Attach them to the body, press them on to make them stick.
Step 7
Roll a 1/4-inch ball of black clay, flatten it and cut in half to create two ears. Place them onto the head, press them down to make them stick.
Step 8
Condition two small balls (1/8-inch) of black clay, flatten them and place them on either side of the face to create the eyes.Add two tiny balls of white clay in the center of the eyes to create the panda’s expression. Place them more towards the center for a goofy look, or to one side if you want your panda to look sideways.
Condition a small ball of black clay and place on the face between the eyes to create the mouth.

Step 9
9. Condition a small amount of pink clay, make two tiny balls for the cheeks (about 1/16-inch) and apply them either side of the face – press them down to make them stick.
Step 10
Condition a 1/2-inch ball of black clay and roll it out to make it flat and as thin as you can – use an acrylic roller.Cut a 1/4-inch wide strip, square off the ends and place around the body to secure the salmon piece in place.
Bake as directed in step 1 above.
