

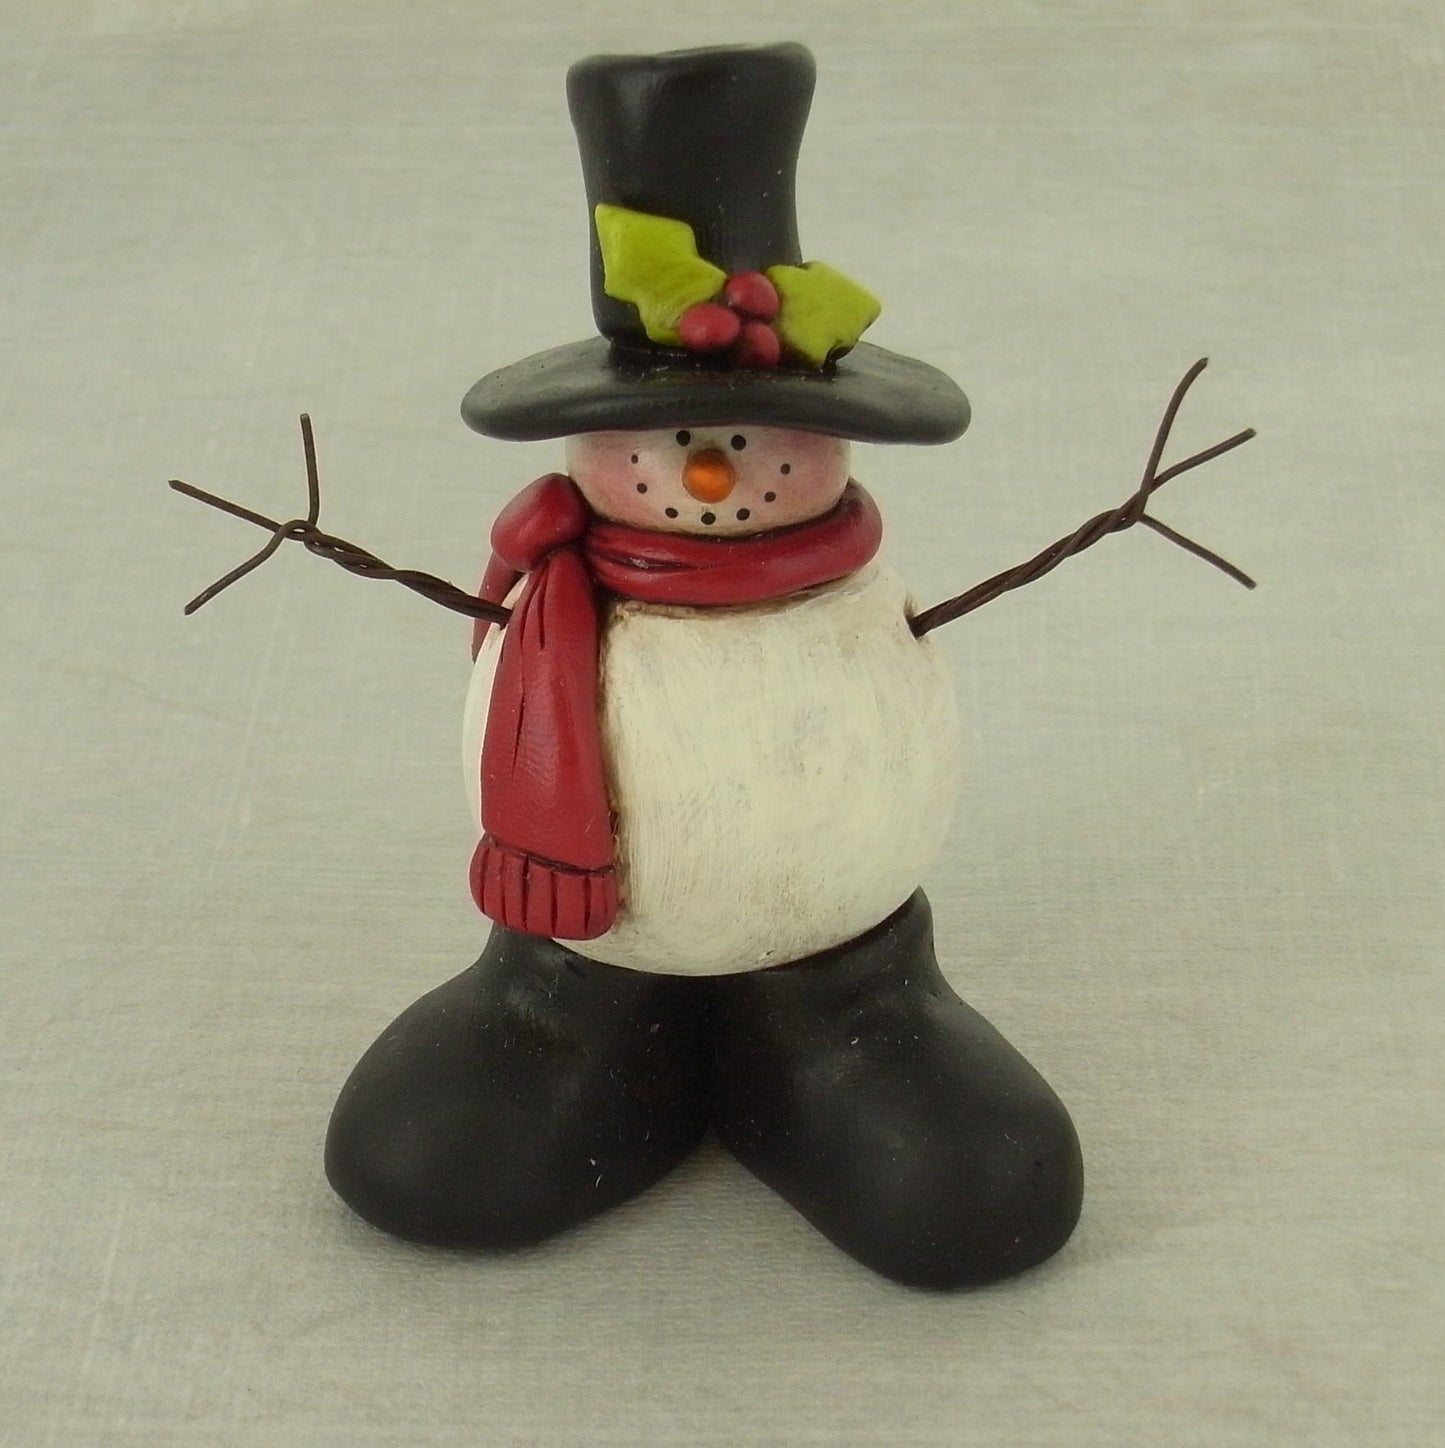
Sculpey® III Happy Boots Snowman
Sculpey® III Happy Boots Snowman
Read More
Add this adorable smiling snowman to any spot in your home
Read Less
ADDITIONAL SUPPLIES
Add this adorable smiling snowman to any spot in your home
Project Instructions
Your workspace:
Please make sure your work area is covered and you are not working on an unprotected surface. We recommend working on the Sculpey® Work ‘n Bake Clay Mat, wax paper, metal baking sheet, or disposable foil. Uncured clay may damage unprotected furniture or finished surfaces. Be sure to cover your crafting area appropriately.
Getting Started:
Start with clean hands, unwrap and knead clay until soft and smooth, or condition by running clay though a Pasta Machine. We recommend using a designated machine for clay purposes only. When working with multiple colors, clean hands with soap and water or baby wipes (we have found that baby wipes work best) before switching colors. Shape clay, pressing pieces firmly together. Wash hands after use.
Baking:
Begin by preheating oven to 275 °F (130 °C). After you are done creating; for best results bake clay on an oven-proof surface such metal, aluminum foil, an index card or the Sculpey® Clay Mat at 275°F (130 °C) for 15 minutes per1/4" (6 mm) thickness according to package directions. Oven safe glass or ceramic surfaces are also acceptable for baking; however please note that the baking times may take longer as the glass or ceramic surfaces take longer to heat up. For best baking results, use an oven thermometer. DO NOT USE MICROWAVE OVEN. DO NOT EXCEED THE ABOVE TEMPERATURE OR RECOMMENDED BAKING TIME.
Cut 3 pieces of thin rusty wire 4" long. Twist all 3 pieces of wire together and cut in half. At each end of the wires, spread the 3 wires out like fingers. Cut another piece of wire 1/4" long for the snowman's nose.

Condition White clay into a 1/2" ball (body) and a 1 1/2” ball (head). Set aside.

With Black clay make a 1" round x 1/8" thick flattened circle for the hat brim. Make a cylinder for the top of the hat 3/4" high x 1/2" around, making it smaller on the bottom. Make boots, use thumb and index finger to make boot tops.

Make 2 small holly leaves out of the Wasabi clay. Make a carrot with the Orange clay about 1/4" long. Using the Red clay, make the scarf and 3 small berries.

Cut 2 pieces of wire 1" long. Insert each piece of wire into each boot.

Push large White ball onto boots. Cut a piece of wire 1 1/4” long and insert into top of large white ball, leaving about half of the wire sticking out.

Push small White ball onto wire. Cut a piece of small rusty wire 1/4" long. Insert small wire where carrot nose will go. Push Orange carrot nose onto the wire.

Place scarf on snowman's neck. With the needle end pointer tool add some detail lines to scarf and carrot nose.

Push flattened Black circle onto wire.

Push top part of hat on. Add holly leaves and berries. Insert wire arms on each side of snowman. Make sure the brim of the hat is turned up a bit so you can see snowman's face. Bake as directed above in Step 1.

Once the snowman has cooled, cover snowman with wood sheen, being careful to get into all crevices.

Wipe excess wood sheen off with a paper towel and cotton swabs.

Add blush to the cheeks of the snowman using a paint brush and spray with the Krylon matte finish spray.

Using stylus dot eyes and mouth with Black paint. Allow to dry. Spray face with Krylon matte finish spray.