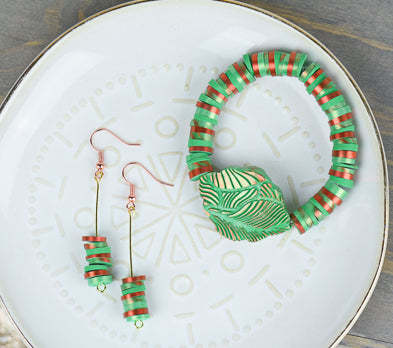
Sculpey Soufflé™ Gleaming Heishi Bracelet
Sculpey Soufflé™ Gleaming Heishi Bracelet
Designed by syndee holt
Read More
Sculpey Soufflé™ Shamrock teams up with Jacquard Pearl Ex to create this gleaming heishi bracelet in an hour!
TIME TO COMPLETION: 30 minutes to create and assemble 30 minutes to bake
DESIGNER NOTE: You can add a pea-sized portion of Soufflé™ Cowboy to tone down the exhuberance of the Shamrock color like I show in the tutorial, but Shamrock on it's own would be quite lovely.
Read Less
DESIGNER NOTE: You can add a pea-sized portion of Soufflé™ Cowboy to tone down the exhuberance of the Shamrock color like I show in the tutorial, but Shamrock on it's own would be quite lovely.
ADDITIONAL SUPPLIES
- Jacquard Pearl Ex: Duo Green/Gold and Hot Copper
- 2 mm double pointed knitting needle or bamboo skewer (4)
- .8 mm beading elastic – about 20 inches in length
- Craft blade (like Exacto)
- Measuring tape
- Small brush for glaze
- Small spray bottle of water

Project Instructions
Getting Started with Sculpey Soufflé™ Clay:
Please make sure your work area is covered and you are not working on an unprotected surface. We recommend working on the Sculpey® Oven-Safe Work Mat, wax paper, metal baking sheet, or disposable foil. Uncured clay may damage unprotected furniture or finished surfaces. Be sure to cover your crafting area appropriately.
Start with clean hands, unwrap and knead clay until soft and smooth, or condition by running clay though a Pasta Machine. We recommend using a designated machine for clay purposes only. When working with multiple colors, clean hands with soap and water or baby wipes (we have found that baby wipes work best) before switching colors. Shape clay, pressing pieces firmly together. Wash hands after use. Baking: Begin by preheating oven to 275 °F (130 °C). After you are done creating; for best results bake clay on an oven-proof surface such metal, aluminum foil, an index card or the Sculpey® Clay Mat at 275°F (130 °C) for 30 minutes per 1/4" (6 mm) thickness according to package directions. Oven safe glass or ceramic surfaces are also acceptable for baking; however please note that the baking times may take longer as the glass or ceramic surfaces take longer to heat up. For best baking results, use an oven thermometer. DO NOT USE MICROWAVE OVEN. DO NOT EXCEED THE ABOVE TEMPERATURE OR RECOMMENDED BAKING TIME.
Start with clean hands, unwrap and knead clay until soft and smooth, or condition by running clay though a Pasta Machine. We recommend using a designated machine for clay purposes only. When working with multiple colors, clean hands with soap and water or baby wipes (we have found that baby wipes work best) before switching colors. Shape clay, pressing pieces firmly together. Wash hands after use. Baking: Begin by preheating oven to 275 °F (130 °C). After you are done creating; for best results bake clay on an oven-proof surface such metal, aluminum foil, an index card or the Sculpey® Clay Mat at 275°F (130 °C) for 30 minutes per 1/4" (6 mm) thickness according to package directions. Oven safe glass or ceramic surfaces are also acceptable for baking; however please note that the baking times may take longer as the glass or ceramic surfaces take longer to heat up. For best baking results, use an oven thermometer. DO NOT USE MICROWAVE OVEN. DO NOT EXCEED THE ABOVE TEMPERATURE OR RECOMMENDED BAKING TIME.
I mixed a tiny bit of Soufflé™ Cowboy into my 1-inch ball of Shamrock just to take the color exuberance down just a little notch.
You can slight difference between the clay still in the block and the mixture.


Flatten this sheet of clay out with either a Sculpey Clay Conditioning Machine (set on second from widest) or with an acrylic roller. Divide the sheet of clay in half.
Lightly spray the selected texture with water and press firmly into one of the small sheets of clay. I recommend sliding or rolling a water glass over the texture to help embed it.
Remove the texture sheet to reveal the texture!
Lightly spray the selected texture with water and press firmly into one of the small sheets of clay. I recommend sliding or rolling a water glass over the texture to help embed it.
Remove the texture sheet to reveal the texture!


Carefully slide your clay blade underneath the sheet of clay to remove it from the worksurface and set aside for now.

Using the other half of the clay sheet, firmly press the double pointed knitting needle (or bamboo skewer) into the clay and remove the needle. This will create the channel for our elastic to feed through.

Place your textured sheet of clay onto top of the channeled sheet, carefully line up the template pattern with the channel holes. I also use a piece of paper to ensure that I’m lined up with the channels on both sides.

Use the craft blade to trim around the shape. I keep a loose grip on the blade and let the template guide the knife instead of me trying to “drive” it.

Gently use the needle tool to reopen the channel at the edges.

Open both jars of Pearl Ex and touch your finger to the lid and gently wipe it on the top part of the texture pattern. I like to start with one color and touch it into different areas and then fill in with the second color.

Use a small soft brush or cotton swab to wipe Pearl Ex on the edge of the pattern. Set aside.

Roll a small ball of clay about 1/2 diameter and string onto the needle or bamboo skewer.

Use your hand to roll the ball back and forth to start spreading the clay along the skewer. You can use both hands as well. The aim is to roll the clay out along the skewer to create a diameter about 1/4 inch in diameter.

Trim the ends off to create about 2 inch lengths. Leave the clay on the skewer!

Repeat steps 11 and 12 twice more but this time rub a color of the Pearl Ex along the length on the skewer. You can build the color up as you go and gently rub it into the texture of the Souffle. Here is my plain green skewer, my Green/Gold skewer and my Hot Copper skewer. Set the skewers so that they don’t touch on the baking tray with the stamped focal piece. NOTE: My clay lengths are all longer than 2 inches, but yours should be about 1.5 to 2 inches in length)

Create one more skewer of clay and this time rub stripes of the Pearl Ex colors down the length of the clay tube. (Mine is longer than 2 inches). Some of the green from the clay can show as well.

Now, grasp each end of the clay on the skewer and gently twist in opposite directions to twist the colors. You can gently roll the clay on the skewer if it becomes a little uneven. Repeat the twisting until you have really nice spirals of color.
Bake the clay skewers and focal beads according to the directions in Step 1 above.
Bake the clay skewers and focal beads according to the directions in Step 1 above.

Once the clay has baked and cooled to warm, use a pair of small pliers to hold the end of the skewer and gently twist the clay. You will feel/hear a small pop and the clay will slide right off the skewer.
NOTE: If you are using bamboo skewers, you will need to remove the clay from the bamboo as soon as you remove it from the oven. Use a hot pad to protect your hand!
Use your selected varnish or glaze to glaze and seal the tubes that have the Pearl Ex on them. Allow the glaze to dry. If you are using the metal skewers, just leave the clay on the skewer while glazing and poke it into a piece of Styrofoam to allow the tubes to dry.

Position one of the lengths of clay as shown and start cutting your heishi. Heishi do NOT have to be the same thickness – in fact, it looks better when they aren’t! They don’t all have to be evenly cut either. (My kind of project!)
Repeat with the other lengths, keeps the heishi in separate stacks.
Repeat with the other lengths, keeps the heishi in separate stacks.

I have measured my wrist and I know that it is about 7 inches in diameter, so use the tape measure to roughly measure your wrist as well!
Place the focal bead onto a roughly 20-inch piece of the elastic and then start randomly stringing the heishi on either side of the focal bead..
Place the focal bead onto a roughly 20-inch piece of the elastic and then start randomly stringing the heishi on either side of the focal bead..

Measure your bracelet to get a good length for your wrist with fairly even amounts of heishi on both sides.

Tie a loose double knot and carefully slide the bracelet onto your wrist to check for a comfortable fit. Adjust the number of heishi if needed and retie the double knot. Tighten the knot and then really pull it tight. Trim the ends of the elastic to the edge of the heishi.

Here is a look at my finished bracelet! Look at how the Pearl Ex shines in each of these heishi. The wonderful Shamrock color is just such a happy color, I’m sure that you will smile every time you wear it!

Got leftover heishi? I store mine by color in old egg crates. You can also make yourself a cool pair of earrings by threading a couple of heishi onto an a 2 inch eye pin about halfway up the length of the pin. Use your pliers to make a loop at the top of the pin and add your ear wire. Repeat for the other earring. I DO try to match my color pattern in the heishi for earrings

- Choosing a selection results in a full page refresh.
- Opens in a new window.

