

Sculpey Premo™ Forest Green Textured Bead Bracelet
Sculpey Premo™ Forest Green Textured Bead Bracelet
Designed by syndee holt
Read More
Read Less
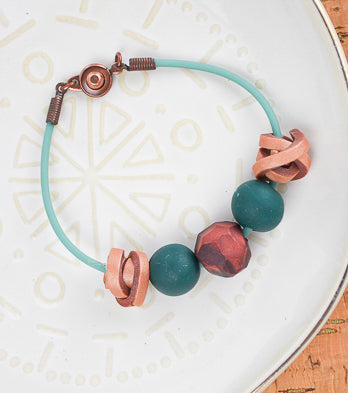
This simple little bracelet, featuring Sculpey Premo™ Forest Green and the Copper tones is loaded with textures and shapes!
TIME TO COMPLETION: 60 minutes
ADDITIONAL SUPPLIES
- Bamboo skewers (at least 2)
- 2 mm cording – about 10 inches
- Antique copper toned findings – clasp (mine is calls a snap clasp), 6 mm jump rings (2), pinch close cord ends
Project Instructions
- Getting Started:
Start with clean hands, unwrap and knead clay until soft and smooth, or condition by running clay though a Pasta Machine. We recommend using a designated machine for clay purposes only. When working with multiple colors, clean hands with soap and water or baby wipes (we have found that baby wipes work best) before switching colors. Shape clay, pressing pieces firmly together. Wash hands after use.
- Baking:
To create the Copper wrapped beads, sheet out a small piece of conditioned Copper on the 2nd from widest setting on the clay conditioning machine. The sheet should be 4 inches long. Use the Sculpey Clay Blade to cut strips of this clay about 1/8 inch wide. Cut at least two.


Gently wrap the lengths around the bamboo skewer, tumbling the strip around the skewer for more interest and texture. Set aside.

Create simple round beads by sheeting out a small piece of the Premo Forest Green on the second from widest setting. Use the 1.5” cutter to cut out two circles of clay. Gently roll each circle in the palms of your CUPPED hands to create a round ball. Set the finished beads aside to rest and cool before gently twisting onto a bamboo skewer. I prefer to use the needle tool from the Sculpey Clay Tool Starter set to make the first hole through the bead (twist don’t push), then I gently twist the bead onto the skewer using my “pilot hole” I just created with the needle tool.

Repeat step 4 with a small sheet of conditioned Premo Bronze clay, except this time we are going to cut facets into the clay. Use your Clay Blade to gently make small slices all around the bead. Don’t worry about making a pattern or making the slices uniform! Use the needle tool from the Sculpey Clay Tool Starter set (or your favorite needle tool!) to create the “pilot hole” before gently twisting the beads onto the skewer.
Bake all the beads as directed in Step 1 above. Once the beads have baked and cooled, twist the beads to help pop them off the bamboo skewer. If you can catch it, removing the beads when they are just warm makes it easier to remove them from the skewer.
Bake all the beads as directed in Step 1 above. Once the beads have baked and cooled, twist the beads to help pop them off the bamboo skewer. If you can catch it, removing the beads when they are just warm makes it easier to remove them from the skewer.

Assemble the bracelet as shown. I’ve got my snap clasp, jump rings and cord ends all ready to go. Make sure to measure and trim the bracelet around your wrist, adding space for the clasp.

I wanted to try to keep my beads all in the center of the bracelet, so I dug through my bead stash to find these small beads (actually crimp beads) that just fit snugly onto the cording. I dragged one of these beads on each end of the bracelet and pulled it into the wrapped bead on each end to help hold the beads in place.

Because this cord is firm and not soft like rat tail, I used my pliers to gently round the cord end around it instead of just smashing it closed. Repeat on the other end.
Attach your clasp pieces with the jump rings and you are ready to wear your new bracelet!
Attach your clasp pieces with the jump rings and you are ready to wear your new bracelet!


- Choosing a selection results in a full page refresh.
- Opens in a new window.