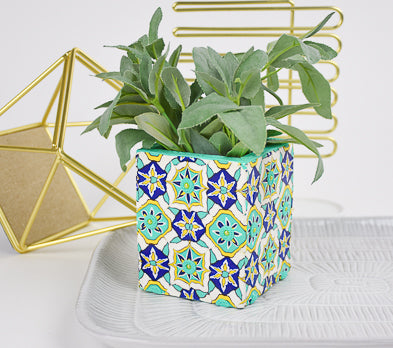

Sculpey Soufflé™ Fiji Tiled Planter
Sculpey Soufflé™ Fiji Tiled Planter
Designed by Cindi McGee
Read More
This colorful planter, created in gorgeous Mediterranean-inspired colors, is created using a classic caning technique with step-by-step instructions to transform a plain wooden planter into a work of tiled art!
The measurements of clay may vary dependent upon your desired size of the finished cane.
This cane was inspired by a Spanish tile, so you will note I refer to my inspiration photo in the instructions.
Time to create cane and cover planter – Approximately 3 hours. Baking Time – 1 hour, twice. Additional 15 minutes for Liquid Sculpey®.
Read Less
The measurements of clay may vary dependent upon your desired size of the finished cane.
This cane was inspired by a Spanish tile, so you will note I refer to my inspiration photo in the instructions.
Time to create cane and cover planter – Approximately 3 hours. Baking Time – 1 hour, twice. Additional 15 minutes for Liquid Sculpey®.
ADDITIONAL SUPPLIES
- Yellow ceramic hot fix cabochons
- Wooden planter
- Pasta machine
- Large round cutter (mine was 3” diameter)
- Heat tool
- Paintbrushes
- Acrylic paint in desired color – I used Sea Breeze
- Parchment paper

Project Instructions
- Getting Started:
Start with clean hands, unwrap and knead clay until soft and smooth, or condition by running clay though a Pasta Machine. We recommend using a designated machine for clay purposes only. When working with multiple colors, clean hands with soap and water or baby wipes (we have found that baby wipes work best) before switching colors. Shape clay, pressing pieces firmly together. Wash hands after use.
- Baking:
Using Fiji Soufflé clay, make a round cylinder/plug about 1/2” in diameter and 1” long. Make a petal shaped cane approximately the same width and about 2” long.

Using the Canary Soufflé clay, make a petal shaped cane about 1/2” wide and about 3” long.

Roll Burnt Umber clay to setting #3 on the pasta machine.
Wrap the petal shaped Fiji cane, the plug, and the Canary petal shaped cane in brown clay.
Wrap the petal shaped Fiji cane, the plug, and the Canary petal shaped cane in brown clay.

Cut the Fiji plug in half lengthwise. Cut 3 pieces of the Canary cane the same thickness as the plug. To determine placement, place the 3 yellow petals around the curve of the Fiji plug.

Roll a thick piece (about a setting #1 on pasta machine) of White clay. Cut a piece to wrap each of the Canary petals. Use your clay blade to slice off the base to make a straight edge.

On each of the 3 Canary petals, use a paintbrush handle, or tool of choice, to make an indentation on either side near the tip of the petal.

Place the 3 petals back against the curved side of the Fiji plug.

In a curved direction, pack around the petals tightly with Ultramarine Blue clay.

Use a large round cutter to carefully slice through the Ultramarine packing and create a smooth, rounded edge.

Roll more Burnt Umber clay to setting #6 on the pasta machine. Cut a strip and wrap the outer edge around the blue clay. Trim away any excess as needed.

Cut two petals from the Fiji cane. Determine placement as desired. My placement is based upon the original Spanish tile which inspired the cane.

Roll Canary clay to about 1/8” thick. Cut strips long enough to make curved details as shown in the photo.

Roll Burnt Umber clay to setting #6 on the pasta machine, and place a strip on one side of each of the 3 Canary strips. Place the longest strip (same with as the base of the cane) curving upward between the two Fiji petals. I used the same large round cutter to be sure it was evenly curved. Begin packing around the petals with White clay.

Continue packing and add two quarter circle Canary strips as shown.

Make a petal cane the same size with Ultramarine Blue clay.
Wrap it with Burnt Umber rolled to setting #6 on the clay machine, then with White clay about 1/8” thick. You will need at least 4. I made 5 to allow for error.
Wrap it with Burnt Umber rolled to setting #6 on the clay machine, then with White clay about 1/8” thick. You will need at least 4. I made 5 to allow for error.

Next, we will continue building the cane to the point.
Add another strip of Burnt Umber against the Canary half circle of clay. Then add a half circle strip of Fiji about 1/8” thick. Using your inspiration photo as a guide, determine placement for one of the Ultramarine Blue petals centered, then slice one petal in half lengthwise and place it on opposite sides of the solid petal. Add Fiji clay to pack around the petals.
Add another strip of Burnt Umber against the Canary half circle of clay. Then add a half circle strip of Fiji about 1/8” thick. Using your inspiration photo as a guide, determine placement for one of the Ultramarine Blue petals centered, then slice one petal in half lengthwise and place it on opposite sides of the solid petal. Add Fiji clay to pack around the petals.

Use a small round cutter to cut out where the 3 petals meet to make space for a plug.

Create a Canary plug about 1/2” in diameter and wrap it with Burnt Umber. Insert it into the space made with the round cutter. Use the clay blade to cut away the extending portion of the Canary plug.

We will create the corners on the wide edge of the cane next. Add the Burnt Umber sheet to the edge of the Canary strip. Cut two of the Ultramarine Blue petals in half lengthwise. Arrange them as shown. Pack the space between them with Fiji clay. Use the small round cutter to cut a curve where the petals meet. Then cut the excess Canary plug you cut from the top point into quarter sections and insert in the curved space.
When everything was in place, I used my clay blade to trim the cane as needed to create the triangle as shown.
Let the cane rest. Carefully reduce the cane to the desired sizes.
When everything was in place, I used my clay blade to trim the cane as needed to create the triangle as shown.
Let the cane rest. Carefully reduce the cane to the desired sizes.

Covering the Planter
Working one side at a time, apply Bake & Bond to the surface. Use the clay blade to slice even slices from your cane. Begin in the center of the surface you are covering. Place two slices with the wide sides together to create a diamond shape with a full flower in the center. Then continuing adding slices of the cane in the same fashion, matching the elements as closely as you can, to cover the surface. When one side is covered, lay onto a flat surface and use blade to trim away extending pieces.
Repeat on remaining sides until planter is covered. Place a piece of parchment over each side and smooth with a clay roller and your hands to join seems. Be careful and work slowly to try to reduce distortion.
Bake according to manufacturer instructions and let cool.

To make dimensional embellishments to place in yellow centers of flowers, roll a sheet of Fiji clay to setting #2 on clay machine. Press into desired texture on texture sheet.

Use small round circle cutter to cut circles from textured clay. Add a flat backed hot fix cabochon to centers of circles. Then apply Bake & Bond to where needed and add them to the centers of the flowers.

Roll Fiji clay to setting #3 on the pasta machine. Cut strips of clay the same width and length of the top edges of your planter. Add Bake & Bond and place strips around top edge. I cut my corners at a diagonal so the seams would be cleaner. Use your fingers to gently smooth the seams together.

Use desired texture from texture sheet to impress clay strips. Bake according to manufacturer instructions and let cool.
Bake again according to manufacturer instructions and let cool.
Bake again according to manufacturer instructions and let cool.

Apply a thin coat of Clear Liquid Sculpey® over the surface of the planter. I did not cover the dimensional embellishments. Bake according to manufacturer instructions. When you remove it from the oven, quickly apply heat with a heat tool to add shine to the liquid clay giving a “glazed tile” effect.

To paint the inside and base of the planter, I created a wash effect by mixing Sea Breeze green paint with water. I like to create a wash rather than paint it opaque because I like the effect of the wood grain showing through.

- Choosing a selection results in a full page refresh.
- Opens in a new window.