

Sculpey Soufflé™ Faux Feather Wall Hanging
Sculpey Soufflé™ Faux Feather Wall Hanging
Designed by syndee holt
Read More
Read Less
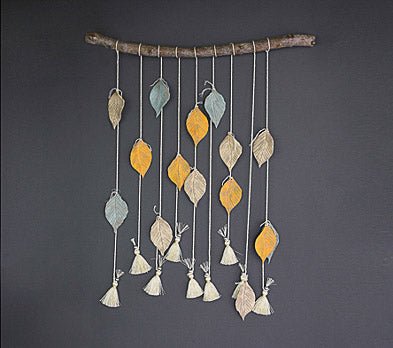
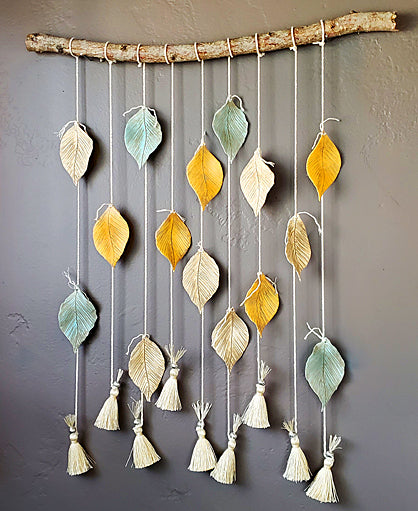
This dynamic wall piece is so fun and easy to make! You know you have been hanging onto the ball of string for something! Here it is!
TIME TO COMPLETE: 90 minutes including construction
ADDITIONAL SUPPLIES
- Stick about 16-20 inches long
- Mailing twine or equivalent
- Tassels for the end (NOTE: Mine are cut from a yard length of tassels from the upholstery section of the yardage store!)
- Kemper Scratch Wire Brush
- Grey or “Greige” acrylic paint and brush
- Clear instant glue
- Plain paper or index card to draw the feather design on
- Craft knife like Exacto
Project Instructions
- Getting Started:
Start with clean hands, unwrap and knead clay until soft and smooth, or condition by running clay though a Pasta Machine. We recommend using a designated machine for clay purposes only. When working with multiple colors, clean hands with soap and water or baby wipes (we have found that baby wipes work best) before switching colors. Shape clay, pressing pieces firmly together. Wash hands after use.
- Baking:
Sheet out the conditioned Ochre on the #3 (middle) setting. Use your template to cut out the shape. NOTE: I just drew the shape on an index card and cut it out. Repeat to make about 6 of the Ivory color.

Use the pointed tool from the Clay Tool Starter Set to draw the center vein in the feathers.

I used my finger to slightly flatten and smooth the cut lines around the edge. Souffle does not fingerprint very easily so we can just do this with our fingertip!

Use the Wire Scratch Brush to draw in the detail of the feather. This also does not have to be perfect neat!

Poke a hole in the top of each of the completed feathers.

Drape the feathers BETWEEN the bumps on the Hollow Bead Maker (HBM). I can usually get about 3 feathers on each HBM.

While the first set of feathers is baking, we can mix the color for the blue feathers by mixing 2 parts Ivory to 1 Part Sea Glass. I usually use a cutter to help me measure the parts more accurately. The shape of the cutter does not matter as long as you use it for BOTH colors. You can even leave the color a little marbled looking if you wish!

While the second set of feathers is baking, we can antique the first set (after they are cooled) to bring out the detail. I just brush the light grey color onto the feather and then quickly whip with a paper towel to remove it from the top surfaces and to highlight the details.

I knotted my strings to the top back of my stick and added a drop of glue to keep them in place. The strings should be about 24 inches long each. Then I laid out my feathers to see where I wanted to place them all.

My feathers are tied to the string with small pieces of the twine I used. NOTE: I separated the twine strands and used only one strand to tie them on.

I trimmed the ends of my strands to random lengths and also tied my tassel to the strand in a similar fashion to the feathers. A small dot of glue will hold that knot to the strand.

- Choosing a selection results in a full page refresh.
- Opens in a new window.