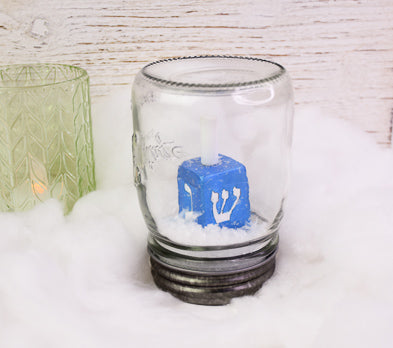

Sculpey Air-Dry™ Dreidel Snow Globe
Sculpey Air-Dry™ Dreidel Snow Globe
Designed by Gretchen Amberg
Read More
Read Less
Create a one-of-a-kind snow globe for your holiday display or as a cherished gift.
Working Time: 75-minutes plus drying time
ADDITIONAL SUPPLIES
- Plastic Wrap
- Fine Tip Paint Brush
- Small Flat Paint Brush
- Acrylic Craft Paints – white, and metallic blue
- Pint Mason Jar
- 20-gage wire
- Pin-Drill Set
- Small jewelry Wire Cutters
- Sandpaper – Coarse and fine grits (220 – 60)
- 2-part Epoxy
- Fake Snow/Glitter
- Printed copies of clip art of the characters used on a dreidel – sized to approximately 3/4” square.

Project Instructions
- Getting Started:
Start with clean hands, unwrap and knead clay until soft and smooth, or condition by running clay though a Pasta Machine. We recommend using a designated machine for clay purposes only. When working with multiple colors, clean hands with soap and water or baby wipes (we have found that baby wipes work best) before switching colors. Shape clay, pressing pieces firmly together. Wash hands after use.
- Baking:
Open the package and remove ¼ of the clay. Tightly wrap the left-over clay into the packaging or plastic wrap to keep it from drying.
Roll a ball of clay which is approximately 1-3/4” in diameter. Press the ball into the inside of the lid from the jar. Use your fingers to press the ball to approximately 1/2” thick. Smooth the edges down and out against the lid while still leaving the middle of the piece of clay taller: do not fill the entire space of the lid. Use your fingertip to make a small indentation in the center top of the piece of clay. Set this to the side to dry.
Roll a ball of clay which is approximately 1-3/4” in diameter. Press the ball into the inside of the lid from the jar. Use your fingers to press the ball to approximately 1/2” thick. Smooth the edges down and out against the lid while still leaving the middle of the piece of clay taller: do not fill the entire space of the lid. Use your fingertip to make a small indentation in the center top of the piece of clay. Set this to the side to dry.

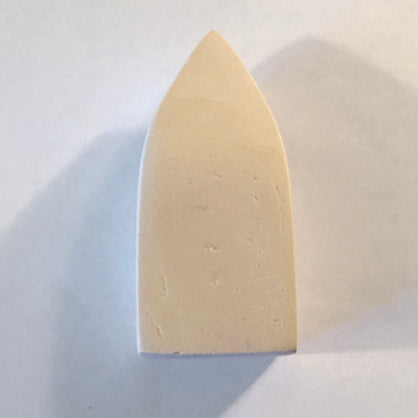
Roll a small piece of clay into a 1/4” log and trim to a little over 1” in length. Set the piece to the side to dry.

Take the remaining clay from the package and combine with the leftover clay from the previous steps. Form a square bar that is 1-1/4” square by 3” long. Use the blade to mark a line on each side that is 1-1/4” from one end.

Pick up the Super Slicer blade. Place the blade along one edge about 1/4” away from the line you marked in the previous step and cut across the bar at a 45-degree angle. Move the blade to the other side of the bar and repeat the process of cutting a 45-degree angle from the other side. The result should be a pointed end.

Rotate the bar one quarter turn and repeat the process of cutting the 45-degree angles. Set the piece to the side to dry. The result should be a square bar with a 4-sided pointed end. Set the piece to the side to dry. Wrap any leftover clay into the plastic wrap, make sure it is tightly wrapped and airtight. Note: Wait for all pieces to be completely dry. Due to the size the piece that is the dreidel body may take extra time to dry.


Remove the piece of clay created in Step 2 above from the lid. Prep a small amount of the 2-part epoxy and glue the clay piece back onto the lid.
Note: This step involves sanding, the sanding needs to be done dry, do not wet the sandpaper.
Use the fine grit (60) sandpaper to sand the 1” log of clay so the outside is smooth and the ends are flat. Set the piece to the side.
Next, begin sanding the flat sides into a subtle curve that reaches the pointed end of the dreidel. The goal is to soften the angles from where the cuts were made to create the pointed end. After you have the shape created use the finer grits of sandpaper to refine the surface and make it smooth.

Use the edge of the super slicer and a pencil to mark lines on the top of the dreidel. Draw a line from one corner to the other and repeat with the remaining corners. The result will be an “X” and the area where the lines intersect is the middle of the top.
Note: In this step will involve drilling the clay. Before drilling, pick a bit size that matches the wire diameter. Use the pin drill to drill a hole in the middle of the top of the dreidel and into the center of one end of the log. Drill 1/4” deep into the dreidel and log.
Note: In this step will involve drilling the clay. Before drilling, pick a bit size that matches the wire diameter. Use the pin drill to drill a hole in the middle of the top of the dreidel and into the center of one end of the log. Drill 1/4” deep into the dreidel and log.

Trim the clip art letters to fit onto the sides of the dreidel. Pick up one piece of paper at a time and use the clear craft glue to attach the clip art pieces to the dreidel. When attaching make sure there are no air bubbles and use the paint brush to add a thin layer of glue on top of the paper around the outer edge; this bit of glue will help tack the edges into place. Let the glue dry completely before moving to the next step.

Use the small flat paintbrush to add blue metallic paint onto the sides, around the outside border of the letters on the dreidel, and the top. To achieve solid coverage, you may need to paint an additional 1-2 coats of paint. Let the paint dry completely before moving to the next step.

Use the small point paintbrush to paint in the lettering white. Be sure to paint as close to, or over the black outline as possible. The goal is to have a nice clean image of the letters. Also paint the log piece (which will be the stem). Set the pieces to the side and let dry completely before moving to the next step.

Cut a 1/2” length of 20-gauge craft wire.
Prepare another batch of the 2-part epoxy. A dime-size amount of epoxy will be enough to cover the remaining steps.
Add a small amount of epoxy to one end of the 1/2” piece of wire. Insert the end of wire into the end of the white peg.
Prepare another batch of the 2-part epoxy. A dime-size amount of epoxy will be enough to cover the remaining steps.
Add a small amount of epoxy to one end of the 1/2” piece of wire. Insert the end of wire into the end of the white peg.

Add epoxy to the other end of the wire and insert into the hole in the top of the dreidel body. Press the stem firmly against the top of the dreidel and hold a couple of minutes so the epoxy can start to set.

Fill the small indentation in the clay in the lid with epoxy. Place the pointed tip of the dreidel into the well of epoxy.

Lay long strips of narrow masking tape across the top of the dreidel. The tape should be added along the edge of each side and the ends taped down to the work surface. Before letting go of the dreidel, make sure the dreidel stable enough to stay upright on its own. Once you know the dreidel will stay upright release your grip and let the epoxy fully cure.

Once the epoxy is completely cured, remove the tape, add your fake snow to the jar, turn lid over, screw the lid into place and flip the jar over so it is standing on the lid with the snow around the base of the dreidel.
