

Premo Sculpey® and Liquid Sculpey® Greige Granite Mosaic Tiles Frame
Premo Sculpey® and Liquid Sculpey® Greige Granite Mosaic Tiles Frame
Read More
Read Less
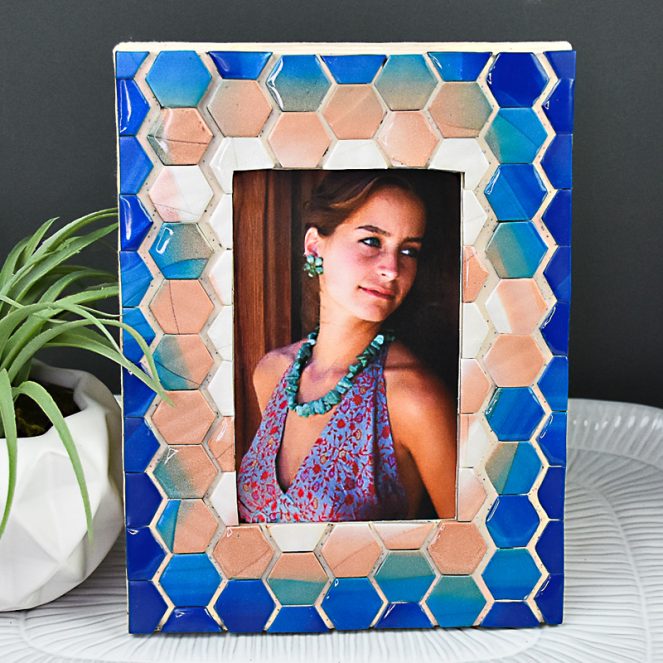
Premo Sculpey® and Liquid Sculpey® Greige Granite team up to help create this stunning frame that will fit in just about any decor scheme.
TIME TO COMPLETION:3 Hours to make and bake
ADDITIONAL SUPPLIES
• Paper mache or wood frame with 4 x 6 opening
• Paper towel
• Copier paper or other plain scrap paper
• Heat gun
Project Instructions
- Getting Started:
Start with clean hands, unwrap and knead clay until soft and smooth, or condition by running clay though a Pasta Machine. We recommend using a designated machine for clay purposes only. When working with multiple colors, clean hands with soap and water or baby wipes (we have found that baby wipes work best) before switching colors. Shape clay, pressing pieces firmly together. Wash hands after use.
- Clay Baking:
- Liquid Sculpey Baking:
Open the Greige Granite Liquid Sculpey® (LS) by removing the cap. Stir the LS completely with the knife tool. Clean the tool with paper towel. Replace the cap on the LS. Squirt some Greige Granite LS all over the front surface of the frame.

Spread the LS in an even layer over the surface of the frame with the knife tool. Add more LS as needed to make sure all of the front is covered. Set the frame aside for now. The LS will soak in a bit if the frame you are using is wood or paper mache. This will create a nice adhesive between the frame and the Premo.

Sheet 1/2 block of each of the Premo colors through the pasta machine on the thickest setting. The desired shape of each color is a long rectangle that when placed side by side are approximately the same width as the rollers on the pasta machine.

Lay the colors slightly overlapping each other.

Use the Acrylic Clay Roller to roll over the four sheets and make sure they are connecting to each other at the overlapping edges.

Sheet the four colors together through the pasta machine pressing the colors through with the stripes perpendicular to the rollers. Fold the sheet in half matching like color to like color.

Press the folded sheet fold first through the pasta machine on the thickest setting. Fold and press the sheet through the pasta machine until the sheet is blended to the desired amount. This is also a good time to check that you have enough clay to cover your frame. If your sheet of clay is approximately the same size as your frame, there will be enough to complete the project.

Flip the blended sheet over to see the blending pattern on the back side. Choose which side you prefer and place it face side up on the work surface. I prefer the side of the clay that has more streaks and lines in it. The small hexagon shapes are small enough that the streaks and lines will make a nice random pattern in the little shapes.

Cut out as many small hexagon shapes as you can with the cutter. Press the cutter down evenly with both hands cutting all the way through to the work surface so you have nice clean cuts.

Lift the cutter up carefully. If the cut pieces stayed in the cutter when lifted, carefully press them out with your fingertip and place them on a piece of paper so they are easy to move. Line up the cutter again as closely as possible to the previous cuts and cut another section of small hexagons. At the top and the bottom of the clay, I stepped the cutter to cut out even more pieces even though some of them are not full shapes. These partial pieces will come in handy around the edges.

Now for the fun part! Measure your frame surfaces and compare the measurements to the size of the hexagons. I started in the bottom center of my frame and I know that the bottom and top edges of my frame will accommodate two of the hexagons completely. You may have to make adjustments according to the size of your frame. Or cover the frame completely, allowing whole hexagons to fall across the edges and borders, and then trim them later.

Take your time and cover the frame surfaces with the hexagon shapes. Be careful because if the LS has soaked into the frame a bit, then it will be very difficult to slide the hexagon pieces around much. They are really going to want to stick where you place them. Here is my covered frame. The method I used was to concentrate lighter shapes around the opening in the center and to concentrate mostly darker pieces around the outside. I did try to keep my pattern random. I also butted the hexagons top to bottom with very little space between them, but I left a wider spaced between them from side to side so that the grout would show more. Double check the edges both inside and outside. Trim any tiles that hang over the edges so the look is nice and neat.

Open the bottle of Clear LS and stir it really well. Clear LS will naturally have sediment in the bottom of the bottle that you should mix back into the liquid as best as you can. When the LS is stirred completely, replace the cap. Wipe your tool clean with paper towel. I wanted some of the tiles to really shine so I added a large drop of Clear LS randomly to some of the tiles as shown.

Then I used the tip of the knife tool to carefully spread the spots of Clear LS all the way to the edge of each tile. Be especially careful not to let the Clear LS go over the edge of the tile into the grout line.

Bake the frame following the baking instructions for Premo. When you remove the frame from the oven, the tiles with the Clear LS on them will be sort of frosty looking. This is because the heat needed to cure Premo is not hot enough to make the Clear LS go completely clear and shiny. We will do this with a heat gun.

While the frame is still hot from the oven, and with it resting on the baking pan, turn the heat gun on HI. Wave the heat gun 4”-6” over the tiles. This should take less than a minute for the tiles with the Clear LS on them to shine. When you see the tiles with the Clear LS on them go clear and shiny turn the heat gun off so that you do not burn the Premo tiles with the high heat. Next, squirt a line of Greige Granite LS into the wide grout lines being careful to stop just before the end so that it doesn’t run off the edges.

Bake the frame one more time following the baking instructions for Premo. Allow to cool completely before handling.
