
Liquid Sculpey® Just Breathe Tray
Liquid Sculpey® Just Breathe Tray
Designed by Amy Koranek
Read More
Read Less
I’ve noticed in my Liquid Sculpey® “mad-science” lab, that the translucent colors have the effect of feathering or blending slightly with non-translucent liquid colors when they touch each other. I wanted to come up with a technique of really enhancing this quality of the translucent colors. So I started blowing the colors into each other. Then I found that I was able to direct the air more accurately by blowing through a straw. This project - which I think turned out great - is the result of my breathing technique!
TIME TO COMPLETE:2 Hours to prep tray, make, and bake twice
ADDITIONAL SUPPLIES
- Paper towel
- 5” x 8” Wood tray
- Sandpaper
- Copper acrylic paint
- Paintbrush
- Drinking straw cut down to 6” length
- Large gold mica flake
- Heat gun

Project Instructions
- Getting Started with Liquid Sculpey:
- Baking:
First, we need to make sure the wood tray is ready to go. If you ever have any inkling that your wood base might leak wood sap during the baking process, here’s what you can do. Bake your piece of wood in a pre-heated oven at 275F for 30 minutes. If wood sap is going to come out, it will come out during this pre-bake and then it can be sanded away. Unfortunately, since we don’t actually know how pieces of wood are being made for crafts, we have no way of knowing if the sap will be an issue or not. You be the judge ... pre-bake the wood or not, it’s up to you.
Sand away rough edges and baked sap from the wood piece. Paint all areas of the tray that will not be covered with Liquid Sculpey®. Allow the paint to dry completely. My tray is painted entirely on the back, and all side edges. Only the flat bottom of the tray is still raw wood.
Sand away rough edges and baked sap from the wood piece. Paint all areas of the tray that will not be covered with Liquid Sculpey®. Allow the paint to dry completely. My tray is painted entirely on the back, and all side edges. Only the flat bottom of the tray is still raw wood.

Spread a very thin layer of Clear Liquid Sculpey® (LS) into the bottom of the tray. I did this because I really want my layers of colors to have the freedom to move into each other and I knew that without the Clear LS layer, the colors would immediately just start soaking into the wood grain.

I poured three rivers of Copper Metallic onto the surface of the Clear LS. The little swirls that you notice in the top and bottom corners is where the Copper Metallic LS intermingled with the Clear LS naturally.

Dribble ribbons of Beige Translucent and Blush Translucent alongside the Copper Metallic. The Clear LS is appearing again as an outline between the colors.

Add White LS ribbons. Look closely, you can see that the White LS is done in very random patterns alongside the other colors and also inside the bands of color.

Add more bands of Blush LS and Beige LS.

It’s time for some of the magic. Point the straw (shown in red) toward an area where two colors meet. Blow through the straw, moving the air along the margins where colors come together. You will see the colors swirl and mix creating a feathery flow.

I used the straw to direct my breath along all the edges where colors come together. The result is a beautiful random mixing of colors. Blowing through the straw harder will cause colors to mix more. Blowing less deeply will cause a more shallow feathering.

I added more squiggles of the Copper Metallic LS to the lighter colored areas. Then I blew along the edges of the added Copper squiggles to blend them and make them less harsh.

Here’s a close up of the tip of the red straw. You can see that a wave is created at the end of the straw. Then when the air stops flowing, the colors rush back into the area creating a random blending effect. Blowing air deeply through the layers also helps the bottom colors rise to the top.

Once I blended all the colors as I liked them, I added big flakes of gold mica to the Copper river mostly down the middle.

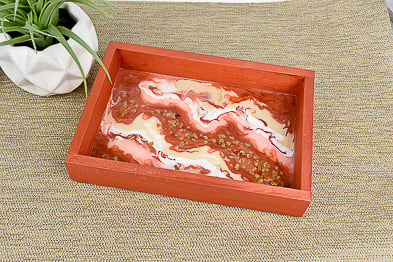
Look how rich and beautiful the colors are after baking. I baked the entire tray following the baking instructions for LS and allowed it to cool completely. The heat really brings out the depth and layers of the colors.

There are even a few areas where you can see that the Clear came to the top and added it’s own effects to the mix.

To finish it off, I thought it would look really beautiful with a Clear layer overall. I let the tray cool completely - this is very important - before adding a thin layer of Clear LS. Please make sure you have stirred the Clear LS really, really, really well. Clear LS is very different from the other liquids because it goes completely clear when treated properly. It has special ingredients in it that cause the “clearing”. Those special ingredients like to dwell in the bottom of the bottle.
Cover the entire surface with a layer of Clear LS. You should be able to kind of see the colors of the base show through and this is how you will know your Clear layer is not too thick. Then I baked the tray one more time following the baking instructions for LS.
Cover the entire surface with a layer of Clear LS. You should be able to kind of see the colors of the base show through and this is how you will know your Clear layer is not too thick. Then I baked the tray one more time following the baking instructions for LS.

The Clear LS will only go clear when it is brought to a temperature of at least 300F. We can do this step with a heat gun, or if you don’t have a heat gun, you can increase the oven temperature to 300F and bake it until it becomes clear.
When the tray came out of the oven a second time, I handled it carefully with hand protection. Then I turned the heat gun on the hi setting. Move the heat back and forth across the piece at a distance of about 3”-4”. Since we are dealing with wood in this project, make sure you keep moving the heat and don’t allow it to concentrate on any of the wood areas. Watch closely to see the Clear LS turn crystal clear and shiny. Once this is achieved, turn off the heat from the heat gun.
I like to use a heat gun any time I am “clearing” Clear LS because I enjoy watching the process and I can make sure the additional heat doesn’t affect the other areas of my finished piece.

- Choosing a selection results in a full page refresh.
- Opens in a new window.