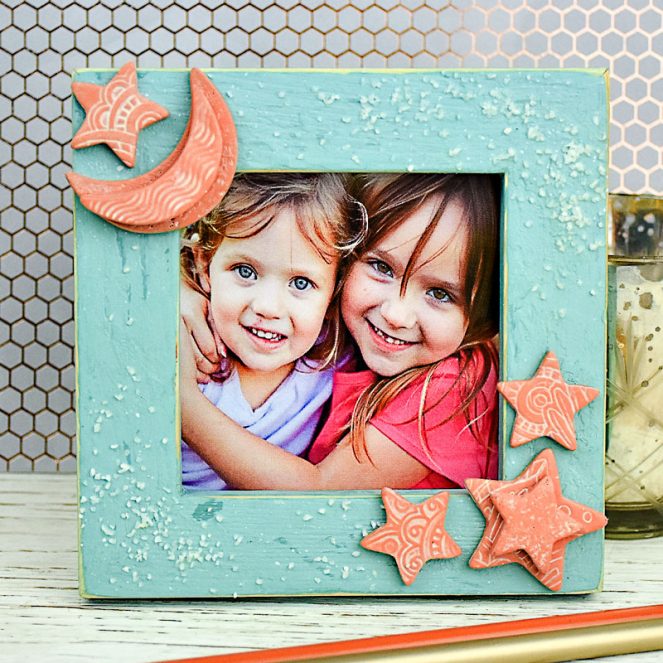
Sculpey Air-Dry Clay Terra Cotta Star Frame
Sculpey Air-Dry Clay Terra Cotta Star Frame
Designed by Linda Hollander
Read More
Read Less
This pretty little frame uses Air Dry Modeling Clay Terra Cotta as the "star" of this mixed media project!
ADDITIONAL SUPPLIES
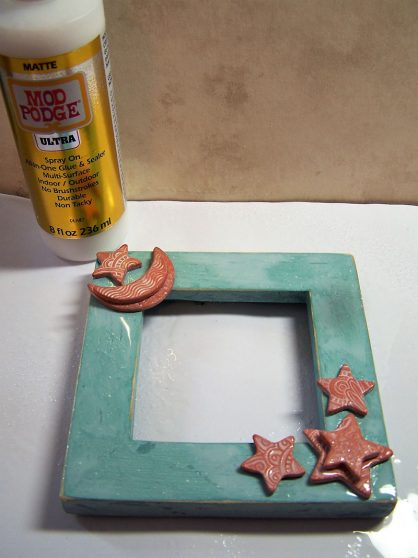
• 5” square unfinished wood frame
• Plaid Mod Podge Ultra All -In-One Glue & Sealer
• Folk Art Coastal Texture Paint #6501 Sea Salt
• Folk Art Acrylic Paint: #4670E Cascade; #480 Titanium White
• Folk Art Glazing Medium
• Paper crafting embossing folder of choice, texture sheets, old toothbrush
• Star and moon cutters
• Paint brushes
• Palette knife
• Course sand
• Corn starch or baby powder
• Sand paper
• Flat, smooth piece of cardboard
Project Instructions
- Getting Started:
Start with clean hands, unwrap and knead clay until soft and smooth. Wash hands after use. Wrap any extra clay in then wrapper and then put in an air tight container.
- Tips for using air dry clay
- • Condition clay to make it more pliable placing it in a zip lock type plastic bag and knead with hands. • Use water on fingertips to help smooth clay as needed. • Use a hard surface such as a large tile or piece of glass to roll out clay. • Lightly sand dried clay to smooth out imperfections.
Cut off a piece of clay and roll into a baseball sized ball. Roll into a sheet approximately 3/16” thick. Dust inside of embossing folder with corn starch. Lay clay sheet into the embossing folder. Close the folder. Use the clay roller and firm pressure to impress the clay. Flip over and repeat. Carefully open embossing folder and gently remove clay sheet. Texture more clay using texture sheets and toothbrush.

Use the cutters to cut clay shapes of choice. Use finger pressure to smooth edges of clay. Lay on a flat surface covered with cardboard. Flip clay shapes over occasionally for promoting even drying and prevent warping. When dry lightly sand edges as needed.


Mix Titanium White and Faux Glazing medium (1:1). Apply mixture to each dried shape one at a time. Use a slightly damp paper towel to wipe off most of the mixture. Allow the paint/glaze to remain in the low areas. Let dry. Set aside.
Lightly sand any rough areas of frame. Use Cascade to base entire frame. Let dry. Mix Coastal Texture Paint + Cascade (6:1). Use the palette knife to apply the mixture to the frame (top and outer edges only). Allow some of the basecoat to show through here and there. Let dry. Distress the edges with sand paper

Lay out clay shapes into a pleasing arrangement. Remove shapes temporarily. Shake Mod Podge Ultra well the spray a light coat onto the frame top and sides. Immediately place the first layer of clay shapes on the wet surface. Spray another coat of Mod Podge Ultra and place the second layer of shapes. Spray a final coat of Mod Podge Ultra. Sprinkle some course sand in open areas. Let dry. Clean nozzle of Mod Podge Ultra and replace for future use.