

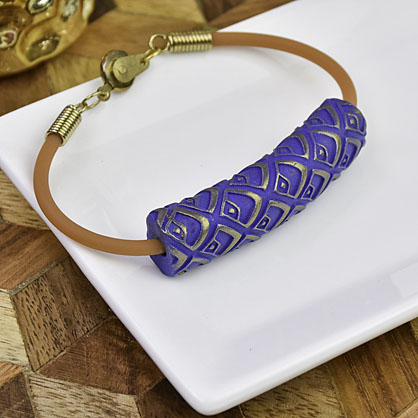
Sculpey Soufflé™ Midnight Blue Textured Bead Bracelet
Sculpey Soufflé™ Midnight Blue Textured Bead Bracelet
Designed by syndee holt
Read More
Read Less
Sculpey Soufflé™ is the perfect medium for stamped textures! Adding a shiny mica to the textured surfaces gives a great contrast to the matte surface of the clay.
TIME TO COMPLETION: 60 minutes including baking and assembling
ADDITIONAL SUPPLIES
- Gold Pearl Ex Mica Powder
- 3 mm cording (mine is a nylon/plastic cording)
- Gold-toned coiled cord 3.5 mm finding (2)
- Gold-toned jump rings (2)
- Gold-toned small clasp – mine is called a snap clasp
- Jewelry pliers
- Small spray bottle of water
- Instant gel glue
- Sewing tape measure
- Bamboo skewer or Etch n’ Pearl
- Small piece of paper or baking paper
- Small clean paint brush
Project Instructions
- Getting Started:
Start with clean hands, unwrap and knead clay until soft and smooth, or condition by running clay though a Pasta Machine. We recommend using a designated machine for clay purposes only. When working with multiple colors, clean hands with soap and water or baby wipes (we have found that baby wipes work best) before switching colors. Shape clay, pressing pieces firmly together. Wash hands after use.
- Baking:
Sheet out about 1/3 of the block of conditioned Soufflé™ Navy on the second from widest setting on the pasta machine. Lightly spray the texture sheet with water and firmly emboss the texture into the clay, using the acrylic roller.

Remove the texture sheet and set the sheet of clay aside to dry.

Sheet out 1/3 of the remaining clay on the second from widest setting and stack two pieces together and cut a piece of clay that is about 1/2-inch-wide by at least 3 inches.

Trim the edges of the textured sheet of clay and then wrap around the stacked layers of clay, trim to butt the edges up against each other.

Trim the edges of the textured sheet of clay and then wrap around the stacked layers of clay, trim to butt the edges up against each other.

Make sure that your textured clay is completely dried from the mold release for stamping. Remove the lid from the Pearl Ex and touch your finger into the lid. Lightly wipe your finger across the top of the texture to highlight it beautifully! Go slow and build up the intensity of color.

Press your skewer or I used my medium Etch n’ Pearl to make a channel for the cording. Check to see if your cording fits the hole neatly.

While the oven is pre-heating for baking, cut a small square of paper or baking paper and lay it over one of the largest bumps on the Hollow Bead Maker. Place your bead on this paper and gently press it down to form a curve for your wrist. Bake according to the directions in Step 1 above.

Once the clay has baked and cooled, use your brush to lightly apply a coat of Sculpey Satin glaze to the TOP of the texture where the Pearl Ex is. I like to keep the lower portions of the texture glaze free so that the matte texture of the Souffle contrasts more with the shiny mica glazed surfaces.

Glue the coiled cord ends to the cording and attach the clasp. Push the cording into the bead and check your measurements (and math!). If the cording is the correct length, glue the cording into the bead. NOTE: If you need to enlarge your holes just a tiny bit, but the tip of a craft blade like a #11 Excel blade to gently spin in the hole to enlarge it. Allow the glue to dry and show off your new bracelet!

- Choosing a selection results in a full page refresh.
- Opens in a new window.