

Sculpey Premo™ Unique Multiples Texture Earrings
Sculpey Premo™ Unique Multiples Texture Earrings
Designed by Amy Koranek
Read More
This the fifth part of a six-part series of tutorials based on mass producing earrings that are all unique in design. This series features Terrazzo, Floral, Pebble, Gold Leaf, Texture, and Scrap all in the same color-way for a myriad of combinations. A great way to create lots of mix and match pieces that can be combined into unique styles. If you are just starting out to sell jewelry, this instruction teaches mass production techniques while building your business. The entire line of earrings that I have created with these pieces - over 40 pairs of earrings - came from just 6 - 2ounce bars of clay.
The Tools and Supply Lists here may be overkill for just this one section of the tutorial. I’m including everything in each section for the total project so that you can keep the overall outcome in focus. TIME TO COMPLETION: 45 minutes
Read Less
The Tools and Supply Lists here may be overkill for just this one section of the tutorial. I’m including everything in each section for the total project so that you can keep the overall outcome in focus. TIME TO COMPLETION: 45 minutes
ADDITIONAL SUPPLIES
- Teardrop Clay Cutters by Craft Smart®
- Square & Circle Premium Clay Cutters by Craft Smart®
- Edgy Texture Sheet Set by Craft Smart®
- Interfolded clear plastic deli and bakery wrap - or - plastic kitchen wrap
- Stiff cardboard or extra baking trays for scrap organization
- Gold composite leaf
- Dremel or Dremel Stylo
- Egg cartons for sorting pairs
- 6 mm Gold tone jump rings
- 8 mm Gold tone jump rings
- Gold tone ear wires
- Gold tone ear posts and backs
- Gold tone connectors in various shapes
- Silicone glue or instant drying glue
- Flat nose pliers
Project Instructions
- Getting Started:
Start with clean hands, unwrap and knead clay until soft and smooth, or condition by running clay though a Pasta Machine. We recommend using a designated machine for clay purposes only. When working with multiple colors, clean hands with soap and water or baby wipes (we have found that baby wipes work best) before switching colors. Shape clay, pressing pieces firmly together. Wash hands after use.
- Baking:
We will use the darkest colors from our color way for the textured pieces so that the texture will add a layer of highlight and shadow to our finished earrings. We will be using half of the clay that was set aside in the Unique Multiples Gold Leaf Earrings tutorial.
For the Raw Sienna, use the woven texture. Position the woven texture, texture side down on top of the Raw Sienna that has been pressed through the pasta machine to the second thickest setting.
Apply hand pressure to the texture sheet until it bites into the surface of the clay below. Then roll over it with the Acrylic Clay Roller to make sure the texture is deep and even.
Carefully remove the texture sheet by peeling it up first at one corner.

For the Spanish Olive, repeat Step 2 with the chevron texture. For the Alizarin Crimson, use the fine pebbly texture (not shown).

Decide how you will use the Textured patterns in your finished designs. Then follow the steps in the previous tutorials for marking, baking, and drilling the pieces.
Assemble with jump rings using flat nose pliers. Add ear wires and posts as desired. The large metal connectors that are featured in some of these finished styles are easily added when the jump rings are connected.
Assemble with jump rings using flat nose pliers. Add ear wires and posts as desired. The large metal connectors that are featured in some of these finished styles are easily added when the jump rings are connected.

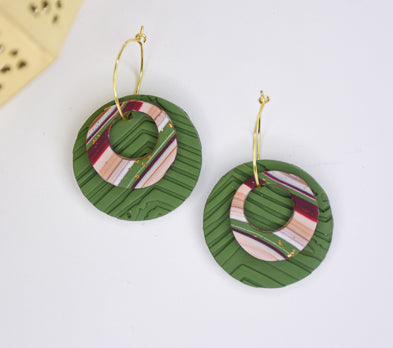
Here is just one pair highlighting the Texture pieces that we made in this tutorial. These elements are connected together with simple ear wires.

- Choosing a selection results in a full page refresh.
- Opens in a new window.