

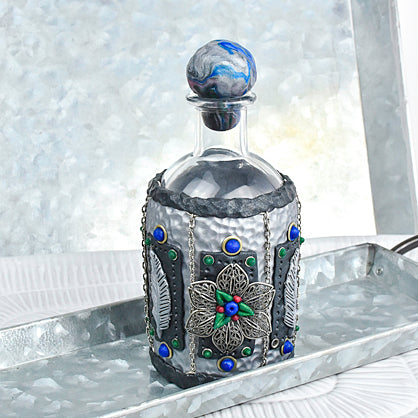
Sculpey Premo™ Steampunk Bottle
Sculpey Premo™ Steampunk Bottle
Designed by Amy Koranek
Read More
Read Less
This project can be adapted to any size and shape of bottle for a unique decorative vessel.
COMPLETION TIME:2 Hours to make and bake
ADDITIONAL SUPPLIES
- Glass bottle
- Antique silver small eyelets (24)
- Antique silver medium eyelets (12)
- Antique silver filigree flower
- 18” Antique silver chain
- 6 mm Silver tone jump rings (12)
- Wire cutters
- Flat nose pliers
Project Instructions
- Getting Started:
Start with clean hands, unwrap and knead clay until soft and smooth, or condition by running clay though a Pasta Machine. We recommend using a designated machine for clay purposes only. When working with multiple colors, clean hands with soap and water or baby wipes (we have found that baby wipes work best) before switching colors. Shape clay, pressing pieces firmly together. Wash hands after use.
- Baking:
Sheet 2 ounces of Silver Premo through the pasta machine to the third thickest setting. Trim straight edges along both long sides so that the sheet is as wide as the height of your bottle. For my design I did not extend the clay over the curved edge at the top of the bottle. Wrap the bottle in the sheet of Silver Premo. Trim straight edges so that the clay sheet wraps around and butts to itself with a nice straight edge. Smooth the seam with your fingertips. Set extra Silver Premo aside to be used later in this instruction.

Hammer this entire sheet with the 12 mm Ball Tool.

I love the pounded metal effect this gave to the Silver Premo. It really hides fingerprints, seams, and every other inconsistency.

Sheet 1 ounce of Pewter Jewel Metallic Premo through the pasta machine to the third thickest setting. Cut out three 2” squares.

Cut each of the squares in half with the Super Slicer.

Position each of the rectangles around the outside of the bottle. When they are spaced evenly, press them into place.

Hammer the same texture into the Pewter rectangles that you did in the Silver background.

Push one of the small eyelets into each corner of each rectangle. Seat them just deep enough that the Pewter clay starts to emerge into the center of each eyelet.

Use the 2 mm Ball Tool to impress little rivet type indentions along each edge of the rectangles.

Press some of the excess Silver Premo into the small feather shape in the Silicone Boho Chic Mold.

Shave off any excess Silver from the feather cavity.

Gently flex the mold to release the feather shape. Make a total of five of these Silver feathers.

Position a feather in five of the six rectangles. Alternate the positions of the feathers - some upwards and some downwards. Score the lines in the feathers more deeply with the needle tool. Please note - Don’t fill the eyelets with the Burgundy colored clay! Well you can if you want to. I did use the Burgundy at first and then switched them all to Rich Green instead.

Fill each of the small eyelets with a pearl of Rich Green using the Medium Etch ‘n Pearl tool.

Press a medium sized eyelet into the center top and center bottom of each rectangle.

Fill each of the medium eyelets with an Azure Blue pearl using the Large Etch ‘n Pearl.

Cut lengths of chain that are the same height as the Silver Premo background of your bottle using wire cutters.
Use flat nose pliers to connect a jump ring to each end of the chain lengths.
Use flat nose pliers to connect a jump ring to each end of the chain lengths.

Imbed just the top jump rings into the top edge of the Silver Premo background allowing the chains to dangle freely. Then press the bottom jump rings along the bottom edge of the Silver Premo background.

Twist the remaining Pewter clay into a rope.

Flatten the rope.

Press the Pewter flat rope along the top and the bottom edges of the Silver background sandwiching the jump rings into place.

Make the hammered texture on the Pewter ropes with the 12 mm Ball Tool. Press the floral filigree in the center of the remaining rectangle. Make sure some of the clay protrudes through the filigree openings.

Make three little Rich Green petal shapes. Press these into place in the center of the floral filigree. Use an Etch ‘n Pearl to make the center vein in each petal.

Add a large Azure Blue pearl to the center of the filigree with the Large Etch ‘n Pearl. Add small pearls in Burgundy with the Small Etch ‘n Pearl.

Take the remaining Silver Premo, the remaining Pewter Jewel Metallic Premo and scraps of Azure Blue, Burgundy, and Rich Green and wad them up into a ball.

Roll the ball out and twist into a rope making lots of colorful random stripes.

Coil the rope up into a nautilus shape.

Make a ball out of the nautilus. You can also knead this ball a bit further if you want to really make the stripes more mottled and marbled.

Make a shape that is fat on one end and just small enough on the other end to fit tightly into the bottle neck.

The following tips are recommended for making a clay cork that fits a bottle neck really well. My friend Priscilla came up with this technique because she makes lots and lots of “Bottles of Hope” for Cancer patients.
Dampen the small end of the clay cork and push it into the bottle. Press hard enough that the tapered end of the clay cork conforms to the shape of the neck of the bottle.
Dampen the small end of the clay cork and push it into the bottle. Press hard enough that the tapered end of the clay cork conforms to the shape of the neck of the bottle.

Pull the clay cork back out. If it makes a little “pop” as it comes out, then it fits really well. If it doesn’t make this “pop” noise, then the tapered end needs to be a bit thicker to better fill the neck of the bottle.

If the clay cork did make the “pop” sound, then it fits perfectly. Carefully score just the most shallow line in the side of the clay cork so that when the cork is baked, air can escape from this shallow gap.

Place the clay cork back in the neck of the bottle and hammer it with the 12 mm Ball Tool.

Bake the bottle and the cork following the baking instructions for Premo. Allow to cool completely before handling.
