

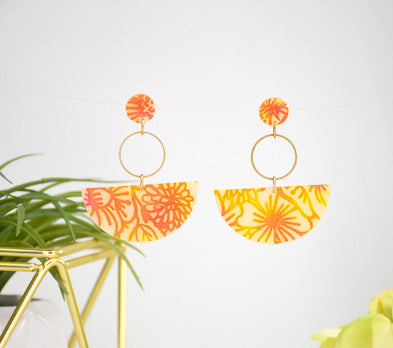
Sculpey Premo™ Slice of Summer Earrings
Sculpey Premo™ Slice of Summer Earrings
Designed by syndee holt
Read More
These quick and easy earrings are a snap to make! The secret is using a silkscreen and craft paint to create the design on Sculpey Premo™ Translucent clay.
TIME TO COMPLETION: 70 minutes including baking
Designer note: You can also use a clay dedicated pasta machine to sheet your clay out on a medium setting.
Read Less
Designer note: You can also use a clay dedicated pasta machine to sheet your clay out on a medium setting.
ADDITIONAL SUPPLIES
- Small circle cutter for the top portion of the earring
- Toothpick
- Acrylic Craft Paints in desired colors (I chose a Rose color and a yellow color)
- Small craft paint brushes (2)
- Silicone paint brush or old credit-type card to scrape paint on silkscreen
- Small gold-toned rings about 3/4 inch diameter (2)
- Gold-toned jump rings (4) NOTE: Mine are oval jump rings
- Jewelry Pliers
- Stainless Steel posts (2)
- Instant glue (I prefer Gorilla glue)
- Several sheets of paper to work on, including a lined index card
- Small piece of aluminum foil to cover the clay on your baking tray (I bake on cardboard box flaps)
- Optional: Microfiber towel
Project Instructions
- Getting Started:
Start with clean hands, unwrap and knead clay until soft and smooth, or condition by running clay though a Pasta Machine. We recommend using a designated machine for clay purposes only. When working with multiple colors, clean hands with soap and water or baby wipes (we have found that baby wipes work best) before switching colors. Shape clay, pressing pieces firmly together. Wash hands after use.
- Baking:
Roll out a sheet of conditioned Translucent clay that is about the thickness you would like your earrings. (I used a middle setting on my clay dedicated pasta machine). The sheet doesn’t have to be as big as the silkscreen – unless you plan to make a couple of pairs of earrings!

Place the silkscreen with the emulsion side (shiny side) DOWN and lightly rub into place.
Dab your paint colors lightly and QUICKLY onto the silkscreen. A little paint goes a LONG way!
Dab your paint colors lightly and QUICKLY onto the silkscreen. A little paint goes a LONG way!

QUICKLY use your paint spreader tool to drag the paint across the screen to cover the clay areas. I also wiggle my silicone brush to make the colors a little more random.
Remove any excess paint with your spreader tool.
Remove any excess paint with your spreader tool.

IMMEDIATELY remove the silkscreen and go wash it under running water. I prefer to dry my screen by putting it in a folded microfiber towel and lightly rubbing the top of the towel. Remove the screen and set aside to dry completely.
NOW admire your gorgeous silkscreened clay! The paint should be allowed to dry completely (usually just a couple of minutes).
DESIGNER NOTE: If you are not happy with your silkscreened clay, immediately wash the sheet of clay under running water, lightly rubbing the surface to remove the paint. Then lightly dry the sheet with the towel and allow it to dry before attempting the silkscreen again.

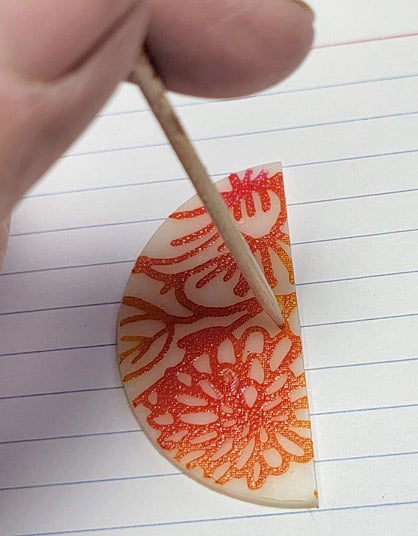
Once the paint design has dried, you can use your selected circle cutter (mine is 2 inches) to cut out your favorite portion of the silkscreen.
Don’t forget to cut out 2 smaller circles for the post portion of the earring! You can also cut out several other sized earrings if you have a full sheet of silkscreen.
Don’t forget to cut out 2 smaller circles for the post portion of the earring! You can also cut out several other sized earrings if you have a full sheet of silkscreen.

I like to use lined index cards to help me find the center line of the circle and provide a guideline to cut the circle.

Now I can just rotate each half circle and line it up on the lines to find the center to place my hole to attach the jump ring. I am using a toothpick here, but you can also use any needle tool.
Set the two pieces on your baking tray.
Set the two pieces on your baking tray.
Place holes in your smaller circles for the posts as well and set them on your bake tray.
Cover the clay loosely with the foil and bake according to the directions in Step 1 above
Cover the clay loosely with the foil and bake according to the directions in Step 1 above

Once the clay has baked and cooled, you can assemble your earrings as shown.
My last step is to glue the posts to the back of the smaller circles.
My last step is to glue the posts to the back of the smaller circles.

Here is a look at my final earrings. I’ve place one of those small round camera lights for Instagram behind a sheet of paper so you can see the beautiful translucency of the earrings.
