

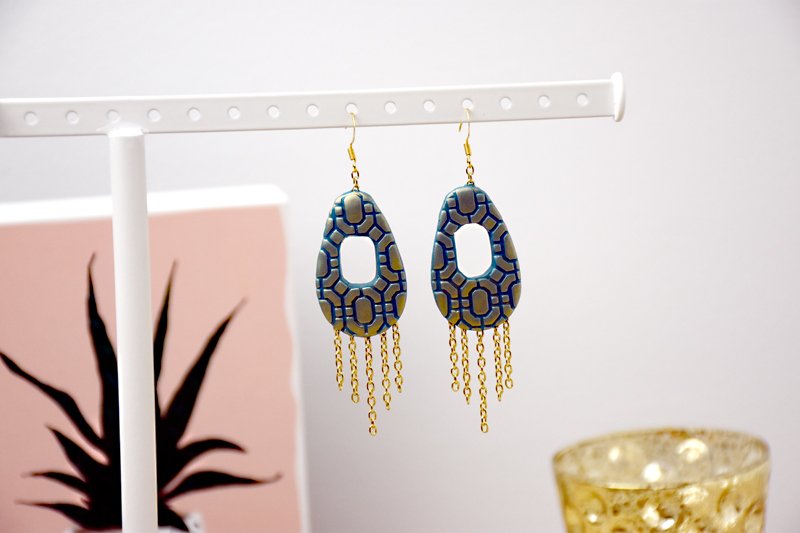
Sculpey Premo™ Simple Chain Link Earrings
Sculpey Premo™ Simple Chain Link Earrings
Read More
Read Less
This earring project was inspired by Ann and Karen Mitchel of AnKara Designs. Their simple method for embedding metal components into the clay makes jewelry construction quick and easy.
ADDITIONAL SUPPLIES
- Gold chain
- Gold Mica powder
- 2 gold ear wires
- Jewelry pliers
Project Instructions
- Getting Started:
Start with clean hands, unwrap and knead clay until soft and smooth, or condition by running clay though a Pasta Machine. We recommend using a designated machine for clay purposes only. When working with multiple colors, clean hands with soap and water or baby wipes (we have found that baby wipes work best) before switching colors. Shape clay, pressing pieces firmly together. Wash hands after use.
- Baking:
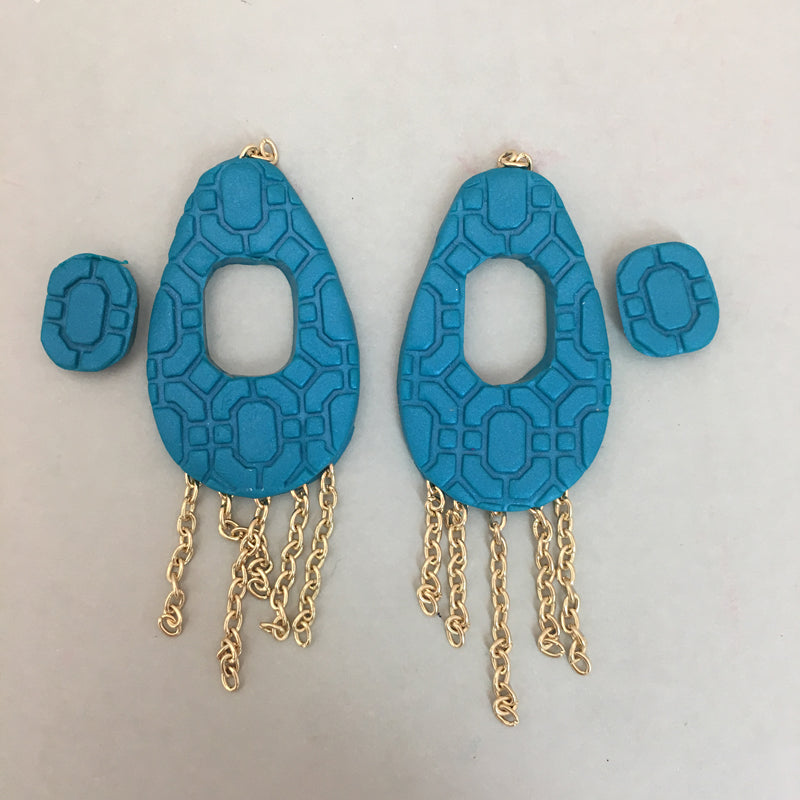
Sheet Peacock Pearl through the pasta machine to the second thickest setting. Divide the sheet in half. Texture one side of the sheet with the Chain texture pattern and leave the other side untextured. Press the Chain texture into the clay as deeply as you can with fingertip pressure. Once the texture has bitten into the clay, you can make it deep and even by rolling over it with the Acrylic Clay Roller. Remove the texture sheet carefully

Cut out two 1.5” teardrops from the textured sheet and two 1.5” teardrops from the plain sheet. Make sure the teardrop lines up nicely with the textured pattern

Use the 2” teardrop cutter to remove the tip from each of the teardrops as shown.

Cut the chain into pieces using the wire cutters. I cut right through the links with the cutters and discard the cut links. You will need two .5” pieces, eight 1” pieces, and two 1.5” pieces. Embed these pieces of chain in the backing clay as shown.

Sandwich the chains into place with the textured pieces. Make sure the front and the back are stuck together well but don’t smash the textured design.

Use the knife blade in the 5-in-1 Clay Tool to remove the center part of the design. Smooth the cut edges carefully with your fingertip.
Dab your fingertip into the gold mica powder and carefully apply it to just the raised surfaces. Bake the pieces following the baking instructions from step 1. After removing them from the oven, carefully slide them onto a flat surface to cool so that they will remain flat.

When the pieces are completely cool, apply a thin layer of Sculpey Glossy Glaze to set the mica powder in place. Add ear wires to the top chain pieces with jewelry pliers.
