

Sculpey Premo™ Queen of Hearts Necklace
Sculpey Premo™ Queen of Hearts Necklace
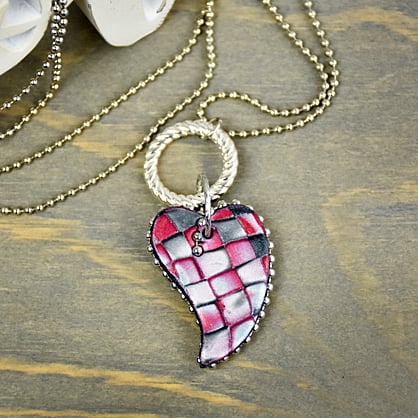
Designed by Amy Koranek
Read More
Read Less
You’ll love this funky little reversible heart pendant with the stylin’ finish.
COMPLETION TIME:90 Minutes to make, bake, and assemble
ADDITIONAL SUPPLIES
- 6” Silver tone ball chain
- 20”-24” Silver tone ball chain necklace with clasp
- 12mm Bright silver tone oversized textured jump ring
- 2cm Bright silver tone oversized connector ring
- 6mm Bright silver tone jump ring
- Flat nose jewelry pliers
- Wire cutters
Project Instructions
- Getting Started:
Start with clean hands, unwrap and knead clay until soft and smooth, or condition by running clay though a Pasta Machine. We recommend using a designated machine for clay purposes only. When working with multiple colors, clean hands with soap and water or baby wipes (we have found that baby wipes work best) before switching colors. Shape clay, pressing pieces firmly together. Wash hands after use.
- Baking:
Sheet each color through the pasta machine on the thickest setting. Cut out one 2” x 2” piece of each Burgundy and Pewter; and two 2” x 2” pieces from Pearl.

Stack the colors as shown.

Hand roll the little pile with the Acrylic Clay Roller to thin it and press out air bubbles.

Press the layers through the pasta machine on the thickest setting.

Divide the layered sheet into three equal sections and stack these up as shown.

Lay the stack in front of you on the work surface and hand roll it with the Acrylic Clay Roller so that it sticks to your work surface.
Starting on the left side and working to the right, cut the layered slab every 1/4” using the Super Slicer.
Pick up the slices and alternate flipping every other one over to create stripes. Gently push the stripes together.
Starting on the left side and working to the right, cut the layered slab every 1/4” using the Super Slicer.
Pick up the slices and alternate flipping every other one over to create stripes. Gently push the stripes together.

Starting at the top and working to the bottom, cut the striped and layered slab every 1/4”. Pick up the slices and alternate flipping every other one over to create a checkerboard.

Hand roll the slab with the Acrylic Clay Roller to heal the cuts all back together. Ultimately we still want the slab to be at least 1/8” thick so don’t roll it too much.

Use the Flexible Super Slicer blade to shave away a very thin layer of the clay parallel to the sheet. A random checkerboard pattern will be revealed. When you are happy with the pattern hand roll it with the Acrylic Clay Roller to make it smooth.

Carefully lift the slab from the work surface and flip it over. Shave this side too with the Flexible Super Slicer. When you are happy with the pattern hand roll it with the Acrylic Clay Roller to make it smooth.

Use the large Irregular Heart Cutter to cut out a heart. Smooth the cut edges with your fingertips. Set the remainder of the patterned clay aside for now. You can look forward to incorporating this pattern into a future design of your own.

Starting on the right side of the heart and lining up with the tip at the bottom, wrap the short piece of ball chain around the outside. Finish it up with a drape over the top of the right lobe of the heart. Trim the ball chain as necessary with the wire cutters. Take some time to move the chain into place exactly how you want it. Then when you are satisfied with the layout, you can push the chain into place around the outside edge and into the front. You need to push it in far enough that the clay will hold it permanently in place.

Next, start again at the bottom tip of the heart with another piece of ball chain and drape it around the left side.

When you get to the top, flip the heart over and finish by bringing the chain once again over the top right lobe. Finish as shown.

Turn the heart back over. Poke a hole through the heart with the Needle Tool or the Blunt Point Tool to create a place to insert the jump ring for assembly after baking. Use the Needle Tool to poke a hole through the front and again through the same hole from the back making the hole nice and neat.
Bake the heart following the baking instructions for Premo.
Bake the heart following the baking instructions for Premo.

When the heart is completely cool, assemble it into a necklace. Use flat nose pliers to open the large decorative jump ring and run it through the heart and the oversized connecting loop. Attach the connecting loop to the ball chain necklace with the small jump ring.
