

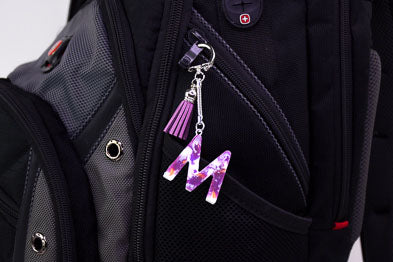
Liquid Sculpey® Initial Key Chain
Liquid Sculpey® Initial Key Chain
Designed by Amy Koranek
Read More
Make your favorite letter or letters with Liquid Sculpey® in a silicone alphabet mold. It’s so quick and easy that you can make a whole set to share with every friend in the alphabet!
TIME TO COMPLETE:
45 Minutes to make, bake, and assemble
Read Less
ADDITIONAL SUPPLIES
- Paper towel
- Small silicone cup or glass dish for mixing colors
- Tiny spoon for mixing and dipping
- Purple alcohol ink
- Oven safe silicone alphabet mold
- Bright silver tone screw in eye
- Bright silver tone snake key chain
- Flat nose pliers
- Coordinating color tassel
- 8 mm Bright silver tone jump ring
Project Instructions
- Getting Started with Liquid Sculpey:
- Baking:
This tutorial will show you how to fill one letter. But feel free to go crazy making the entire alphabet if you so desire!
Fill the letter of your choice in the alphabet mold halfway full with White Liquid Sculpey® (LS). Allow the White LS to settle and level.
Fill the letter of your choice in the alphabet mold halfway full with White Liquid Sculpey® (LS). Allow the White LS to settle and level.

Next make sure the Clear LS is stirred completely well. Clear LS will have a layer of sediment that naturally forms in the bottom of the bottle. This sediment layer needs to be mixed completely back into the liquid layer in order for the Clear LS to be ready to use.
Add a small amount of Clear LS to the bottom of a glass dish or silicone baking cup. Add one drop of purple alcohol ink to the LS and stir it in completely. The alcohol ink will darken considerably when baked. You may want to do a color test by baking a few drips of the mixed color to make sure you like it. If you look now at the finished photo and compare the purple there to the purple in this step, you can see how much the color has darkened during baking. If the purple LS feels very thick, you can thin it with a drop or two of Clay Thinner & Softener and stir it in completely.
Add a small amount of Clear LS to the bottom of a glass dish or silicone baking cup. Add one drop of purple alcohol ink to the LS and stir it in completely. The alcohol ink will darken considerably when baked. You may want to do a color test by baking a few drips of the mixed color to make sure you like it. If you look now at the finished photo and compare the purple there to the purple in this step, you can see how much the color has darkened during baking. If the purple LS feels very thick, you can thin it with a drop or two of Clay Thinner & Softener and stir it in completely.

Add a few random splotches of the Purple LS to the letter shape. The dyed ink color and the White are very different in viscosity and so they will interact a little randomly with each other. This is what gives the finished design it’s cool tie dye look.

Add more drops of White only on top of the White areas. Add more drops of Purple only on top of the Purple areas.

Keep adding the same color on top of the same color until the letter shape is full to level.
Tap the mold on the work surface a few times to settle the colors and to release air bubbles.

Add a few random drops of Gold LS next. Insert the Needle Tool in the center of a Gold drop and drag it just slightly from side to side to create minute swirls and veins. Remove the Needle Tool from a dot and wipe it with paper towel before dipping it into the next dot. Clean the Needle Tool after each Gold dot with paper towel.

Bake the mold following the baking instructions for Liquid Sculpey®. Allow the mold to cool completely before flexing it to release the shape.

Poke a hole in the top edge of the letter with the Needle Tool to mark where the screw eye should go. Remove the Needle Tool and push the screw eye into the hole. Then turn the screw eye deeply into the baked LS to provide an eye for the key chain finding. You may find it helpful to use flat nose pliers to screw in the eye. Add the snake key chain to the eye. Add a colorful tassel if you like with a jump ring.

- Choosing a selection results in a full page refresh.
- Opens in a new window.