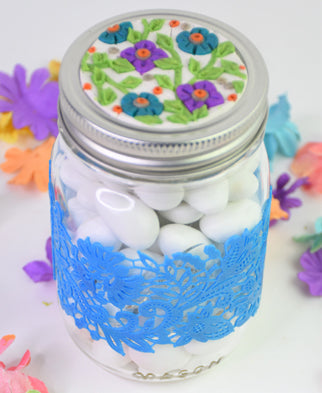
Sculpey Premo™ Granite Floral Slab Pint Jar
Sculpey Premo™ Granite Floral Slab Pint Jar
Designed by Amy Koranek
Read More
Read Less
The Granite Floral Slab Pint Jar is one project from a six part series of projects incorporating a mix and match style approach to jewelry making and vessel decorating. The lid for this pint jar is decorated with a piece of the Floral Slab that we made for the Granite Floral Slab Earrings.Then add Liquid Sculpey Lace Mold pieces around the center of the jar to tie it together. Please see this tutorial for directions to make the Granite Floral Slab https://www.sculpey.com/products/sculpey-premo-granite-floral-slab-earrings.
ADDITIONAL SUPPLIES
- Paper towel
- 1 Pint glass jar with lid and ring seal
- Instant drying glue
- Clear tape

Project Instructions
Please make sure your work area is covered and you are not working on an unprotected surface. We recommend working on the Sculpey® Oven Safe Work Mat, wax paper, metal baking sheet, or disposable foil. Uncured clay may damage unprotected furniture or finished surfaces. Be sure to cover your crafting area appropriately.
Start with clean hands, unwrap and knead clay until soft and smooth, or condition by running clay though a Pasta Machine. We recommend using a designated machine for clay purposes only. When working with multiple colors, clean hands with soap and water or baby wipes (we have found that baby wipes work best) before switching colors. Shape clay, pressing pieces firmly together. Wash hands after use.
Baking:
Begin by preheating oven to 275 °F (130 °C). After you are done creating; for best results bake clay on an oven-proof surface such metal, aluminum foil, an index card or the Sculpey® Oven Safe Work Mat at 275°F (130 °C) for 30 minutes per 1/4" (6 mm) thickness according to package directions. Oven safe glass or ceramic surfaces are also acceptable for baking; however please note that the baking times may take longer as the glass or ceramic surfaces take longer to heat up. For best baking results, use an oven thermometer. DO NOT USE MICROWAVE OVEN. DO NOT EXCEED THE ABOVE TEMPERATURE OR RECOMMENDED BAKING TIME. BAKING SHOULD BE DONE BY AN ADULT.
After stirring the Peacock Pearl Liquid Sculpey® (LS) completely, squirt some down the center of the Lace Mold.

Spread the LS into all the details with your fingertip or with the squeegee that is included in the Lace Mold kit. Add more LS as needed to make sure all the little details are filled.

Hold the squeegee at a 45 degree angle to the mold and using pressure, drag the excess LS off of the design. If possible, scrape the excess from the squeegee back into the open bottle. Clean the squeegee with paper towel.
Bake the mold following the baking instructions for LS. When the mold is completely cool gently flex it to remove the Lace design. Repeat Steps 2-4 to create a second Lace piece if you want your design to go all the way around the middle of the jar.
Bake the mold following the baking instructions for LS. When the mold is completely cool gently flex it to remove the Lace design. Repeat Steps 2-4 to create a second Lace piece if you want your design to go all the way around the middle of the jar.

Use the ring seal from the jar as a template to cut out a circle shape from the Granite Floral Slab using the 5-in-1 Knife Tool.
Smooth cut edges with your fingertips.
Smooth cut edges with your fingertips.

Place the circle on top of the lid and make sure it fits within the ring seal.
Bake the clay piece on top of the lid following the baking instructions for Sculpey PremoTM.
Bake the clay piece on top of the lid following the baking instructions for Sculpey PremoTM.

When the lid is completely cool, carefully pop the clay piece off of the lid with your fingertip. Glue it back into place permanently and allow to dry completely before pushing it up into the ring seal.

When the Lace pieces are completely cool, audition them around the middle of the jar. You can use clear tape to hold them into place. On my jar, they did not quite meet at the mid points, but this is okay with me. I’m making sure the gaps in my Lace molded pieces are at the side seams of the jar and evenly spaced on both sides.

Peel one end of the clear tape away and add a few dots of instant drying glue to the back of the Lace piece. Then add pressure to the Lace to make sure it is well stuck to the jar. Repeat in as many places as you would like to make sure the Lace is attached well.

Add the beautiful Granite Floral Slab lid and enjoy.

- Choosing a selection results in a full page refresh.
- Opens in a new window.

