
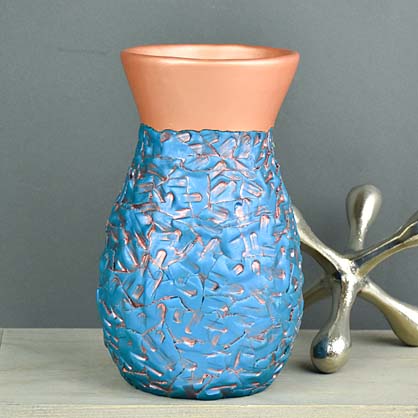
Sculpey Premo™ Faux Hammered Copper Vase
Sculpey Premo™ Faux Hammered Copper Vase
Designed by Gretchen Amberg
Read More
Read Less
Sculpey Premo™ is the star for creating this show-stopping vase that looks like it could be a real hammered copper vase.
ADDITIONAL SUPPLIES
- Additional Supplies:
- Small Paint Brush
- Metallic Copper Acrylic Paint
- Paper Towels
- Dish of water
- 8” Glass Bouquet Vase
- Craft Knife
Project Instructions
- Getting Started:
Start with clean hands, unwrap and knead clay until soft and smooth, or condition by running clay though a Pasta Machine. We recommend using a designated machine for clay purposes only. When working with multiple colors, clean hands with soap and water or baby wipes (we have found that baby wipes work best) before switching colors. Shape clay, pressing pieces firmly together. Wash hands after use.
- Baking:
Condition 2 blocks of Copper clay and roll out a sheet on a medium setting. The sheet should be about 6” wide and long enough to wrap around the top of the vase with a bit of overlap.
Position the long edge of the clay so that it is approximately 1” below the narrowest part of the vase (the neck). Start wrapping the clay around the vase. As you wrap the clay around the vase gently smooth the clay onto the vase making sure you do not have any air trapped between the clay and the vase.
Position the long edge of the clay so that it is approximately 1” below the narrowest part of the vase (the neck). Start wrapping the clay around the vase. As you wrap the clay around the vase gently smooth the clay onto the vase making sure you do not have any air trapped between the clay and the vase.

Continue wrapping the clay the rest of the way around the vase until the two ends of the strip of clay meet. Overlap the two ends but do not press the clay together. Position the Super Slicer blade so it is vertical and centered on the overlapping clay. Cut clean through both layers of clay and remove the blade from the clay.

Gently lift the excess clay off of the top layer of overlap. Carefully lift the top layer until you have exposed the excess clay from the bottom layer of the overlap. Peel away the excess of the bottom layer. Note: While lifting the clay do your best to avoid stretching the clay.

Carefully replace the top layer and butt the cut ends up against each other. Use your fingers to smooth the seam closed.

Carefully roll the excess clay over the top edge and into the inside top of the vase. Make sure to press the clay along the very top edge of the vase smooth to avoid an uneven edge around the top. Once you have the clay rolled over into the inside use your fingers to smooth the seam together making sure that there is no air trapped between the clay and the vase.

Note: When you have the clay rolled over into the inside of the vase you will very likely end up with some areas that have folds of excess clay (see image). You can either use the Super Slicer blade to trim some of the excess off or use your fingers to press the clay flat and then smooth the surface.

Once you have the clay smoothed to the inside of the vase use the craft knife to trim a neat edge on the clay on the inside of the vase. Remove the trimmed clay from the vase, be sure to also check for any bits of clay that may have fallen into the bottom of the vase.

Maneuver the vase so you are looking at the seam area on the outside of the vase. Use the craft knife to cut a small flap that is parallel to the edge of the wrapped clay. Hold the flap and begin slowly tearing a long horizontal strip of clay that goes all of the way around the vase. Try to keep the torn edge as straight as possible to avoid creating a wavy line. Once you have the clay torn off, bake the vase for 30 minutes and let cool completely while still in the oven.

Condition 2 blocks of the Peacock Pearl clay and roll out a sheet on the same medium setting used for the copper clay. Lay the sheet onto your work surface and begin tearing the clay into pieces that are about 1” in size; the pieces can be square, rectangular, or even triangular in shape, however, try to avoid round shapes.

Pick up a piece of the torn clay and place it so the edge is butted against the very bottom of the torn Copper clay. When placing the Peacock Pearl piece avoid covering the torn edge of the Copper, the goal is to maintain the torn edge of the Copper clay. Press the Peacock Pearl clay onto the vase. Continue the process of adding the pieces of Peacock Pearl to the vase along the torn edge of the Copper clay.

Once you have the first row of Peacock Pearl in place continue adding more torn pieces of clay to the vase. As you add the pieces make sure you overlap the pieces of clay so that you do not see any of the vase underneath the clay. Stop adding the torn pieces of clay once you have covered the vase with just a little wrapped over onto the bottom of the vase.

Use the back end of the knife tool from the Clay Tool Starter Set to press indentations into all of the Peacock Pearl clay.

Use the Super Slicer blade to trim excess clay from the bottom of the vase. After you trim off the excess clay stand the vase on your work surface to make sure the vase does not wobble or tilt. Once you have confirmed that the vase sits flat on your work surface bake the vase for 30 minutes and let cool completely while still in the oven.

Pour a small amount of the copper acrylic paint into a small plastic cup. Use the paint brush to paint a coat of paint onto a small section of the vase, make sure to get paint into the crevices and indentations. Use a damp paper towel to immediately wipe the excess paint from the surface of the clay. Make sure to not get any of the copper paint on the Copper clay at the top of the vase. The goal is to leave the paint in only the indentations and along the seams between the torn pieces. Continue adding paint and wiping off in small sections until you have the entire Peacock Pearl portion of the vase highlighted with the copper paint. Note: The reason you want to add paint in small sections instead of all at once is that by the time you get all of the paint on and start to wipe way the excess the paint may have dried in the first section you started.

Bake the vase one more time for 10 minutes to make sure the paint sets and is completely dry. Remember to let the vase cool completely while still in the oven.