

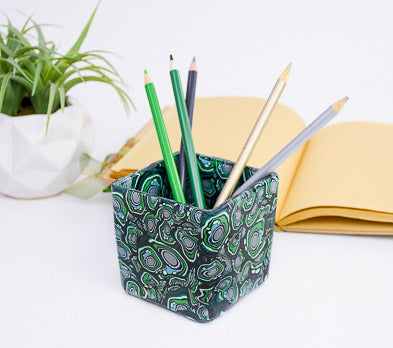
Sculpey Premo™ Easy Faux Malachite Pencil Jar
Sculpey Premo™ Easy Faux Malachite Pencil Jar
Designed by syndee holt
Read More
Read Less
Creating a polymer clay “cane” is very intimidating to clay users because of the fear of creating a “perfect” cane. Well, what makes this cane so “perfect” is the more “imperfect” it is, the more natural (and complex) it looks!
TIME TO COMPLETION: 90 minutes including baking
ADDITIONAL SUPPLIES
- Small glass jar
- Several sheets of plain paper
Project Instructions
- Getting Started:
Start with clean hands, unwrap and knead clay until soft and smooth, or condition by running clay though a Pasta Machine. We recommend using a designated machine for clay purposes only. When working with multiple colors, clean hands with soap and water or baby wipes (we have found that baby wipes work best) before switching colors. Shape clay, pressing pieces firmly together. Wash hands after use.
- Baking:
Mix a small amount (large pea sized)of Black Clay into about a 2x3 sheet of conditioned White clay sheeted on the wide-open setting. Add just a small pinch of the Forest Green to the mix.
Sheet about 1/4 block of the Turquoise clay and mix in a small bit of the Forest Green (as shown). Repeat with the Green clay as well.
Add about 4 pea sized pieces of the Forest Green to 3/4 of the Black clay.
By adding a small amount of the Forest Green, our signature color here to the clays, we make them more of a color family instead of color individuals.

Roll the mixed grey clay into a cylinder that is about 3/8 inch in diameter and 2.5 inches long. Sheet out a piece of Forest Green clay on the second from widest setting and trim to the width of the grey cylinder. Roll the cylinder in the Black sheet until the beginning of the sheet just touches the flat portion of the strip. Roll back slightly and trim at the mark it made. Do NOT worry if the clay overlaps a little – it will just make it look more natural!

Add a sheet of the Mint clay and another sheet of Black clay mixed with a little Forest Green clay. The Mint sheet can be one setting smaller if you wish. Note that I just wrapped the excess Forest Green mix around the cane this time and didn’t even bother to trim it. Random is GOOD in this project – it makes the design flow.

Use the BACK of your Clay Blade to firmly push notches into the length of the cane, this will make the wraps we just added look a little more irregular.

Roll about 1/4 of the Mint into a coil that is about 1/4 inch in diameter by 5 inches and add a thin wrap of Black clay. Reduce this cane slightly to about 1/2 of the original width. This does NOT have to be even width the entire length of the cane.

Add a Turquoise wrap to the cane and use the back of the blade to press firmly down on the length at irregular intervals like above. Add pieces of the Black-wrapped Mint cane and another small length of just the Turquoise (if you wish!)
Add a thin wrap of the Forest Green/Black mix around this assembly and use the back of your blade again to press firmly into these pieces.
Add a thin wrap of the Forest Green/Black mix around this assembly and use the back of your blade again to press firmly into these pieces.

Let’s add a wrap of the Green mix now and maybe a thin coil of it to the side as shown. Use the back of the blade again on this wrap. You can see how the blade is making the inner wraps look nice and irregular now.

Add a wrap of the Forest Green/Black mix, more of the Mint wrapped cane if you have it and a final thin wrap of Forest Green/Black mix. Press the back of the blade firmly into the cane. NOTE: You can alter your cane from mine by changing the width of the layers or which color goes where!

I added another wrap of the Forest Green/Black mix, then a Mint wrap, a JUST Forest Green wrap and a final Forest Green/Black mix. I also had 2 more pieces of the Mint cane from step 6 above.

Reducing the Cane:
I put the center of the completed cane snugly in the notch created by my thumb and forefinger and squeeze to create a dumbbell shape. And then I squeeze the same way out to each end. Remember this cane does NOT have be to perfectly smooth or perfect in diameter! It’s now about a little over an inch in diameter. You can reduce one piece slightly smaller if you wish. Note that the cane slice is NOT perfect round!
I put the center of the completed cane snugly in the notch created by my thumb and forefinger and squeeze to create a dumbbell shape. And then I squeeze the same way out to each end. Remember this cane does NOT have be to perfectly smooth or perfect in diameter! It’s now about a little over an inch in diameter. You can reduce one piece slightly smaller if you wish. Note that the cane slice is NOT perfect round!

Make several thin slices of the cane in different sizes and begin applying them to your glass surface. I even use half slices often. Slightly overlap the slices so that the glass does not show through. Slices can go above the lip and bottom so that you can trim them to the edge with your clay blade. Cover the entire glass piece.

Because my glass is rectangular, I can lay it on a clean sheet of paper and use the acrylic roller to gently roll and flatten the pieces together. If your glass is round, you can place it on a clean sheet of paper and roll it back and forth with slight pressure to help flatten. I would also use the acrylic roller on a round surface for difficult areas. Retrim the top and bottom edges if needed. Bake according to the directions above in Step 1 and allow the glass to completely cool in the oven.

Once the piece is baked and cooled, you can lightly sand any bumps that bother you. Then apply a light coat of Sculpey Gloss glaze if you wish! I like to dip my brush in water, touch it to a paper towel and then just dip the tip of the brush in the glaze. Then the water and glaze mix as I apply it and help to create a thin coat with no brush strokes. Allow the glaze to dry and your new jar is ready to use!
