
Sculpey Premo™ Amber Layers Wine Glass
Sculpey Premo™ Amber Layers Wine Glass
Designed by Amy Koranek
Read More
Read Less
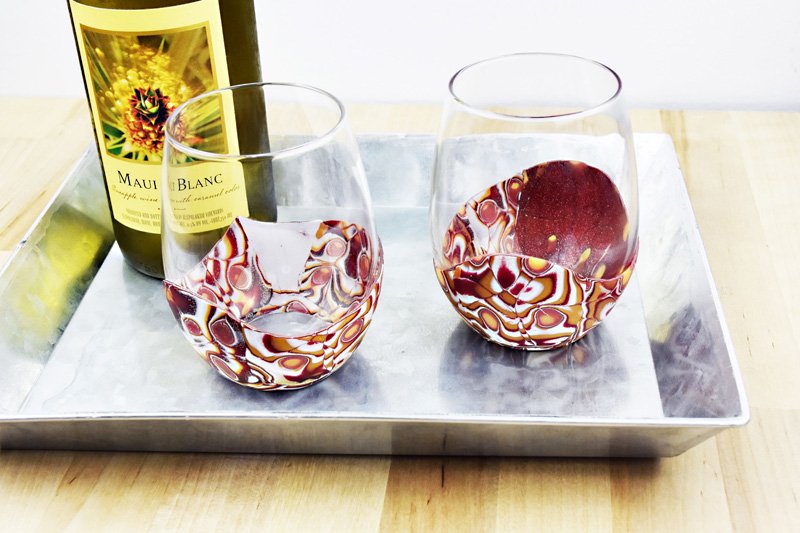
Premo Sculpey Amber gives a pop of translucent color in this Mokume Gane technique for decorating wine glasses. What a great "guest gift" for your next dinner party.
ADDITIONAL SUPPLIES
- Stemless wine glasses (2)
- Paper towel

Project Instructions
- Getting Started:
Start with clean hands, unwrap and knead clay until soft and smooth, or condition by running clay though a Pasta Machine. We recommend using a designated machine for clay purposes only. When working with multiple colors, clean hands with soap and water or baby wipes (we have found that baby wipes work best) before switching colors. Shape clay, pressing pieces firmly together. Wash hands after use.
- Baking:
First we will make a Mokume Gane slab to use in decorating the outside of the wine glasses. Sheet each color through the Clay Conditioning Machine on the thickest setting. Cut out same sized pieces of each color. A 2” x 2” square of each one should be enough to decorate two glasses.

Stack the colors as shown.

Roll over the thick stack with the Acrylic Clay Roller to thin it enough to go through the Clay Conditioning Machine.

Sheet the stack through the Clay Conditioning Machine on the thickest setting.

Cut the sheet in half and stack one half on top of the other. It’s okay to have edges that are not completely square. Mokume Gane is a very forgiving technique and does not have to be rigid in shape.

Sheet the layered sheet one more time through the Clay Conditioning Machine on the thickest setting.

This time cut the sheet into four equal sections.

Stack the sections on top of each other.

Cut the stacked sections in half and stack it one more time.

Push on all sides of the stack with the palms of your hands to make sure all the layers are holding together and that there are not air bubbles in between them. This will give the outside edges of the stack a more rounded appearance. Use the 2” circle cutter to cut all the way through the stack in two different directions. Push the stack back together with the palms of your hands so it does not come apart.

Make more circular cuts all the way through the stack. Keep pushing the stack back together from the outside edges.

Push random holes down through the stack with the medium ball tool. It’s important to go as deeply as you can with the holes so that the stack has patterning all the way through it.

Fill the holes with little plugs of the Amber clay.

Push on all sides of the stack to make sure all the cracks are sticking together. Roll over the stack with the Acrylic Clay Roller to seal up all the cuts.

Stand the stack on edge and slice through the stack parallel to the stripes with the Super Slicer to remove a slice that is about 1/8” thick. When you open up the cut you will see the beautiful Mokume Gane pattern on both sides of the cut.

Make several more 1/8” slices through the stack, always cutting parallel to the stripes.

Sheet each piece through the Clay Conditioning Machine on the thickest setting. Then sheet them again on the second thickest setting. You can sheet them again on the third thickest setting if you need to make them larger and thinner to fit your wine glasses.

Use the Super Slicer flexible blade to cut each piece in half on a curve.

Arrange the pieces around the bottom of the wine glass starting at the bottom and allowing the curved edges to create an uneven border around the bottom third of the glass. Press the pieces gently to the glass and make sure the seams are tight and closed. Trim pieces as necessary to create neat seams. Buff the seams with your fingertips to smooth. Make sure the clay pieces are all placed as tightly as possible to the glass. The clay will not bond with the glass, but if you make sure the clay fits tightly around the bottom and mid curves, it will not come off of the glass.

Use the Mokume Gane pieces to make a second glass. Wipe away fingerprints from the glass areas with paper towel before baking. Bake the glasses following the baking instructions for Premo. Allow to cool completely before use. Please hand wash your finished wine glasses to protect the art that you have so lovingly created.
