

Original Sculpey® Terra Cotta Rope Planter
Original Sculpey® Terra Cotta Rope Planter
Designed by Gretchen Amberg
Read More
Read Less
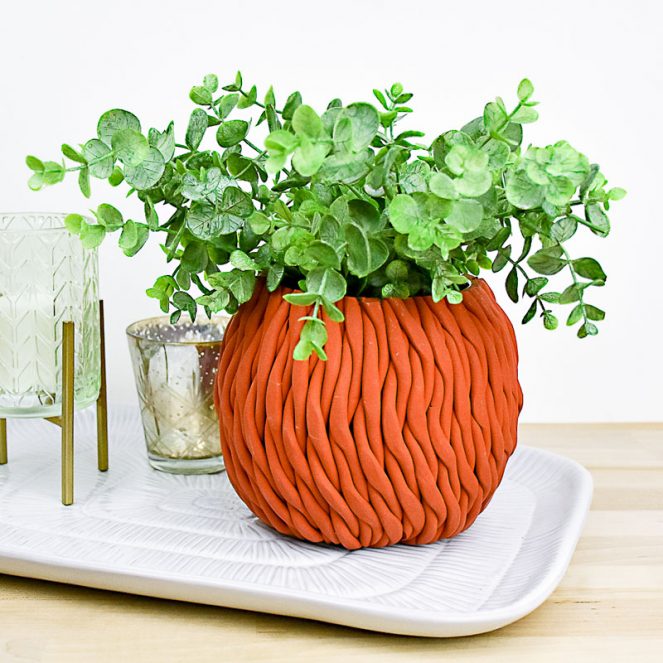
This amazing Original Sculpey Terra Cotta rope planter is so quick and easy to make, you might want to try some other shapes and sizes!
TIME TO COMPLETE: 45 minutes plus 3 bakings
ADDITIONAL SUPPLIES
• Globe Shape Glass Vase – 5” diameter
• Small Paint Brush
• Clear smooth sheet of glass, plexiglass, or acrylic
• Optional – Clay Extruder
Project Instructions
- Getting Started:
Start with clean hands, unwrap and knead clay until soft and smooth, or condition by running clay though a Pasta Machine. We recommend using a designated machine for clay purposes only. When working with multiple colors, clean hands with soap and water or baby wipes (we have found that baby wipes work best) before switching colors. Shape clay, pressing pieces firmly together. Wash hands after use.
- Baking:
Condition half of the package of clay, you will likely need more than this but the extra needed can be conditioned as needed. Roll as many 6” long 1/4” diameter snakes of clay as you can get out of the conditioned clay. If you have the optional extruder with a 1/4” hole disc, extrude the clay and cut into 6” lengths.

Gather the strands in sets of 2. For each set of two strands press the cut ends on either side of the pair of strands together.

Pick up a set of strands and hold at each of the pinched ends. Slowly twist the strands until you have 3 full twists in the middle. Press the two ends of the twisted strand down onto your work surface. Note: Pressing the ends of the twisted strands on the work surface will keep the strands from un-twisting. Continue twisting a few more sets of strands and pressing onto the work surface.

Use the clear piece of glass, plexiglass, or acrylic to gently press several of the strands flat. You only want to press a little, the goal is to create flats on the raised portion of the twists. After you have slightly flattened the twists press the sides of the twist to get rid of any gaps.

Pick up the glass globe and brush a thin coat of Bake and Bond onto the glass, in a section that is the entire length top to bottom and about 3/4” wide. Pick up one of the flattened twisted strands and place one end onto the bottom of the globe (make sure the strand is on the Bake and Bond), just to the inside of the outer edge of the globe. Press the clay firmly onto the glass. Lift the globe and lay the strand on the glass in a straight line going towards the open end of the globe. Lightly press the strand onto the glass so the strand stays in place.

Pick up another twisted strand. Use the Super Slicer to trim one end of the strand to an angle. Press the trimmed end against the bottom end of the first strand added, do not overlap onto the bottom of the globe. Lay the strand in a straight line towards to the top of the globe. Make sure the strand is butted up against the first strand added and press onto the glass. Use the Super Slicer to trim the top end of the strand to an angle. Continue this process of adding strands and trimming every other strand to angles at each end.

Once you have added enough strands to cover half of the globe bake for 25 minutes. Let the baked clay and glass cool to room temperature while still in the oven, also avoid opening the oven door while the oven is still on.

After the glass globe is cooled continue making and adding the strands until you have an opening of one strand width. At this point it is likely that you do not have a single strand width opening that runs the full length of the globe from top to bottom. To fill this gap, pick up one of the twisted strands, lay over the gap and shift up and down until you have found the place on the strand that will blend in with the rest of the globe. Trim the twisted strand to a point that will fit into the gap. Fit the point of the strand into the bottom of the gap and check if the cut piece will match the twisted pattern on the globe. If the pattern looks good, meaning the fit piece blends in, press the strand into place.
Use the blade to trim the excess clay from around the top edge of the globe. Bake the glass globe for 25 minutes. Let the globe cool to room temperature while still in the oven, also avoid opening the oven door while the oven is still on.

After the globe has cooled place the piece topside-down on the work surface. Tear off some pieces of the conditioned Terra Cotta clay and press into the open area on the bottom of the globe. Use your fingers to smooth the clay as flat as you can. Once the clay is smoothed over turn the globe over and press down onto the work surface to make sure the planter sits level.

Bake the glass globe for 25 minutes. Let the globe cool to room temperature while still in the oven, also avoid opening the oven door while the oven is still on. Once your piece has finished cooling you’re all done.
