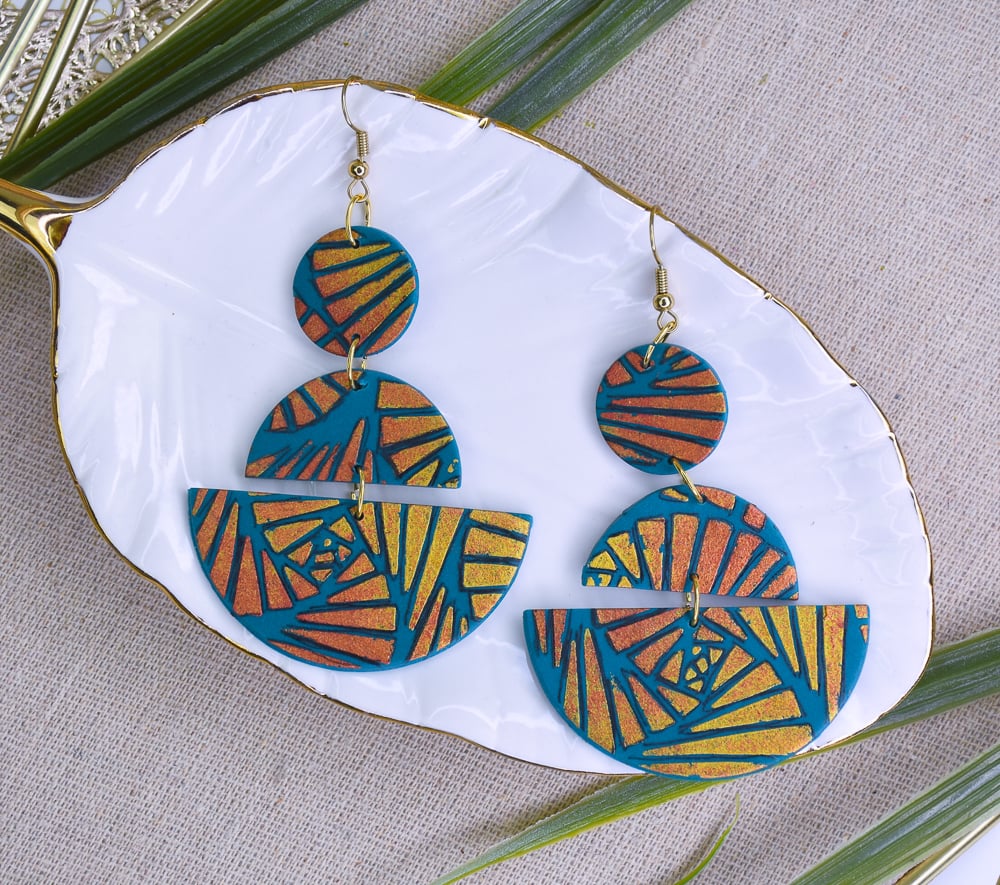

Sculpey Soufflé™ Graphic Stenciled Earrings
Sculpey Soufflé™ Graphic Stenciled Earrings
Designed by syndee holt
Read More
Read Less
These eye-catching earrings are a snap to create using a TCW Fantangle stencil, Sculpey Soufflé™ Sea Glass clay and eye catching metallic paints. There is a secret little zip in the finish with a “makers mark” hand-drawn black outline to each of the stenciled pattern components.
TIME TO COMPLETION: 30 minutes to create and 30 minutes to bake.
ADDITIONAL SUPPLIES
- TCW Product: Fantangle 6x6 stencil
- Clay dedicated pasta machine or acrylic roller
- Gold and Copper acrylic paint (mine are Jacquard Lumieres)
- Medium sized sponge pouncers (2) and small paintbrushes (2)
- Black thin line marker – Mine is a Micron #5 marker
- Gold-toned jump rings – mine are 8x6 oval jump rings (6 for the pair on the right and 2 for the post pair)
- Gold-toned ear wires and/or posts and glue for the posts
- Jewelry pliers
- Small piece of graphing paper

Project Instructions
Getting Started: Please make sure your work area is covered and you are not working on an unprotected surface. We recommend working on the Sculpey® Oven-Safe Work Mat, wax paper, metal baking sheet, or disposable foil. Uncured clay may damage unprotected furniture or finished surfaces. Be sure to cover your crafting area appropriately.
Start with clean hands, unwrap and knead clay until soft and smooth, or condition by running clay though a Pasta Machine. We recommend using a designated machine for clay purposes only. When working with multiple colors, clean hands with soap and water or baby wipes (we have found that baby wipes work best) before switching colors. Shape clay, pressing pieces firmly together. Wash hands after use. Baking: Begin by preheating oven to 275 °F (130 °C). After you are done creating; for best results bake clay on an oven-proof surface such metal, aluminum foil, an index card or the Sculpey® Clay Mat at 275°F (130 °C) for 30 minutes per 1/4" (6 mm) thickness according to package directions. Oven safe glass or ceramic surfaces are also acceptable for baking; however please note that the baking times may take longer as the glass or ceramic surfaces take longer to heat up. For best baking results, use an oven thermometer. DO NOT USE MICROWAVE OVEN. DO NOT EXCEED THE ABOVE TEMPERATURE OR RECOMMENDED BAKING TIME.
Start with clean hands, unwrap and knead clay until soft and smooth, or condition by running clay though a Pasta Machine. We recommend using a designated machine for clay purposes only. When working with multiple colors, clean hands with soap and water or baby wipes (we have found that baby wipes work best) before switching colors. Shape clay, pressing pieces firmly together. Wash hands after use. Baking: Begin by preheating oven to 275 °F (130 °C). After you are done creating; for best results bake clay on an oven-proof surface such metal, aluminum foil, an index card or the Sculpey® Clay Mat at 275°F (130 °C) for 30 minutes per 1/4" (6 mm) thickness according to package directions. Oven safe glass or ceramic surfaces are also acceptable for baking; however please note that the baking times may take longer as the glass or ceramic surfaces take longer to heat up. For best baking results, use an oven thermometer. DO NOT USE MICROWAVE OVEN. DO NOT EXCEED THE ABOVE TEMPERATURE OR RECOMMENDED BAKING TIME.
Sheet or roll out your entire 1 oz block of clay on either a middle setting on the clay dedicated pasta machine or roll it to slightly less than 1/4 inch. Press the stencil lightly onto the sheeted clay. Assemble your pouncers, brushes and paint for some stencil fun!

I prefer to apply my paint to the pouncer with a small brush, so I load BOTH pouncers with my selected paints. (I like to see how long I can keep track of which brush belongs to which pouncer.)

Now just pounce away! You can pounce each color in an area and then pounce over the other color slightly to blend the edges. Make sure that you pounce enough paint into the stencil to fill the design.
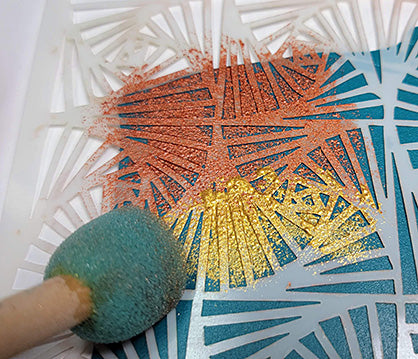
I repeatedly pounce colors onto the stencil to fill all the gaps and to make sure that each color is represented in the design.

Remove the stencil and wash it in soapy water while the paint dries on your clay sheet. GORGEOUS!!!

Use the largest circle cutter (2 inch) to cut out a portion of the design. Just cut one circle for now!

I like to use graphing paper to help me cut my designs. I can line the circle of clay up with the graphing lines to determine the center and use that line to guide my blade position!

Use the 1-1/4 inch circle cutter to cut another circle and split it in half as described above. Use the smallest circle cutter to cut out two circles for the top of the earrings.

I cut another 2-inch circle to help me match the patterns better with the small swirl design in each one. I set aside the remaining half circles for the second pair of earrings.

Back to the graphing paper to align all my earring elements so I know exactly where to put my holes for assembling. This way each piece will hang perfectly straight and centered! Repeat for the other earring and set on the baking tray.

I created my second pair of earrings from the two remaining half circles and punch another pair of the small circles for the top. Once again, align them on your graphing paper and punch your holes. Bake both sets of earring elements as described in Step 1 above.

Use the Micron black marker to draw just on the outside of the painted design. No, it doesn’t have to be perfect! If you DO make a mistake, a little hand sanitizer on a cotton swab will remove it while the ink is still wet.

Look at the amazing difference that little black line makes in these two pieces. The one on the left is just the stenciled paint while the one on the right has been “marked” with the black pen. Mark all the pieces for both sets of earrings (if you are making both sets)

This is my assembly pattern for the three-tiered earrings. The post earrings will only have one jump ring and the post glued to the back of the top portion of the earring.

Here is a final look at both pairs of my earrings. NOTE: the posts have not been glued to the back of the earrings on the right. Use a good quality super glue and allow the glue to cure completely.
