

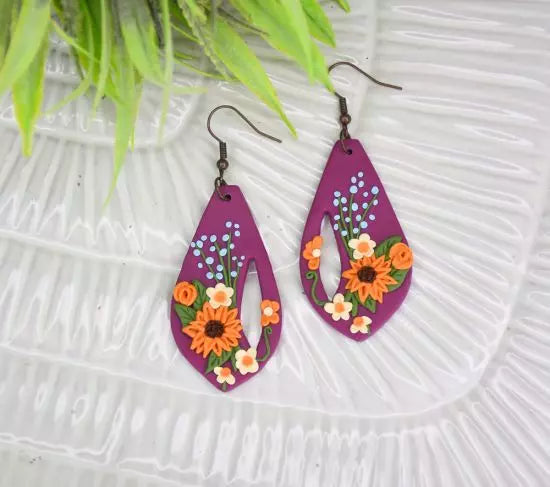
Sculpey Soufflé ™ and Premo™ Sunflower Garden Earrings
Sculpey Soufflé ™ and Premo™ Sunflower Garden Earrings
Designed by Lauren Medina
Read More
Read Less
Sculpey Premo™ and Soufflé™ team up again to create these colorful garden earrings featuring a multitude of floral shapes and colors. TIME TO COMPLETION: 158 mins to create
45 mins to bake
45 mins to bake
ADDITIONAL SUPPLIES
- Clay cutter about 2 inches
- Needle tool
- Hand drill, 1/16 inch drill bit
- 600 grit micro-finishing sandpaper
- 1200 grit micro-finishing sandpaper
- Antique copper ear wires
Project Instructions
Step 1
- Getting Started:
Start with clean hands, unwrap and knead clay until soft and smooth, or condition by running clay though a Pasta Machine. We recommend using a designated machine for clay purposes only. When working with multiple colors, clean hands with soap and water or baby wipes (we have found that baby wipes work best) before switching colors. Shape clay, pressing pieces firmly together. Wash hands after use.
- Baking (also called Curing):
Step 2
Roll out 1/4 block of Soufflé Turnip on setting 5 on a pasta machine. Cut out a pair of earrings with a clay cutter. This will be your base. Press your cutter firmly into the clay. You want to cut all the way through. If you don’t have clay cutters, you can freehand a shape of your own.
Step 3
Mix together 50% Soufflé Koi and 50% Soufflé Yellow Ochre. You should have approximately a grape-sized amount of the yellow/orange mixture and Premo Spanish Olive.
Step 4
Use Spanish olive to create tiny foliage details. Create a mixture of large leaves, small leaves, and some stems. Arrange these details however you like.
Step 5
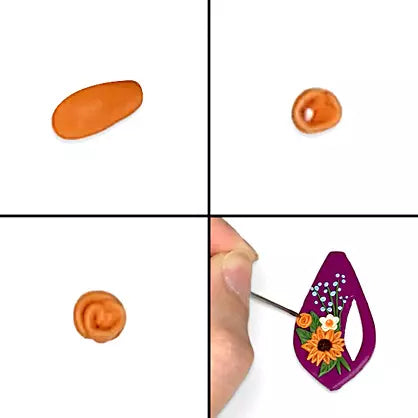
Add details like veins on the leaves using a needle tool.Roll out tiny balls of your yellow/orange mixture to create sunflowers.
My sunflower has two levels, 8 petals per level - I placed the second level of petals between the first level.
To create a petal convert the tiny balls of clay into a shape that resembles a grain of rice. Place the petal where you want, then press the center with a needle tool.

Step 6
Add a ball of Premo Burnt Umber to the centers of your sunflowers. Use a needle tool to create the iconic, textured center.Create small flowers using Soufflé Ivory for the petals and Soufflé Koi for the center:
Roll a tiny ball of ivory clay and press from the center outwards to form a petal.
Repeat this four more times, then place a small ball of Soufflé Koi in the center, pressing it down with a dotting tool.
Mirror your design on the other earring as you go.

Step 7
Make a tiny snake using Premo Pale Blue. Make even tinier balls of blue and press them onto the taller stems with a dotting tool.
Step 8
Create small rosettes using Soufflé Koi:Flatten a small, short snake with your finger.
Join the end to form a circle - or something that resembles a cinnamon roll center. Repeat the first step to create more petals.
Place them around the center you created.
Use a needle tool to separate the petals if they get misshapen.
Step 9
Add as many small flowers and rosettes as you want. I also added a small vine detail.Once you’re happy with your design, bake at 275 °F for 45 mins on a ceramic tile lined with copy paper (30 mins if baking on an index card or baking mat).

Step 10
After baking, clean up your edges, if needed, with some micro-finishing sandpaper sheets. Use a 600 grit first and follow up with a 1200 grit.
Step 11
You’ll need two antique copper ear wires and two 1/4 inch antique copper jump rings to assemble. The hooks and loops on the ear wire should face the same direction. If they don't align, you can carefully adjust them to the correct orientation using pliers.
Step 12
Create small holes at the top of your earrings using a hand drill. Loop the jump rings through the ear wires and your final pieces. Enjoy your new earrings!