

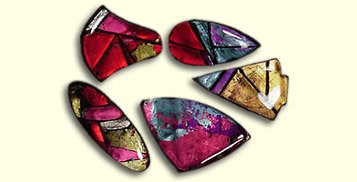
Sculpey Premo™ Dichroic Illusions Pin
Sculpey Premo™ Dichroic Illusions Pin
Read More
Make these glamorous faux dichroic pins to wear or give as the perfect gift.
Read Less
ADDITIONAL SUPPLIES
- Several assorted colors of Jones Tones Foils (or other)
- Plastic shape templates, such as drafting templates
- Clear Ultra Thick Embossing Enamel (at least an ounce- more if making several pendants or pins)
- Metal painter’s spatula
- OPTIONAL: embossing enamel melting pot
- Hot glue gun pad
- Piece of glass or shiny ceramic tile (or something similar to bake on and then to cool the piece)
- Disposable aluminum pie-or-baking pan
- Oven mitt to remove pan from oven
- Sharp scissors (optional)
- 400 or 600 grit automotive sandpaper
- Small bowl of water to sand in
- Your choice gold or silver pin back to fit Cyano glue (“Super” glue)
Project Instructions
- Getting Started:
Start with clean hands, unwrap and knead clay until soft and smooth, or condition by running clay though a Pasta Machine. We recommend using a designated machine for clay purposes only. When working with multiple colors, clean hands with soap and water or baby wipes (we have found that baby wipes work best) before switching colors. Shape clay, pressing pieces firmly together. Wash hands after use.
- Baking:
Flatten half a block of Black clay on the thickest setting of your Clay Conditioning Machine, or about ¼ inch thick.

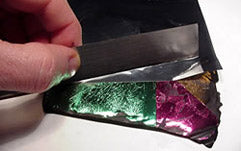
Cut several small sheets of the foils, and arrange them “colored side up” on the surface of the clay.

Use the sharp side of the Super Slicer to burnish the foils tightly to the surface of the clay.

Grasp the corner of one of the sheets and in one quick “ripping” motion, pull it from the clay surface. Repeat until all sheets are removed, and the foils are well-transferred to the clay surface.
If there is any Black clay showing through that you don’t want, lay another contrasting color of foil on the area where the Black is showing, and repeat steps 3 and 4.
Place the shape template on top of the clay, being sure you like what you see as far as the arrangement of foils, as this is what your pin will end-up looking like.

Use the Needle Tool to trace around the edge of the shape template LIGHTLY, at first, then re-trace deeper until you’ve cut totally through the entire piece of clay.

Remove the cut-out piece.

Sprinkle the top of the clay with the Clear Embossing Enamel. HELPS: The shaker that the embossing enamel comes in can be unwieldy to handle-especially if you have the large sized-one. Try transferring some of the enamel into a small salt or pepper shaker. You can apply the coats more evenly, thinly, and direct the flow better.

Place the piece in the oven on the glass, tile or other item the embossing enamel won’t stick to, and bake at 275 °F until the embossing enamel melts. OR, if you have a small embossing enamel pot, use that to melt the embossing powder by placing the piece in it and turning it on. This will take about 20 minutes or so until the powder melts. NOTE: this is not hot enough to fully polymerize your piece; it will still need to be baked at 275 °F for 30 minutes. This method just gives you the opportunity to add several more coats of embossing enamel before the final baking, and it also is a nice flat surface for your piece to rest in, so it helps to flatten the surface of the enamel more evenly. CAUTION! THE SURFACES OF THE POT AND THE PIECE ITSELF ARE VERY VERY HOT!!! USE EXTRME CAUTION AROUND THESE ITEMS! I RECOMMEND USING A SMALL METAL PAINTER’S SPATULA TO REMOVE YOUR PIECE FROM THE POT.

Continue to add more coats of embossing enamel until you are happy with the thickness. A minimum of two coats or a maximum of 6 coats for maximum “glassy depth” is recommended for this project. Note that if you are using an oven, you’ll have to add each coat and return the piece to the oven on the sheet of white or wax paper and re-melt the embossing powder. NOTE: several thin coats work much better than one or two thick coats, as the enamel will tend to run if it is applied too thickly.
Once you’ve baked the piece fully for 30 minutes at 275 °F, and while still warm, CAREFULLY remove it from the sheet of paper using the metal painter’s spatula. Allow it to cool on a piece of glass, a shiny ceramic tile, or any flat surface that the enamel will not stick to once cooled. HELP: If you have a hot glue gun pad, this is ideal to cool your piece on.

Cut any pooled embossing enamel off the edges of the piece using sharp scissors or trim carefully with the Clay Knife. Lightly sand the back of the piece using 400 or 600 grit automotive sandpaper under a running faucet or in a small bowl of water. Dry the pieces, and then apply “Super” glue to area on back that you wish to mount the pin back. Be sure the pin back is clean and free of oils or dust before applying.