

Sculpey Premo™ Faux Turquoise Faceted Ring
Sculpey Premo™ Faux Turquoise Faceted Ring
Designed by Amy Koranek
Read More
Read Less
Who doesn’t love a big chunky stone ring to wear on occasion? This project show you exactly how to create a Premo faux turquoise ring, but you can also adapt the ring construction to any number of other polymer clay techniques!
COMPLETION TIME:60 Minutes to make and bake
ADDITIONAL SUPPLIES
- Scrap paper or deli paper or wax paper
Project Instructions
Getting Started: Please make sure your work area is covered and you are not working on an unprotected surface. We recommend working on the Sculpey® Oven Safe Work Mat, wax paper, metal baking sheet, or disposable foil. Uncured clay may damage unprotected furniture or finished surfaces. Be sure to cover your crafting area appropriately. Start with clean hands, unwrap and knead clay until soft and smooth, or condition by running clay though a Pasta Machine. We recommend using a designated machine for clay purposes only. When working with multiple colors, clean hands with soap and water or baby wipes (we have found that baby wipes work best) before switching colors. Shape clay, pressing pieces firmly together. Wash hands after use. Baking: Begin by preheating oven to 275 °F (130 °C). After you are done creating; for best results bake clay on an oven-proof surface such metal, aluminum foil, an index card or the Sculpey® Oven Safe Work Mat at 275°F (130 °C) for 30 minutes per 1/4" (6 mm) thickness according to package directions. Oven safe glass or ceramic surfaces are also acceptable for baking; however please note that the baking times may take longer as the glass or ceramic surfaces take longer to heat up. For best baking results, use an oven thermometer. DO NOT USE MICROWAVE OVEN. DO NOT EXCEED THE ABOVE TEMPERATURE OR RECOMMENDED BAKING TIME. BAKING SHOULD BE DONE BY AN ADULT.
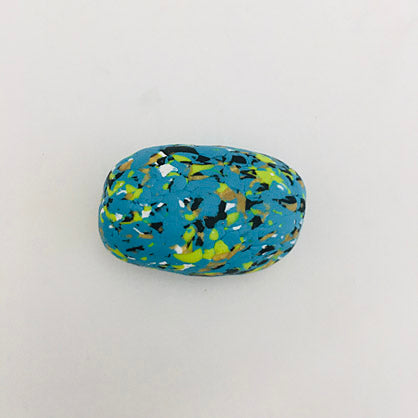
These instructions are based on 1 ounce blocks of Sculpey PremoTM. Start with 1/4 block (1/4 ounce) of Turquoise, and a sliver of each of 18K Gold, White, Wasabi, and Black.

Place the pieces of clay on a piece of paper so that they are kept in one spot on your work surface. Using a Clay Blade, chops the colors up randomly.

Keep chopping and chopping and chopping until the clays are in tiny bits. I use this method for the faux turquoise because I don’t want to create swirls in the clay, but instead I want to create just bits of random color.

Push the colors all together tightly using the palms of your hands into an oval shape. Don’t twist the clay, just compress it.
Press the oval slightly down on the work surface. Push one end down flatter with your thumb allowing the other end to bulge up slightly.

Push a divot into the flattened end with either the 12mm Ball Tool from the Dual End Detail Tools or using the Ball Tool from the Clay Tool Starter Set. Push the tool into the clay as far as you can. This divot will be the starting point of the hole that we will need to turn the clay into a ring.
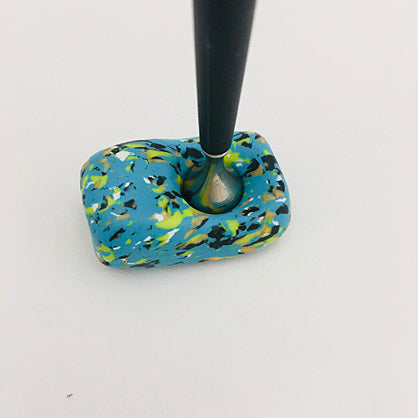
Flip the clay over and push the tool from the opposite side going all the way through the ring.

Wiggle the ring onto your smallest finger to gently stretch the hole.

If you have a circle cutter that is about the same size as your finger, this will be helpful. If you do not, we can still make the right size hole without a cutter.

If you have a cutter, cut a hole neatly into the ring removing the divot.

If you don’t have a cutter, do your best to wiggle the hole more open by placing it on a larger finger and gently wiggling it into place. Carefully remove the ring from your hand so we can work on the facets.

Lay the ring down once again. We want to make all the cuts as clean as possible to make it look faceted. If your clay ring is very warm from handling, you can allow it to rest for a few minutes or even place it in your refrigerator or freezer for a little while to firm it up.
The first cut will be to cut off the bulge on the front. Each time I make a cut, I’m laying the cut piece down from the area where I removed it so you can see the progress.
The first cut will be to cut off the bulge on the front. Each time I make a cut, I’m laying the cut piece down from the area where I removed it so you can see the progress.

Next, cut the back of the ring off straight.

Then I removed the corners at the back. Always keep the blade very straight as you are cutting off pieces and repair wonky cuts with your fingertips when possible.

The next two shavings were off the front bulge along the top corners.

This view is looking at the ring from the hole end as it balances on the front cut. Just keep removing any areas that are not really angular to make them faceted.

Here’s my final look. I even shaved the edges of the ring hole down in all directions so that the band will be thinner around my finger. Sculpey PremoTM is super strong when baked, but you will need about 1/8” of clay thickness around the hole to keep it stable and strong.

Flipping the ring over, double check that all the edges are smooth and angular. Bake the ring following the baking instructions for Sculpey PremoTM . Allow to cool completely before handling.

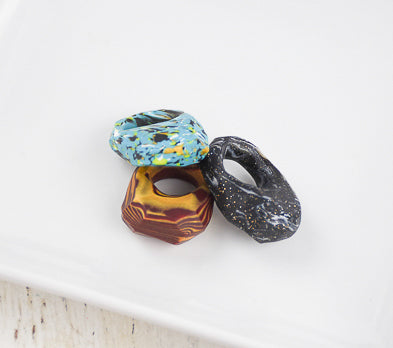
Here’s some inspiration for other styles of Faceted Rings that you can make with the clays in this kit.
The dark red ring is made from simply thinly layering Alizarin Crimson and 18K Gold. Form them into an oval lump like you did in Step 5. As you shave away layers, you will get the cool patterns shown here. The black ring is made from swirling Twinkle Twinkle and Silver clays together then shaving the facets into place.
The dark red ring is made from simply thinly layering Alizarin Crimson and 18K Gold. Form them into an oval lump like you did in Step 5. As you shave away layers, you will get the cool patterns shown here. The black ring is made from swirling Twinkle Twinkle and Silver clays together then shaving the facets into place.
