

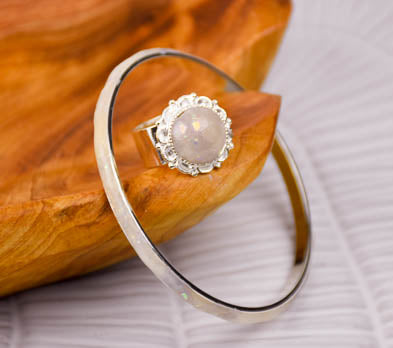
Liquid Sculpey® Faux Opal Effect Jewelry
Liquid Sculpey® Faux Opal Effect Jewelry
Designed by Kristin Vaughn
Read More
I really love using translucent clay to play with depth effects within a piece. You can really layer different elements together to achieve some wonderful striking effects. I thought it would be cool to add Liquid Sculpey and Opal Premo into the mix to come up with a faux opal stone effect. You can play around with the colors of Liquid Sculpey to get some different effects. The colors I chose for this project combine to form a milky blue gray color, with little bits of the solo colors making an appearance for a little variety in the finished piece. I’ve chosen to use Nunn design bezels, but this technique would also make some really stunning stand-alone cabochons! This project gets a little messy so make sure you have some wipes handy for easy clean-up.
This project is part of the 2021 Design Squad Challenge.
Read Less
ADDITIONAL SUPPLIES
- Nunn Design Bezels of Choice
- Acrylic Plate
- Wipes
- Glue to affix cabochon to jewelry bezel (I used E6000)
- Disposable gloves
Project Instructions
GETTING STARTED WITH PREMO AND LIQUID CLAY:
Please make sure your work area is covered and you are not working on an unprotected surface. We recommend working on the Sculpey® Oven Safe Work Mat, wax paper, metal baking sheet, or disposable foil. Uncured Liquid Polymer Clay may damage unprotected furniture or finished surfaces. Be sure to cover your crafting area appropriately.
Getting Started with Premo Clay:
Start with clean hands, unwrap and knead clay until soft and smooth, or condition by running clay though a Pasta Machine. We recommend using a designated machine for clay purposes only. When working with multiple colors, clean hands with soap and water or baby wipes (we have found that baby wipes work best) before switching colors. Shape clay, pressing pieces firmly together. Wash hands after use.
- Baking:
Chop Equal parts of Premo Opal and Premo White Translucent with your tissue blade. I am using about 1/3 of a bar each here, which is far more than needed for this project, but I will use it for other things also. You are looking for around pea-sized chunks, but the more they vary in size and shape, the more natural look your finished project will have.

Drizzle equal amounts of each color of the Liquid Sculpey all over your chopped up clay. You want enough to coat each little chunk of clay.

Start mixing the chopped pieces of clay with your gloved fingers to coat each piece. Most of the liquid clay will combine to form one color, but you should avoid overmixing so that you have some areas where some of the clay varies slightly in color. (a little peek of copper or amber is good!) Once the clay pieces are coated in liquid clay, start smashing them together with your hands. This part is pretty messy and will take a little patience. Keep pressing and forming the clay together until you have one solid piece. Using your acrylic plate, pressing on each side of the chunk of clay and rotating until you form a can shape that you’ll easily be able to cut slices off of. At this point, the liquid clay will still be pretty sticky and messy. You can go ahead with the next step, but you may find it easier to work with if you let it rest for an hour or two.

Roll out a thin sheet (about 1mm) of white translucent to form a base for your slab.

Cut thin slices of your cane and place them on your base right up next to each other so that your base layer is completely covered.

Roll your clay flat with your acrylic roller, as evenly as possible. Be sure to press well at the seems to avoid any breaking or cracking. I rolled it back down to around 1mm to fit into my bracelet bezel.

For the bracelet: Measure your bezel and cut a strip to fit inside. Wrap it around your bracelet bezel taking care to press it firmly into the bracelet. Smooth the seam with your fingers, as well as smooth out any fingerprints.

For the ring: find an area of your slab that has some interesting detail that you like. Press your ring bezel into the surface so you know the size and shape of clay to cut out to fit inside.

Cut this shape out of your slab. If you would like the opal to be domed out of the bezel, cut two and stack them on top of each other. If you would like it flat, just cut one.

Press your pieces of clay into the bezel and shape it into your desired shape. Smooth out any fingerprints. Bake according to directions.

After baking, gently pry out cabochon from the ring bezel. It should come out fairly easily. Apply Sculpey Gloss Glaze to the cabochon and let dry. Apply Sculpey Gloss Glaze to the bracelet as well, taking care to only gloss the clay surface and not the metal. (Pro tip: apply glaze with your fingertip to avoid brush strokes)

Once the glaze is dry, use a small amount of glue and affix your cabochon back inside the ring bezel. Since the bracelet bezel is a continuous circle, the clay will stay in place by itself and there is no need to glue the bracelet.

Stand back and admire your work!

- Choosing a selection results in a full page refresh.
- Opens in a new window.