

Sculpey Premo™ Rustic Pendant or Brooch
Sculpey Premo™ Rustic Pendant or Brooch
Designed by syndee holt
Read More
Read Less
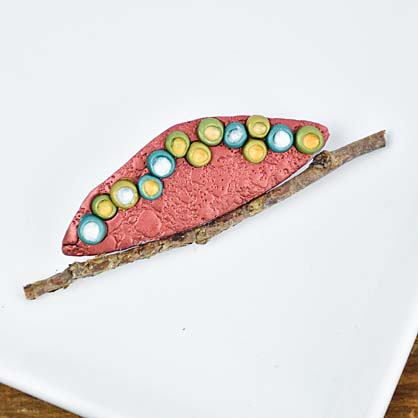
This cool organic looking design uses the Etch n’ Pearls to create tiny bowls that you fill with Liquid Sculpey!
TIME TO COMPLETE: 60 minutes to make and bake
ADDITIONAL SUPPLIES
- Organic looking stamp for texture
- Exacto blade
- Template for shape
- Toothpicks
- Pin back
- Instant glue
- Small damp sponge
- Optional: small stick
Project Instructions
Please make sure your work area is covered and you are not working on an unprotected surface. We recommend working on the Sculpey® Oven Safe Work Mat, wax paper, metal baking sheet, or disposable foil. Uncured Liquid Polymer Clay may damage unprotected furniture or finished surfaces. Be sure to cover your crafting area appropriately.
Getting Started with Premo Clay:
Start with clean hands, unwrap and knead clay until soft and smooth, or condition by running clay though a Pasta Machine. We recommend using a designated machine for clay purposes only. When working with multiple colors, clean hands with soap and water or baby wipes (we have found that baby wipes work best) before switching colors. Shape clay, pressing pieces firmly together. Wash hands after use.
Getting Started with Liquid Sculpey
Stir Liquid Sculpey® completely. Thin with Sculpey® Liquid Clay Softener as needed - Wash hands after use (we have found that baby wipes work best) .
Getting Started with Premo Clay:
Start with clean hands, unwrap and knead clay until soft and smooth, or condition by running clay though a Pasta Machine. We recommend using a designated machine for clay purposes only. When working with multiple colors, clean hands with soap and water or baby wipes (we have found that baby wipes work best) before switching colors. Shape clay, pressing pieces firmly together. Wash hands after use.
- Baking:
Getting Started with Liquid Sculpey
Stir Liquid Sculpey® completely. Thin with Sculpey® Liquid Clay Softener as needed - Wash hands after use (we have found that baby wipes work best) .
- Baking:
Sheet out a small section of the conditioned Bronze clay on a medium setting and apply your organic texture (mine is Judikins Esponge stamp). Use your selected template to cut out your design with an Exacto blade.

Sheet out another small piece of clay on the widest setting on the clay and place it under your shape. Use the Exacto blade to trim around this piece at about a 45 degree angle. (NOTE: I like to place my clay on a small piece of paper so that I can rotate it easily to cut). Once you have cut the shape out again, gently press your fingers around the edges of the shape to slightly round the edges of the clay (that’s what that 45 degree under cut was about!)

Sheet out a small piece of the Peacock Pearl. Mix another small piece of the Peacock Pearl with the Gold clay to create a metallic green color. You only need small portions of each of these colors. Sheet both colors out on the widest setting on the clay conditioning machine.

Press the largest Etch n’ Pearl into the damp sponge and then press firmly into one of the sheet of clay. Twist slightly and remove the tool. The “pearl” may remain on the paper or in the tool itself. If it is on the paper, press the tool into the sponge again and pick up the pearl with a scuffing motion. Gently press the pearl into place on the Bronze clay. Repeat to create your pattern using the large and medium Etch n’ Pearls.

Use the smallest Dual End Detail tool to gently open up each of the pearls. Start by pressing into the center of the pearl and then using a tight circular motion to open the pearl up. Repeat for all the pearls.

Squeeze a couple of drops of each of the Liquid Sculpey colors out on a smooth tile or I like to use empty clay wrappers. Dip your toothpick into a selected color and fill one of the opened pearls with this color. Add more Liquid Sculpey as needed and alternate between the Pearl and Gold LS.

Bake according to the directions above in Step 1. Glue a pin back to the brooch or mount as a pendant. I added a small textured twig to the side of mine with instant glue.
