

Premo Coil Bird Pin
Premo Coil Bird Pin
Designed by Amy Koranek
Read More
Read Less
Paper quilling is a fun and popular craft! we have recreate it using Sculpeu Premo clay!
ADDITIONAL SUPPLIES
- Exacto craft knife
- Metal pin bar
- Clear, fast drying glue
Project Instructions
Step 1. Getting Started:Do not use unbaked clay on unprotected furniture or finished surfaces. Start with clean hands and work surface area. Good work surfaces include wax paper, metal baking sheet, or disposable foil. Knead clay until soft and smooth. For best results, clean your hands in between colors. Shape clay, pressing pieces together firmly. Bake on oven-proof glass or metal surface at 275 degrees F (130 degrees C) for 15 minutes per ¼” (6mm) thickness. For best baking results, use and oven thermometer. DO NOT USE MICROWAVE OVEN. DO NOT EXCEED THE ABOVE TEMPERATURE OR RECOMMENDED BAKING TIME. Wash hands after use. Baking should be done by an adult. Begin by preheating oven to 275 degrees F (130 degrees C). Test temperature with oven thermometer for perfectly cured clay. For best results, condition all clay by running it through the clay dedicated pasta machine several passes on the widest setting. Fold the clay in half after each pass and insert the fold side into the rollers first.
Start with clean hands, unwrap and knead clay until soft and smooth, or condition by running clay though a Pasta Machine. We recommend using a designated machine for clay purposes only. When working with multiple colors, clean hands with soap and water or baby wipes (we have found that baby wipes work best) before switching colors. Shape clay, pressing pieces firmly together. Wash hands after use.
- Getting Started:
Start with clean hands, unwrap and knead clay until soft and smooth, or condition by running clay though a Pasta Machine. We recommend using a designated machine for clay purposes only. When working with multiple colors, clean hands with soap and water or baby wipes (we have found that baby wipes work best) before switching colors. Shape clay, pressing pieces firmly together. Wash hands after use.
- Baking:
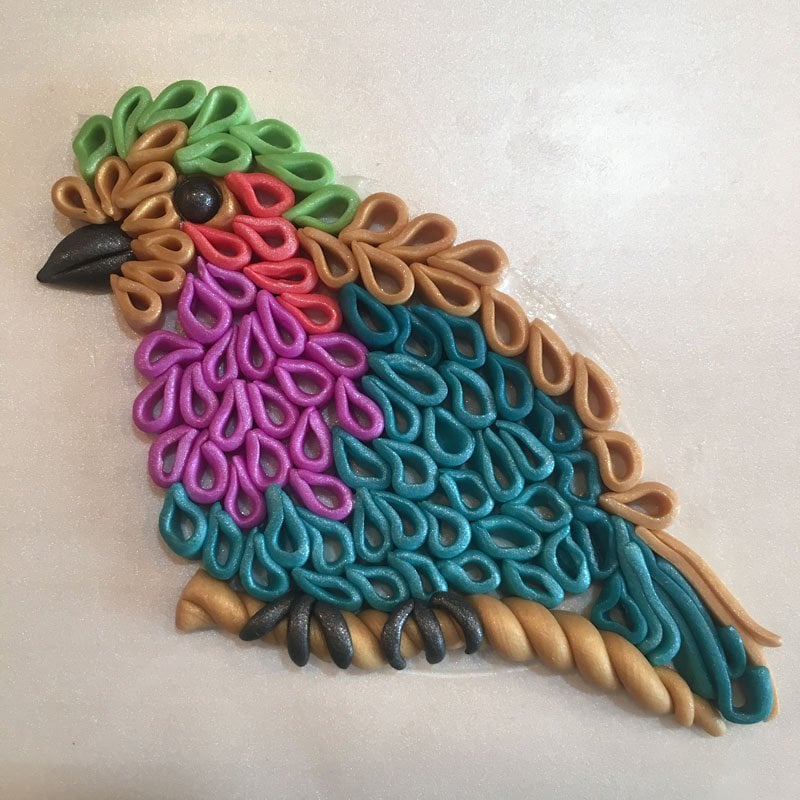
Mix 1/8 bar Pearl with 1/8 bar Sunset Pearl. Mix 1/8 bar Pearl with 1/8 bar Bright Green Pearl.Mix 1/8 bar Pearl with 1/8 bar Peacock Pearl.Mix 1/8 bar Pearl with 1/8 bar Purple Pearl. Sheet each color through the pasta machine to the fourth thickest setting. Cut strips from each color that are 5/16” wide. Cut across the strips perpendicular making little 3/16” wide cuts. You’ll also need a strip of Peacock Pearl that isn’t mixed with Pearl and a strip of 18K Gold.

Sheet 1/2 block of Pearl through the pasta machine to the fourth thickest setting. Make a loose sketch of the bird on the Pearl clay with the 2mm ball tool. I looked up my bird on the internet so I’d have a rough idea of it’s body shape.

Start with the beak. Make a little teardrop shape from Graphite Pearl. Score a line in the beak.

Paint a small area around the beak with a thin layer of Pearl Liquid Sculpey (LS). Just start with a small area so it’s not in your way as you add the details. When you add the coil pieces, you’ll need to add more LS

Pick up one little strip of 18K Gold and pinch it between your fingers to soften the cut edge. Bend the piece over so the two ends touch and pinch them together. Place six of these little loops around the beak standing on their edges as shown. The Pearl LS will help the delicate shapes adhere to the base clay

Keep making little teardrop loops and adding them in rows around the first row. Tuck the points in between the loops of the previous row. Make sure each little teardrop coil is standing upright and that the coils are as close together as possible.

Keep adding colors as shown. Using the photo I found on the internet as an inspiration, I made my bird have a gold back with a Peacock Pearl row underneath. I filled in the body with Light Purple Pearl and Light Peacock Pearl. For the tail details, add little strips of light Peacock Pearl, Peacock Pearl, and 18K Gold but don’t bend them into loops.

Decide where the eye should go. Press in a divot there with the 6mm ball tool.

Set a Graphite Pearl eye in the divot with the medium Etch ‘n Pearl tool.

Twist a rope of 18K Gold and add it beneath the bird for a branch. Add tiny pieces of Graphite Pearl for talons. Cut out the shape of the bird with a craft knife as close to the coils as possible. Bake the bird following the baking instructions. Allow to cool completely on a flat surface so it won’t curl while cooling. Glue on a pin bar when the clay is cool and allow to dry completely.
