

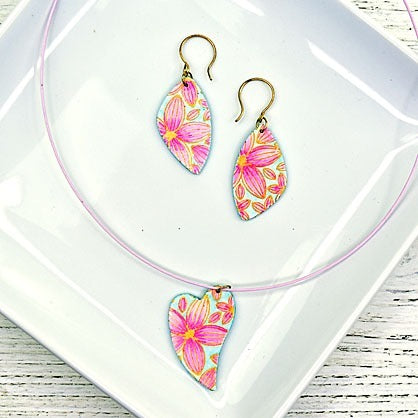
Sculpey Soufflé™ Silkscreened and Inked Jewelry Set
Sculpey Soufflé™ Silkscreened and Inked Jewelry Set
Designed by syndee holt
Read More
Read Less
What’s better than an afternoon of Sculpey Clay Play? An afternoon of Sculpey Clay Play and COLORING! Chameleon markers are a perfect way to add color to your silkscreened images.
ADDITIONAL SUPPLIES
- Chameleon Color Tones Markers – I’ve used Grape and Sky Blue
- Gold acrylic paint, small brush
- 6mm gold toned jump rings (3), gold toned ear wires (2), gold toned chain or coordinating cord
- Sculpey Needle tool or jewelry drill and small bit
- Sheet of plain paper
Project Instructions
Please make sure your work area is covered and you are not working on an unprotected surface. We recommend working on the Sculpey® Oven-Safe Work Mat, wax paper, metal baking sheet, or disposable foil. Uncured clay may damage unprotected furniture or finished surfaces. Be sure to cover your crafting area appropriately.
Start with clean hands, unwrap and knead clay until soft and smooth, or condition by running clay though a Pasta Machine. We recommend using a designated machine for clay purposes only. When working with multiple colors, clean hands with soap and water or baby wipes (we have found that baby wipes work best) before switching colors. Shape clay, pressing pieces firmly together. Wash hands after use.
Start with clean hands, unwrap and knead clay until soft and smooth, or condition by running clay though a Pasta Machine. We recommend using a designated machine for clay purposes only. When working with multiple colors, clean hands with soap and water or baby wipes (we have found that baby wipes work best) before switching colors. Shape clay, pressing pieces firmly together. Wash hands after use.
- Baking:
Sheet out the conditioned Igloo clay on the middle setting on the Clay Conditioning Machine or use the acrylic roller to roll out a sheet about a little less than a ¼ inch thick. Lay the selected silkscreen, with the shiny side down, onto the clay and gently rub into place.

Squeeze a small amount of the paint onto the silkscreen and used the provided spatula to spread the paint quickly over the entire selected silkscreen. Remove any excess paint with the spatula. Immediately remove the silkscreen to wash and dry it. NOTE: I like to use a small micro fiber towel to dry my screens. Allow the screen to dry completely – but you can roughly trim away any excess clay. Repeat steps 2 and 3 two more times for a total of 3 screens.


Use the largest of the Irregular triangles to cut out two pieces from each screen as shown. Repeat for two of the screened pieces you have created for a total of 4 pieces. If you just turn one of the pieces in each pair 90 degrees you get opposite pieces! You can use your Sculpey needle tool to poke holes in the tops of the earrings as shown. I prefer to drill my holes after baking since Souffle is such a dream to drill!


Use the largest Irregular Heart cutter to cut out a heart pendant from the final screen. NOTE: this heart cutter is a great way to use a screen that has a small smudge on one side! Pierce the top point with the needle tool. Bake all the earring and pendant pieces according to the directions in Step 1. Allow to cool

Coloring time! I chose the Grape and Sky Blue pen for my pieces. You could choose any colors you wish! I like to use the traditional pointed end instead of the Japanese brush for these small areas. Chameleon pens has a built in blender in each pen. So mark the pen on the paper to see how strong (dark) it is. Since the Grape was a little strong, I decided to just touch the pen to the blender for a couple of seconds. Again, I tested it on the paper before adding my darker tone to the petal areas closest to the center of the flower. NOTE: Normally you put the pen tip into the blender and hold the entire pen straight up and down and count to 10. But because I just wanted a little lightening, I held it parallel to my worksurface.


Now that I have the darker tones in the center of the flower, I can lighten the pen color with the vertical hold for a count of 8-10. Then I mark it on the paper until I see the tone I want. The really cool thing about using these markers on clay is that the ink blend lasts longer on clay than paper, so that light blend will go a long way before you need to re-lighten (if at ALL). Use the pen with the lightened color to mark through the front edge of the darker tone and blend it out toward the tip of each petal. Even if the color is dry to touch, the new ink will blend it. Continue to blend until you are satisfied with the color. If it gets too dark, relighten the pen with the blender and lighten your tone. While the marker is still in a medium light range, color the other smaller petals in the design. YOU WILL FIND THAT THE BLENDS LAST MUCH LONGER ON POLYMER CLAY THAN PAPER!


I chose the very pretty Sky Blue marker for the background – it is a light marker, so you may not want to lighten the color with the blender. You can stroke over areas to create a watercolor effect if you wish. You might like the Japanese brush tip for the background if you want a watercolor/silk effect.

You can use the edge of the marker to color the edge of each piece and don’t forget the back of the clay! You can just color it all in, do a watercolor effect, or draw an image!


I like to put my pieces back into the preheated oven at the clay temp for about 10- 15 minutes to set the inks (particularly the purple/reds). Once they have cooled, I dampen my brush with water and dip just the very tip into the Sculpey Satin Glaze. I stroke it on the paper before I stroke over the surface. I just want the thinnest of coats on there!

NOW is when I use my jewelry drill (called a pin vise) to drill my holes. Again, Souffle is so easy to drill, I don’t have to make any decisions on how my piece is going to be used until now! Then all I need to do is add the jump ring and ear wire to each earring and to the pendant and I’m done! (I make my ear wires with a Beadalon/Artistic Wire jig – super easy!)
