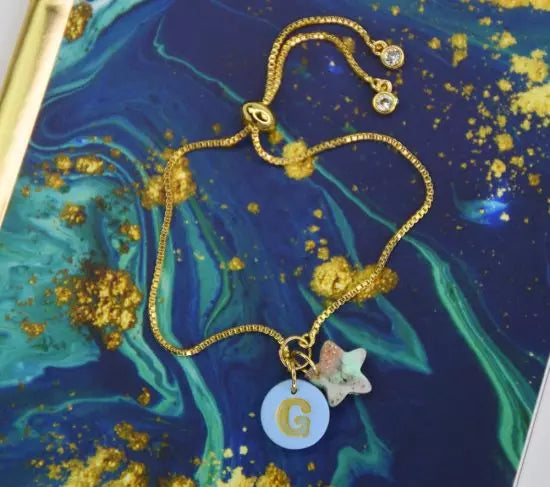

Sculpey Premo™ Pastels Charm Bracelet
Sculpey Premo™ Pastels Charm Bracelet
Designed by Gretchen Amberg
Read More
Read Less
Create this wonderful little charm bracelet featuring Sculpey Premo™ pastel colors in less than an hour as a great gift to a friend, family member..or YOURSELF! TIME TO COMPLETION:Total Baking Time: 30 minutes
Total Working Time: 20 Minutes
Total Working Time: 20 Minutes
ADDITIONAL SUPPLIES
- Gold Tone Slider Bracelet Finding
- 5 mm Gold Toned Jump Rings – 3pcs
- Small Paint Brush
- Metallic Gold Acrylic Craft Paint
- Small Letter Stamp - letter of your choice
- Needle Nose Jewelry Pliers

Project Instructions
Step 1
- Getting Started:
Start with clean hands, unwrap and knead clay until soft and smooth, or condition by running clay though a Pasta Machine. We recommend using a designated machine for clay purposes only. When working with multiple colors, clean hands with soap and water or baby wipes (we have found that baby wipes work best) before switching colors. Shape clay, pressing pieces firmly together. Wash hands after use.
- Baking (also called Curing):
Step 2
Condition a small amount of Pale Blue clay and roll out a sheet on a medium thin setting of the Clay Conditioning Machine. Place the sheet of clay on your work surface and press the letter stamp into the surface of the sheet of clay. Make sure the stamp makes an impression deep enough to hold paint.
Step 3
Use the circle cutter to cut around the stamped letter and remove the excess clay.Use the small paintbrush to add gold paint to the letter impression in the circle of clay.
Note: If paint gets onto the surface of the charm you can use a small piece of damp paper towel to wipe the paint away or use fine grit sandpaper to lightly sand off after baking.

Step 4
Use the needle tool from the starter tool set to poke a hole through the clay near the edge of the circle. Try to center the hole above the letter.
Step 5
Remove small bits of clay from the packages of Grey Granite, Rose Gold Glitter, Mint Green, and Pearl.Condition each color either using the Clay Conditioning Machine or by kneading with your fingers.
Roll each small piece of clay into a strand approximately 3 mm thick and an inch long.
Press the four strands of clay together.

Step 6
Twist the strands together until you have a lump of marbled clay.
Step 7
Roll the lump of clay through the Clay Conditioning Machine using the same medium-thin setting used in Step 2.Place the piece of clay on your work surface and use star cutter to cut out a piece of clay.
Remove the excess clay.
Use the needle tool from the starter tool set to poke a hole through one of the points on the star.

Step 8
Bake both charms as directed in Step 1 above and allow them to cool.Open 3 of the 5 mm jump rings.
Note: When opening the jump rings be sure to open them side-to-side. If you pull the cut ends of the jump ring straight apart from each other, you risk distorting the shape of the ring.

Step 9
Slide the letter charm onto one of the jump rings and close the ring.Slide the star charm onto another jump ring and close the ring.
Note: When closing the rings twist the cut ends back towards each other and try to keep the gap between the cut ends as small as possible.
Pick up the last jump ring. Slide one loop from the bracelet onto the jump ring. Add the two charms to the same jump ring. Slide the remaining loop on the bracelet onto the jump ring. Close the jump ring using the same method described above.
