

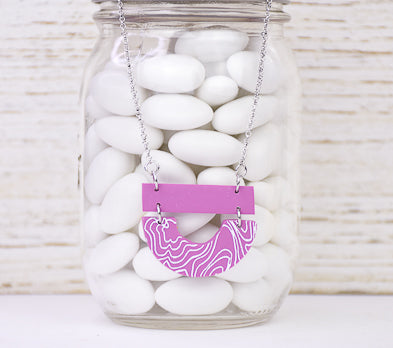
Sculpey Premo™ Mauve Silkscreened Pendant
Sculpey Premo™ Mauve Silkscreened Pendant
Designed by syndee holt
Read More
Read Less
Sculpey Premo™ Mauve is a new neutral! You can team this color with just about any other color. For this project, we have teamed it with a soft white Sculpey Tools™ silkscreen and Sculpey Template shapes for a clean look that will go with everything from jeans to velvet.
TIME TO COMPLETION: 60 minutes
ADDITIONAL SUPPLIES
- White or soft white acrylic paint
- Small paint brush
- Exacto type craft blade
- 8 mm silver-toned jump rings (4)
- 6 mm silver-toned jump rings (2)
- Silver toned chain
- Couple of sheets of plain paper
Project Instructions
- Getting Started:
Start with clean hands, unwrap and knead clay until soft and smooth, or condition by running clay though a Pasta Machine. We recommend using a designated machine for clay purposes only. When working with multiple colors, clean hands with soap and water or baby wipes (we have found that baby wipes work best) before switching colors. Shape clay, pressing pieces firmly together. Wash hands after use.
- Baking:
Sheet out a small square of the conditioned Premo Mauve on the second (or third) widest setting on your Clay Conditioning Machine. The sheet should be big enough for the Agate silkscreen (shown) from the Sculpey Nature silkscreen kit.

Lightly press the silkscreen into place and use a small brush to apply paint across the top of the screen. You do NOT need a lot of paint!

Use the provided paddle to drag the paint across the silkscreen. NOTE: I prefer to have the paddle as flat as possible against the screen – this is a little high in the photo.

Immediately remove the silkscreen and wash it under running water. I live to lay the washed screen between a folded microfiber towel to dry it. And of course, your silkscreened paint is drying while you do this!

Position your template on the dried silkscreened image and use the craft knife to trace the edges of the template. I focus on keeping the knife upright (so I don’t make an undercut edge) and I keep a relaxed grip on the knife so that the template is guiding the blade and not my hand.
Slowly remove the template from the completed cut and set the template and the extra clay aside (or make a pendant for a BFF).
Slowly remove the template from the completed cut and set the template and the extra clay aside (or make a pendant for a BFF).

This is my favorite part about templates – you can use the positive or negative part of the shape you want! For the top bar, sheet out a small piece of the Mauve clay on the same width on the Clay Conditioning Machine. Select the positive portion of the bar that matches the length of the arch we just created. Use your Clay Blade to cut the bar out. Set aside the remaining clay.

Position the two pieces as shown and use the needle tool from the Clay Tool Starter set to place the three holes on each side of the pendant as shown.
Bake as directed in Step 1 above.
Bake as directed in Step 1 above.

Once the clay is baked and cooled, use the larger jump rings to attach the two pieces together and add the same rings at the top of the bar to attach the chain.
I cut a premade chain in half and attached the two chain lengths to the jump rings at top. NOTE: I elected to put two smaller jump rings at the ends of my chain and attach those jump rings to the pendant. DONE!
I cut a premade chain in half and attached the two chain lengths to the jump rings at top. NOTE: I elected to put two smaller jump rings at the ends of my chain and attach those jump rings to the pendant. DONE!


- Choosing a selection results in a full page refresh.
- Opens in a new window.