

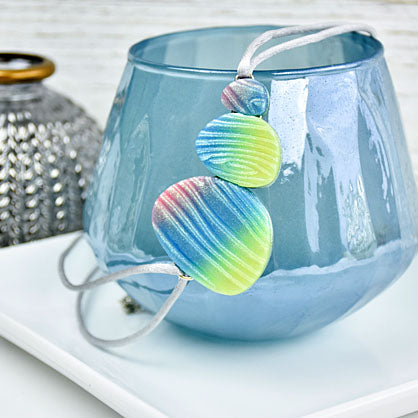
Sculpey Premo™ Iridescent Double Shift Necklace
Sculpey Premo™ Iridescent Double Shift Necklace
Designed by Amy Koranek
Read More
Read Less
Iridescent Premo mica shifts and color shifts at the same time. The high volume of mica in the clay gives it superior shifting power.
COMPLETION TIME:1 Hour and 15 minutes to make, bake, and assemble
ADDITIONAL SUPPLIES
- 18” Silver or light gray rat tail cord (2)
- 10 mm Silver tone jump rings (3)
- 6 mm Silver tone jump rings (3)
- Silver tone lobster clasps (2)
- Silver tone ribbon crimps (2)
- Scissors
- Flat nose pliers
- Super glue gel
Project Instructions
- Getting Started:
Start with clean hands, unwrap and knead clay until soft and smooth, or condition by running clay though a Pasta Machine. We recommend using a designated machine for clay purposes only. When working with multiple colors, clean hands with soap and water or baby wipes (we have found that baby wipes work best) before switching colors. Shape clay, pressing pieces firmly together. Wash hands after use.
- Baking:
From 1/2 ounce of each Pink and Yellow and 1/4 ounce of Blue, create little logs that are equal in length. Push the logs side by side in this order.

Flatten the logs together with the Acrylic Clay Roller. The press them through the pasta machine on the thickest setting to flatten them into a sheet.

Fold the sheet matching like color to like color and press through the pasta machine again on the thickest setting fold side first. Repeat folding and pressing through the pasta machine until a pretty blend is created as shown - about 10 times. When you are happy with your blend, press it through the machine one more time on the second thickest setting but do not fold it. Just make the sheet a bit thinner.

Press the Wood Grain texture sheet into the clay as deeply as possible. Roll it with the Acrylic Clay Roller to make sure the texture is deep and even. Carefully remove the texture sheet.

Shave away the raised surface of the texture carefully with the Flexible Super Slicer Blade.

When you have finished removing all the raised surface the Wood Grain texture will still be visible even though the clay sheet is flat again. This is mica shifting in the clay that shows the pattern even though it has been removed. If you wish you can gently roll over it with the Acrylic Clay Roller to smooth the surface.
Trim out the square patterned area with the Rigid Super Slicer. Remove the scraps.
Trim out the square patterned area with the Rigid Super Slicer. Remove the scraps.

Blend all the scrap clays from Steps 6 and 7 into a neutral colored sheet. You will need as much neutral color clay as you have of the striped color. Add more of each color clay as necessary to make the same size square that you have of the colored sheet. Sheet it through the pasta machine on the second thickest setting.

Press the Wood Grain texture sheet into the clay as deeply as possible. Roll over it with the Acrylic Clay Roller to make sure the pattern is deep and even. Carefully remove the texture sheet.

Shave away the raised surface of the texture carefully with the Flexible Super Slicer. The pattern of the wood grain will still be there mica shifted into the clay even though the texture has been removed. If you wish you can gently roll over it with the Acrylic Clay Roller to smooth the surface.

Lay the two patterned clays side by side.

Flip the neutral sheet over on the work surface so that the pattern of the wood grain is down.

Cut out one each of the irregular oval shapes from the neutral blend. Position them side by side as shown. Imbed the jump rings - three large and one small - as shown into the clay pieces joining them together. The first and last jump rings should extend past the edges of the clay enough to create connectors for the cord.

Cut out one each of the irregular oval shapes from the color blended clay. Position them over the neutral shapes matching the shapes together and sandwiching the jump rings into place. Bake the piece following the baking instructions for Premo.

When the piece is completely cool it is ready to assemble. Thread one of the 18” cords through each jump ring to the half way point.

Place a small dot of super glue gel into the flat space of a ribbon crimp. Lay the two ends of one of the cords on one side into the glue in the crimp. Hold them firmly in place with your thumb. Make sure the little loop in the ribbon crimp is still exposed past the cords.

Carefully smash the sides of the ribbon crimp over trapping the cords with flat nose pliers.

Repeat this process with the cord on the other side of the pendant as well.

Add a lobster clasp to each ribbon crimp with the remaining small jump rings. I sometimes use two lobster clasps when finishing a necklace design to make it easily accessible for both right handed and left handed connecting.
