

Sculpey Premo™ Easy Glittering Arch Pendant
Sculpey Premo™ Easy Glittering Arch Pendant
Designed by syndee holt
Read More
Read Less
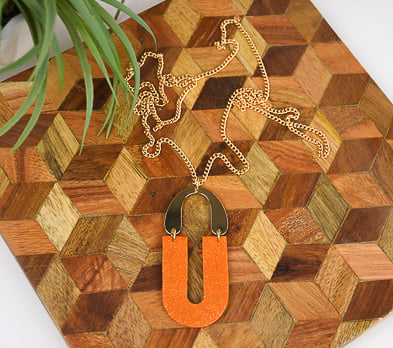
The terrific combination of Sculpey Premo™ Burnt Orange and Yellow Gold Glitter make this simple design a star! This quick design is perfect for gift giving.
TIME TO COMPLETION: 60 minutes
ADDITIONAL SUPPLIES
- Gold-toned metal arches (Michaels)
- 6 mm gold-toned jump rings (4)
- Gold-toned chain in desired length (I made mine 26 inches long)
- Smooth small tile
- Craft blade (like Excel knife)
- Jewelry pliers
Project Instructions
- Getting Started:
Start with clean hands, unwrap and knead clay until soft and smooth, or condition by running clay though a Pasta Machine. We recommend using a designated machine for clay purposes only. When working with multiple colors, clean hands with soap and water or baby wipes (we have found that baby wipes work best) before switching colors. Shape clay, pressing pieces firmly together. Wash hands after use.
- Baking:
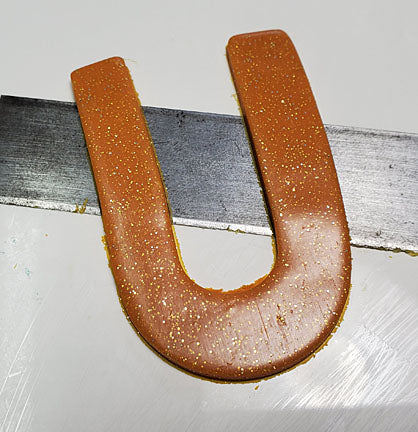
Mix the clay color by adding 2 parts of the Yellow Gold Glitter to 1 part of the Burnt Orange. (NOTE: I like to use a cutter to help me get the right amount of clay for a mix. I prefer to use the Sculpey round 2 inch cutter for this).
Sheet the mixed color out on the #3 (middle) setting on the Clay Conditioning Machine and position the positive version of the large arch on the clay. Put the sheet on the smooth tile (press it down lightly) and use the craft blade to carefully trim around it.
Sheet the mixed color out on the #3 (middle) setting on the Clay Conditioning Machine and position the positive version of the large arch on the clay. Put the sheet on the smooth tile (press it down lightly) and use the craft blade to carefully trim around it.

While the smooth tile helps hold the clay in place while we trace the stencil, now we need to remove the clay without damaging or stretching the design. I like to use my Clay Blade for this and I just slide it underneath the design and pick it up and transfer to the baking sheet.
Once the clay has been transferred to the baking sheet, use the needle tool in the clay tool set to make your holes to suspend the pendant. Put the metal arch in place and make your holes to match the holes in the metal arch. Bake as directed above.

When the clay has baked and cooled, we can assemble the pendant as shown, using the jewelry pliers to open and securely close the jump rings.

I chose to use a longer chain on my pendant, so I just used a jump ring to attach the two ends together – no clasp required!

- Choosing a selection results in a full page refresh.
- Opens in a new window.