

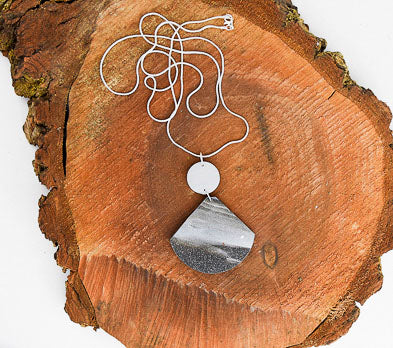
Sculpey III® Marbled Black Glitter Pendant
Sculpey III® Marbled Black Glitter Pendant
Designed by Gretchen Amberg
Read More
Read Less
This dramatic pendant is a great project for beginners to advanced alike!
TIME TO COMPLETION: 60 minutes
ADDITIONAL SUPPLIES
- 20” Silver-tone snake chain
- 6 mm silver-tone jump-rings (2)
- Small chain nose-pliers
- Needle tool or toothpick
Project Instructions
- Getting Started:
Start with clean hands, unwrap and knead clay until soft and smooth, or condition by running clay though a Pasta Machine. We recommend using a designated machine for clay purposes only. When working with multiple colors, clean hands with soap and water or baby wipes (we have found that baby wipes work best) before switching colors. Shape clay, pressing pieces firmly together. Wash hands after use.
- Baking:
Condition 1/4 block each of Black Glitter and Silver clay. Roll each color into a log that is approximately 1/2” in diameter by 1” long.

Press the two logs of color together and twist until you have achieved a desired amount of marbling.

Press the twisted piece of clay flat and run through the Clay Conditioning Machine on a medium/thin setting. Cut out a 2” circle.
Use the clay blade to trim one edge of the circle to a point.
Use the clay blade to trim one edge of the circle to a point.

Cut off the pointed tip. Set the cut piece of marbled clay to the side. Note: Trimming the point off of the shape provides a more stable location to add the hole and also makes it easier to attach a jump-ring.

Condition a small amount of Silver clay and roll out a sheet of clay on the same thickness setting used in Step 4. Cut out a 3/4” circle.
Use the toothpick or needle tool to poke a hole in the trimmed flay section of the large marbled piece. Also poke a hole in one edge of the Silver clay circle and a second hole in the Silver slay circle which is directly across from the first. Make sure the holes are large enough to accommodate the jump-rings.
Bake according to the directions above. Allow the clay to cool completely.

Use the pliers to open both jump-rings. Note: Open the jump-rings by twisting opening the gap in a side-to-side motion. Do not open the jump-rings by pulling the cut ends straight away from each other: opening a jump-ring in this manner distorts the shape and makes it difficult to close.
Slide the hole in the marbled piece and one of the holes in the Silver clay circle onto one of the jump-rings. Close the jump ring.

Feed the second jump-ring through the remaining hole in the Silver clay circle. Close the jump-ring and slide the chain through the jump-ring.
