
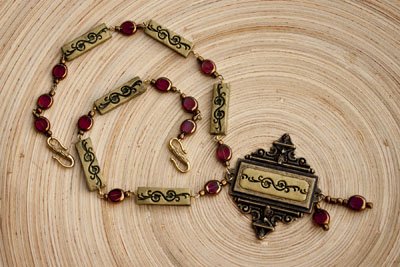
Sculpey Premo™ Ornate Renaissance Necklace
Sculpey Premo™ Ornate Renaissance Necklace
Read More
Read Less
This beautiful necklace may look hard to do but it is really simple when using Premo clay and Sculpey tools!
ADDITIONAL SUPPLIES
- 14 Glass beads to alternate with the clay beads
- 29 Small antique gold “e” bead size beads
- Antique Gold colored eye pins
- Antique gold necklace clasp
- Tools for assembling jewelry – wire cutters, small needle nose pliers Antique metallic metal book plate
- Black (or Dark Gray) acrylic paint
- Paint Brush
- Ruler
- Paper Towels
- Plain White Paper
- Spray Bottle with Water
Project Instructions
Do not use unbaked clay on unprotected furniture or finished surfaces. Start with clean hands and work surface area. Good work surfaces include wax paper, metal baking sheet, or disposable foil. Knead clay until soft and smooth. For best results, clean your hands in between colors. Shape clay, pressing pieces together firmly. Bake on oven-proof glass or metal surface at 275 °F (130 °C) for 30 minutes per ¼" (6 mm) thickness. For best baking results, use an oven thermometer. DO NOT USE MICROWAVE OVEN. DO NOT EXCEED THE ABOVE TEMPERATURE OR RECOMMENDED BAKING TIME. Wash hands after use. Baking should be completed by an adult. Begin by preheating oven to 275 °F (130 °C). Test temperature with oven thermometer for perfectly cured clay. For best results, condition all clay by running it through the clay dedicated pasta machine several passes on the widest setting. Fold the clay in half after each pass and insert the fold side into the rollers first.
Use the Clay Conditioning Machine on the #1 setting to roll out a sheet of Antique Gold.Place the sheet of Antique Gold on your work surface. Lightly mist the sheet of clay with water. Position the ruler near the top of the sheet of clay. Gently roll the texture wheel (whirl design) across the clay, using the straight edge as a guide. Move the ruler down and repeat the texture step 2. Continue until the entire sheet of clay is filled.

Use the Super Slicer to trim the top and bottom edge of the first line of texture, leaving a about 1/8 inch of selvage on each. Continue this for each line of texture.

Trim each of the patterns out of a strip of clay. Place two of the patterns back to back and trim the sides close to the edge of each pattern. This will create a bead with the pattern on either side of the bead. Repeat this until you have created about six beads.

Trim two head pins to about 1/4 inch length and press gently into each end of each bead. Repeat for all six beads. Set aside.

Roll the remaining clay through the Clay Conditioning Machine on the #1 setting. Mist the surface lightly with water and roll the texture across the center of the sheet. Position the metal book plate over a section of the pattern area and press down gently. Remove the book plate and trim the clay, using the imprints from the bookplate as a guide. Replace the trimmed clay into the bookplate. Press the bookplate firmly down onto the clay.

Bake the beads and the bookplate according to the directions above. Allow the clay (and the metal bookplate) to cool thoroughly.
Paint the entire surface of a bead with the acrylic paint and quickly wipe the bead with a damp paper towel to remove the paint from the top surfaces of the design. The paint should remain in the texture to highlight it. Repeat with all the beads and the bookplate and then repeat this step on the back of each bead.
Once the paint has dried, assemble the necklace as shown.NOTE: you may wish to gently pull on the eye pins of each bead and glue them into place while the paint is drying.