

Sculpey Premo™ and Liquid Sculpey® Combine to Create a Moonlight Necklace
Sculpey Premo™ and Liquid Sculpey® Combine to Create a Moonlight Necklace
Designed by Amy Koranek
Read More
Read Less
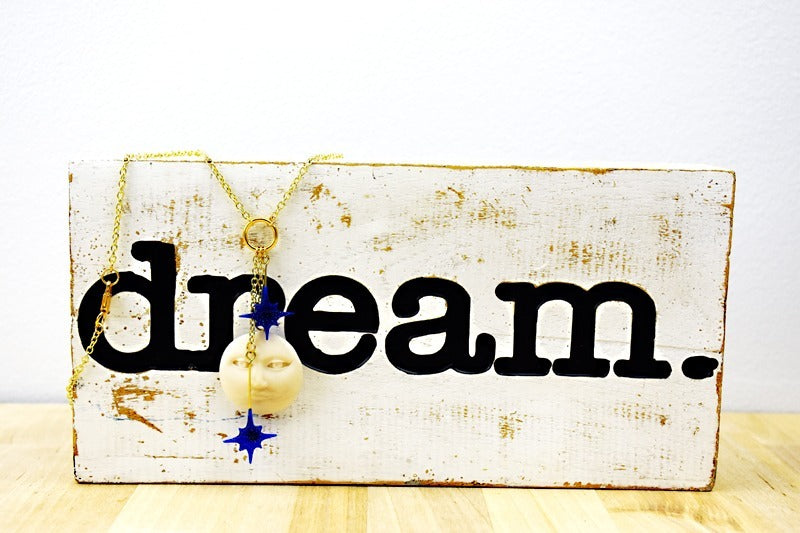
Create an easy ethereal necklace quickly and easily combining both Liquid Sculpey® and Sculpey oven bake clay.
ADDITIONAL SUPPLIES
- Pearl mica powder
- Necklace chain
- 3 eye pins
- 4 mm Jump ring
- Glitter
- Dark blue alcohol ink
- Small paper baking cups
- Round nose pliers
Project Instructions
- Getting Started:
Start with clean hands, unwrap and knead clay until soft and smooth, or condition by running clay though a Pasta Machine. We recommend using a designated machine for clay purposes only. When working with multiple colors, clean hands with soap and water or baby wipes (we have found that baby wipes work best) before switching colors. Shape clay, pressing pieces firmly together. Wash hands after use.
- Oven Bake Baking:
- Liquid Baking:
Condition 1/8 bar of Translucent premo into a ball. Dip the ball into pearl mica powder.

Work the mica powder in by kneading the clay. Repeat dipping the ball of clay into the powder and kneading it in until you have achieved a cloudy look

Press the tinted premo into the moon face mold. Use a lot of fingertip pressure to make sure the clay is entering into all the details.

Carefully shave away excess clay from the mold with the clay blade.

Lay an eye pin on top of the moon clay. Use a scrap of the mixed clay to make a star shape from the mold as well. Overfill the star shape overflowing the clay into a little pancake. Gently flex the mold to remove the star and flip it over. Use a circle cutter to clean up the edge of the background around the star

Use the star to sandwich the eye pin in place on the back of the moon

Use the flat edge of the purple knife tool to score radiating lines around the star. This will add detail and also help the star to connect to the back of the moon. You can either bake the molded piece in the mold or carefully flex it out of the mold and then bake following the baking instructions for Premo Sculpey above

Place a paper mini baking liner in the mini cupcake baking pan. Stir Clear Liquid Sculpey (LS) completely to make sure there are no lumps in it. Pour a little Clear LS into the paper liner. Add one drop of dark blue alcohol ink and a little iridescent glitter. Stir completely.

Pre-heat your oven to 325 °F. This is the temperature we will need to cure and to “clear†Clear LS. When the mold is completely cool, add the tinted LS to the two star shapes. Lay the eye of an eye pin into each one of the stars. Cover the eye of each eye pin with a drop of the tinted LS as shown. Bake at 325 °F for 20 minutes.

When the mold is completely cool, gently flex it to remove the pieces. Trim the eye pin of the moon to 3/4" above the moon. Carefully curl a loop in the tail to just above the moon with round nose pliers. Trim the eye pin of a star to 1". Carefully curl a loop in the tail to 1/4" above the star with round nose pliers.Do not trim the eye pin of the last star. Carefully curl a loop to 1â" above the star with round nose pliers

Connect the short tail star to the large jump ring with a 4mm jump ring using flat nose pliers. Connect the moon to 1" of chain with a 4mm jump ring. Connect the 1" chain to the large jump ring with another 4mm jump ring using flat nose pliers. Connect the last star to the remaining 1.5" of chain. Connect the 1.5" chain to the large jump ring with another 4mm jump ring using flat nose pliers. Cut the necklace chain in half. Connect both ends of the necklace chain to the large jump ring with 4mm jump rings using flat nose pliers

Designer's Note - I use miniature paper baking liners for mixing Liquid Sculpey® for projects that require only a small amount of each color. If mixing up several different colors, I use a mini muffin baking pan to hold the paper cups steady while I'm mixing. When I'm all finished with a project, I fill my mold with any remaining tinted LS and bake the pieces to save for later projects. Then I bake the paper cups with the residue of the LS in them. When they are completely cool the cups can be discarded. The paper cups I use are from the baking department and designed for use as mini cupcake liners.