

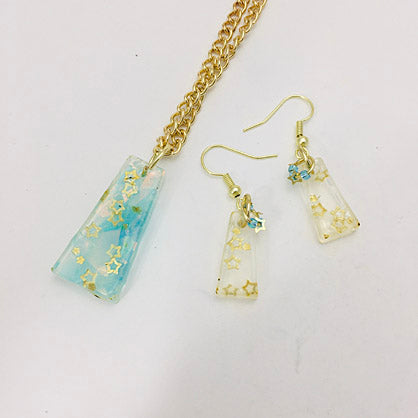
Liquid Sculpey® Trapped Stars Pendant & Earrings
Liquid Sculpey® Trapped Stars Pendant & Earrings
Designed by Amy Koranek
Read More
Read Less
The breathtaking depth of this jewelry set is created with some simple tricks using Liquid Sculpey®
TIME TO COMPLETE:60 minutes to bake and assemble
ADDITIONAL SUPPLIES
- Paper towel
- Gold star shaped glitter
- Tweezers
- Turquoise foil flakes
- 9mm Gold tone jump ring
- 6mm Gold tone jump rings (4)
- Gold tone chain with clasp
- 1” Gold tone chains (2)
- Gold tone ear wires (2)
- Turquoise seed beads (6)
- Flat nose pliers
- Wire cutters
- Small sharp scissors
- Optional - heat gun
Project Instructions
- Getting Started with Liquid Sculpey:
- Baking:
Make sure your mold is clean and dry. Make sure the Clear Liquid Sculpey® (LS) is stirred completely before using. Clear LS has a sediment in it that is part of the clearing process. This sediment should be stirred completely into the liquid in order for it to go crystal clear after baking.
Fill the trapezoid shapes with a thin layer of Clear LS just in the bottom.
Fill the trapezoid shapes with a thin layer of Clear LS just in the bottom.

Add a random sprinkling of little gold stars over the Clear LS. You may find it helpful to use tweezers for distributing the star glitter.

Add another thin layer of Clear LS but don’t fill all the way to level.

Add a layer of turquoise foil flakes to the pendant shape. If the flakes are very thin and translucent, you will want to add more than a single layer to give it more color.

Add more Clear LS to the back of the foil flakes in the pendant shape. Fill the pendant cavity to level. Leave the earring shapes not completely full so they will be thinner. Bake the mold following the baking instructions for LS.

There are two ways to completely clear the Clear LS:
Option 1- While the mold is still hot from the oven, use a heat gun to make the back side of the pieces more clear. Wearing hand protection, carefully remove the hot pieces from the mold. Flip them over and clear with the heat gun from the front as well.
Option 2- Remove the pieces from the mold and bake again at 325F for 20 minutes.
When the pieces are completely cool, check for rough edges on the back sides. These can easily be trimmed with small sharp scissors.

Add the 9 mm jump ring to the pendant with flat nose pliers. Add the chain with a clasp to the jump ring.
For the earrings, cut two 1” pieces of chain with wire cutters. Add a 6 mm jump ring to each earring piece. Connect a 1” section of chain to each jump ring. Close the jump rings. Add another 6 mm jump ring to each of the jump rings at the top of the earring piece. Before closing them, add alternating seed beads and stars onto the open jump rings. Close the jump rings with pliers.
Carefully open the loops at the bottom of the ear wires and attached them to the top of the short chains. Close with pliers.
