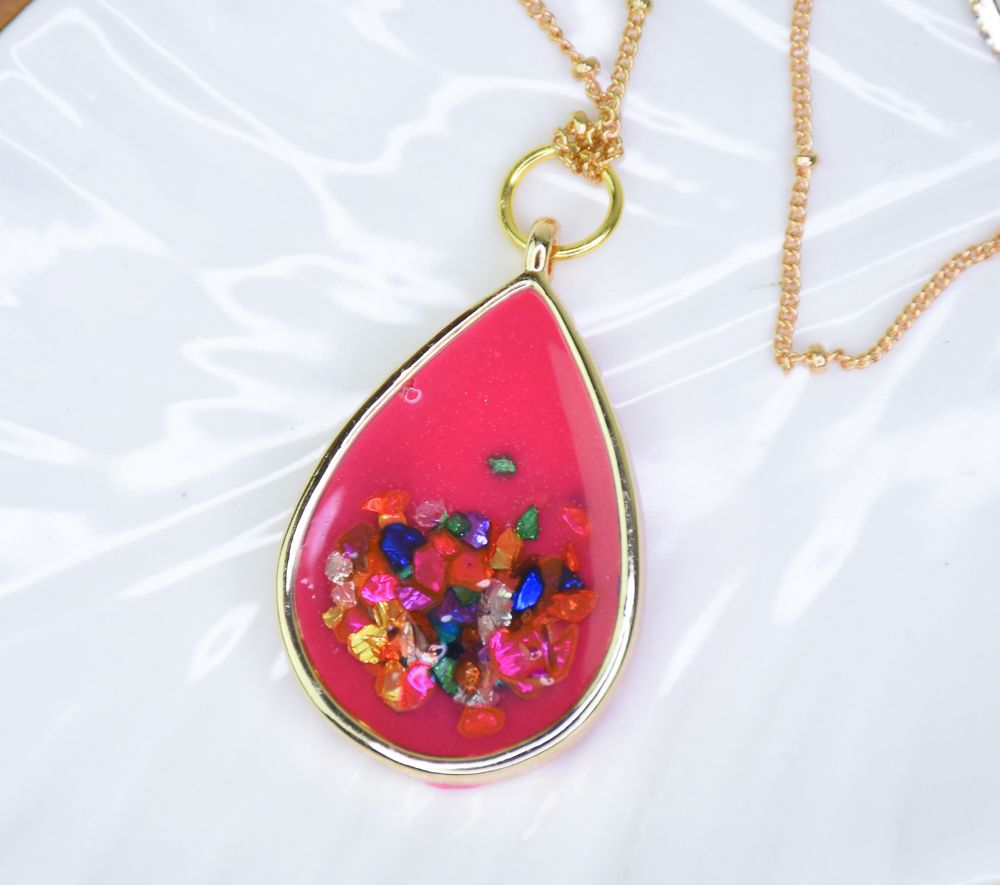

Liquid Sculpey® Fuchsia Glass Chip Pendant
Liquid Sculpey® Fuchsia Glass Chip Pendant
Designed by Amy Koranek
Read More
Read Less
Glass chips are an easy way to add sparkle and shine to Liquid Sculpey® projects.TIME TO COMPLETE: 75 Minutes to make, bake (bakes twice), and assemble
ADDITIONAL SUPPLIES
- Paper towel
- Glass baking surface
- Multi-colored glass chips
- Gold tone deep teardrop shaped bezel(s)
- Small sharp scissors
- Optional heat gun
- 6 mm Gold tone jump ring
- 18” Gold tone thin chain with clasp
- Flat nose pliers

Project Instructions
Step 1
LIQUID Liquid Sculpey®- Getting Started with Liquid Sculpey®:
- Baking:
- It is important to use oven thermometer when you bake the liquids so that you can ensure your oven is at the correct temperature.
- Do not microwave the liquids. They must be baked in a Preheated oven at 275 ºF (130 ºC) for liquid colors and 300 ºF (149 ºC) for Clear – Do not exceed baking temperatures.
- If your piece is less than 1/4” bake for 15 minutes. For thicker pieces that are 1/4” or above bake for 30 minutes.
- If your liquid project has become yellowed or discolored in the oven, when you remake it, tent it by placing either – folding an index card in half and placing your project under it by using aluminum foil over your project.
Step 2
Designer’s Note - Clear Liquid Sculpey has a tendency to separate into a liquid part and a lumpy part when left alone over time. If using Clear LS from the bottle, you can insert your favorite stirring stick into the bottle and really scrape the lumps from off the bottom and the sides and stir until the lumps are re-incorporated into the liquid. Then continue stirring until smooth. This is super important because if the liquid is not stirred until smooth, it will not clear completely during heating. Clear LS can also be decanted into a small silicone, glass, metal, or the Sculpey Silicone Mixing Set Measuring Cup. This makes it easier to stir the liquid completely. Just remember to cover the Clear LS when decanted to keep dirt and lint out of the liquid.Designer’s Note I had two bezels so I filled them both at once. This tutorial can easily be converted for earrings.
Have your oven pre-heated so that the project can go immediately into the oven giving the Liquid Sculpey® (LS) less time to seep under the bezel.
Lay bezels on a glass baking surface. My glass sheet just happens to have a grid on it which is not necessary for this project.
Since the loops on these bezels are perpendicular to the frame, they are slightly thicker than the frame. That is why I positioned them on the edge of the glass so that the frames would lay flat on the glass.
Fill the bezel with a thin layer of Fuchsia LS. Do not fill the bezel to level yet.

Step 3
Add a pinch of glass chips to the bottom area of the bezel.
Step 4
Immediately bake the bezel on the glass.Allow the bezel to cool completely on the glass.
Do not move the bezel from the glass.

Step 5
Add a thin layer of stirred Clear LS to the bezel to almost level.
Step 6
Add another pinch of glass chips to the bottom area of the bezel.
Step 7
Bake the bezel again.Designer’s Note - to really pump up the Clear and make it super shiny, you can use a heat gun. Leave the baked liquid pieces on the glass. Turn the heat gun on “HI” and move it slowly back and forth across the pieces. You will see the Clear areas go really clear and turn shiny. When this happens, turn off the heat gun and allow to cool completely.
Allow to cool completely before removing from the glass.
You can carefully use the edge of a flat tool or your fingernail to release from the glass surface.

Step 8
If there is excess baked LS on the outside, trim it away with sharp scissors.
Step 9
Here’s how they look all trimmed.
Step 10
Here’s the layout for necklace assembly.
Step 11
Add the jump ring to the bezel with flat nose pliers.Thread both sides of the chain through the jump ring.

Step 12
Loop the end of the chain through itself at the jump ring.